How to Integrate Next-Day Payment Deposits for eCommerce
Step-by-step setup for faster funding, lower fees, and automated reconciliation in your eCommerce store
Learn to configure integrated payment solutions that eliminate 3-5 day deposit delays. This tutorial covers gateway setup, interchange optimization, and automated reconciliation for measurable results in your first week.
TL;DR
- Deposit delays cost you working capital – Switching to integrated payment solutions with next-day funding eliminates the 3-5 day wait that strains cash flow
- Integration takes 2-4 hours – With proper preparation (business docs, platform access, bank verification), you can complete setup in a single afternoon
- Configuration details matter – Batch cutoff times, authorization modes, and fraud filter thresholds directly impact when you get paid and how many legitimate orders you capture
- Test before going live – Run every transaction scenario (success, decline, 3DS, refund) in test mode to catch issues before they affect real customers
- Verify results on day 3 – Confirm deposits arrive within 24 hours, decline rates stay under 3%, and reconciliation happens automatically without manual work
What You Will Achieve: Faster Access to Your Revenue
By the end of this tutorial, you will have a fully integrated payment solution that eliminates the 3-5 day deposit delays eating into your cash flow. You will configure next-day funding, set up proper gateway connections, and establish automated reconciliation that saves your team hours of manual work each week.
Your success criteria are clear: deposits hitting your bank account within 24 hours of transaction, transaction fees reduced by 15-30% through proper interchange optimization, and a single dashboard view of all payment activity. These are measurable outcomes you can verify in your first week of operation.
Modern secure payment gateway technology can evaluate transaction legitimacy in milliseconds. According to Visa, optimized payment systems are designed to process transactions securely while maintaining speed and efficiency.
Prerequisites and Setup Checklist
Before starting, confirm you have these items ready. Missing any of these will stall your integration.
- Business documentation: EIN, business license, voided check or bank letter for deposit account
- Current processing statements: Last 3 months of statements from your existing provider (for rate comparison and volume verification)
- eCommerce platform access: Admin credentials for Shopify, WooCommerce, BigCommerce, or your custom platform
- SSL certificate: Active HTTPS on your checkout pages (required for PCI compliance)
- Developer access: API credentials or plugin installation permissions
Time estimate: 2-4 hours for basic integration, 1-2 business days for full testing and go-live. Potential blockers include pending business verification (add 24-48 hours) or custom platform integrations requiring developer support.
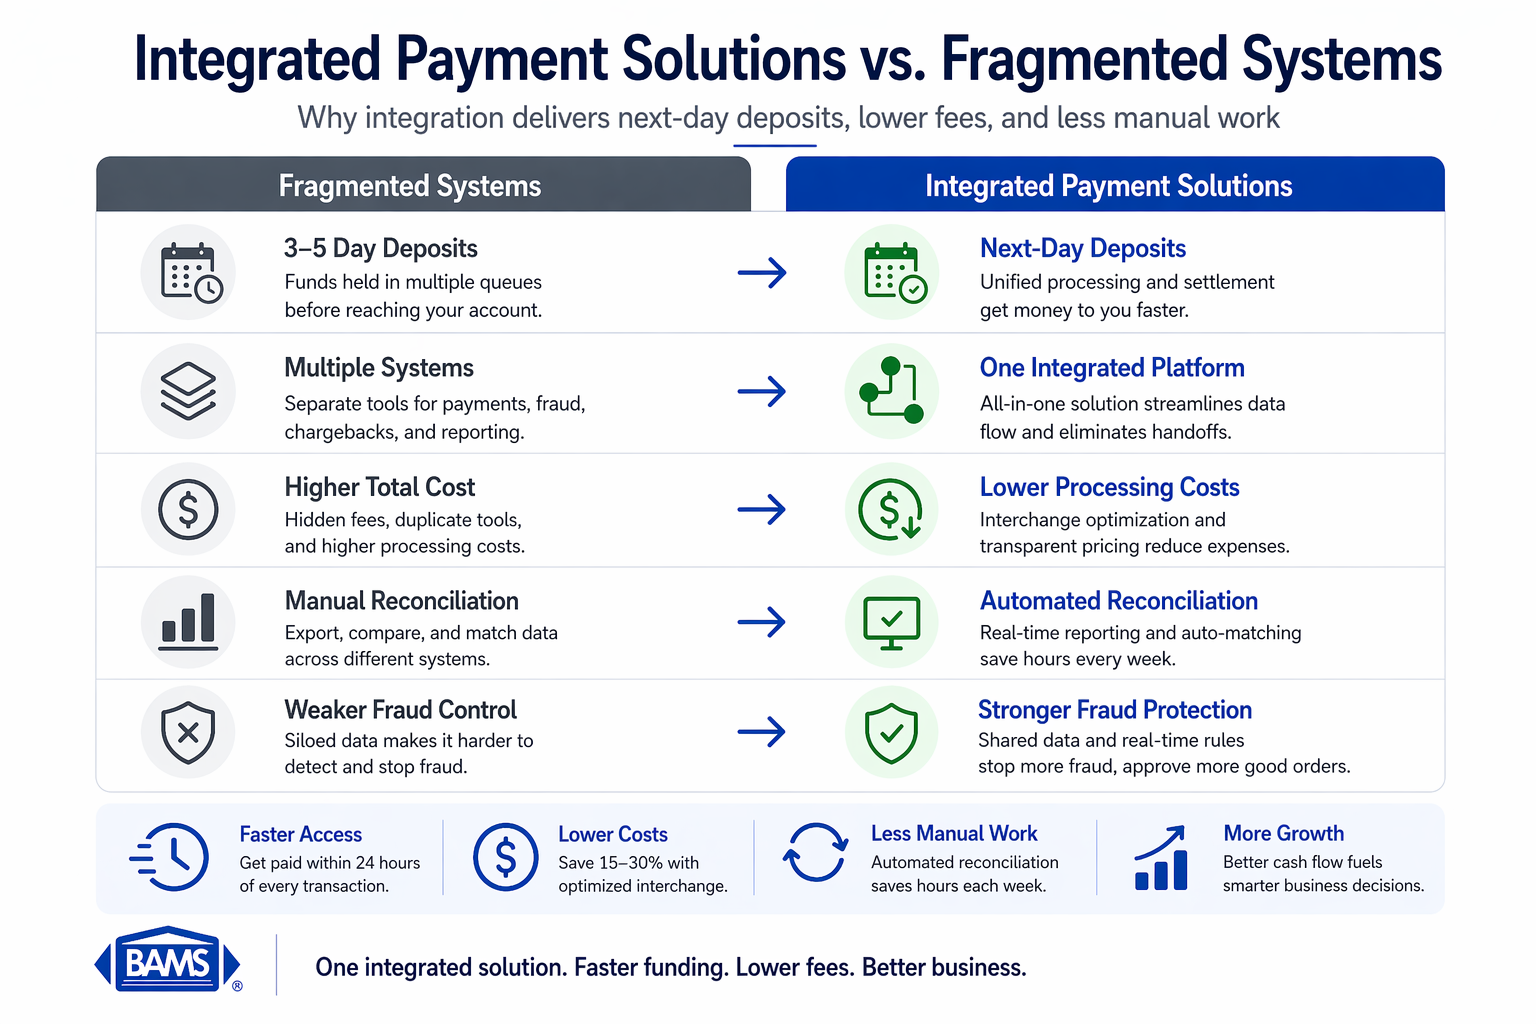
Why Integrated Payment Solutions Beat Fragmented Systems

Integrated payment systems eliminate delays, reduce costs, and improve cash flow by replacing disconnected tools with a unified solution.
Most eCommerce managers run separate systems for payment processing, fraud detection, chargeback management, and reporting. Each disconnected tool adds latency to your deposits and complexity to your operations.
Integrated payment solutions consolidate these functions into a unified flow. Your transaction data moves through a single pipeline from checkout to deposit, eliminating the handoff delays between systems. This integration is why next-day funding becomes possible, as there are no third-party queues slowing settlement.
The difficulty here is moderate. If you have installed plugins or configured API connections before, you will find this straightforward. If this is your first payment integration, budget extra time for the testing phase.
The NACHA ACH Network supports efficient electronic fund transfers, enabling faster settlement and making next-day deposits possible for eCommerce businesses.
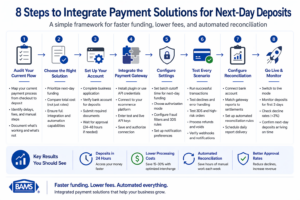
Step 1: Audit Your Current Payment Flow
A streamlined integration process ensures faster funding, lower fees, and automated reconciliation within days of setup.
Action: Map every touchpoint from customer checkout to bank deposit in your current system.
Log into your existing payment dashboard and export a transaction report from the last 30 days. Note the timestamp of each transaction alongside the corresponding deposit date in your bank account. Calculate the average delay.
Expected result: A documented baseline showing your current deposit timing (typically 2-5 business days) and a list of all systems touching your payment data.
Checkpoint: You should have a spreadsheet with columns for Transaction Date, Amount, Deposit Date, and Delay (in days).
Common failure: Cannot access historical data due to limited reporting. Fix: Contact your current processor for a detailed settlement report, or pull bank statements and manually match deposits to transaction batches.
Step 2: Select Your Online Payment Systems Configuration
Action: Choose your integration method based on your platform and technical resources.
For payment gateway integration, you have three paths: hosted checkout (simplest, customer redirected to payment page), embedded forms (payment fields on your site, data handled by gateway), or direct API (full control, highest development requirement).
Expected result: A clear decision on integration type with documentation for your specific platform.
Checkpoint: You have downloaded or bookmarked the integration guide for your chosen method.
Common failure: Choosing direct API without developer resources. Fix: Start with hosted checkout or embedded forms. You can migrate to API integration later without losing transaction history.
Step 3: Configure Your Merchant Account for Next-Day Funding
Action: Set up your merchant account with deposit timing as the primary configuration priority.
During account setup, specify next-day funding as a requirement. Provide your bank account details (routing and account numbers) and verify the account through micro-deposit confirmation or instant verification.
Expected result: Confirmed merchant account with guaranteed next-day funding enabled and verified bank connection.
Checkpoint: You receive written confirmation of your funding schedule (deposits initiated by X time settle next business day).
Common failure: Bank account verification fails. Fix: Ensure the business name on your bank account exactly matches your merchant application. Sole proprietors should use their legal name, not a DBA, unless the bank account is in the DBA name.
Step 4: Install and Connect Your Payment Gateway
Action: Add the payment gateway to your eCommerce platform and authenticate the connection.
For Shopify: Navigate to Settings, then Payments, then Add payment methods. Enter your gateway credentials when prompted. For WooCommerce: Install the gateway plugin from Plugins, then Add New, then activate and enter API keys under WooCommerce Settings, then Payments.
Expected result: Payment gateway appears as an active payment option in your checkout settings.
Checkpoint: The gateway status shows “Connected” or “Active” in your platform dashboard.
Common failure: API key rejected. Fix: Regenerate keys from your gateway dashboard, ensuring you copy the complete string without trailing spaces. Use test mode keys for initial setup.
Step 5: Configure Credit Card Processing Settings
Action: Set up accepted card types, currency settings, and authorization preferences.
Enable all major card networks (Visa, Mastercard, American Express, Discover). Set your primary currency and enable multi-currency if you sell internationally. Configure authorization mode: choose “Authorize and Capture” for immediate settlement or “Authorize Only” if you ship physical goods and capture at fulfillment.
Expected result: All card types accepted, currency configured, and authorization mode matching your fulfillment workflow.
Checkpoint: Test card logos appear on your checkout page, and currency displays correctly.
Common failure: American Express not processing. Fix: AmEx requires separate enablement in most gateways. Check for an additional AmEx toggle or contact your processor to confirm AmEx acceptance is active on your merchant account.
Step 6: Implement Fraud Prevention Rules
Action: Configure fraud filters to protect revenue without blocking legitimate orders.
The PCI Security Standards Council emphasizes that strong fraud prevention and compliance standards are essential for protecting transactions without slowing down payment processing.
Set up Address Verification Service (AVS) to require billing address match. Enable CVV verification for all transactions. Configure velocity filters to flag multiple transactions from the same card within a short window.
Expected result: Fraud rules active with reasonable thresholds that protect without excessive false declines.
Checkpoint: Fraud settings show as enabled in your gateway dashboard with your configured rules visible.
Common failure: Fraud filters too aggressive, blocking legitimate international orders. Fix: Loosen AVS requirements for international transactions (many countries do not support full AVS) while keeping CVV mandatory.
Step 7: Set Up Chargeback Defense
Action: Configure automated chargeback alerts and response workflows.
Enable real-time chargeback notifications to your operations email. Set up automatic evidence collection that captures transaction details, shipping confirmation, and customer communication. Integrate with your order management system to pull fulfillment data automatically.
Expected result: Chargeback alerts trigger immediately with pre-populated response templates and evidence attached.
Checkpoint: Run a test chargeback notification (available in most gateway test modes) and verify the alert arrives with correct transaction data.
Common failure: Chargeback notifications going to spam. Fix: Whitelist your processor’s notification domain and add the sender address to your contacts.
Step 8: Connect Reporting and Reconciliation
Action: Link your payment data to your accounting and operations systems.
Configure automatic daily settlement reports sent to your finance team. Set up webhook notifications for transaction events (successful charge, refund, chargeback) to your order management system. Enable the accounting integration if your gateway supports direct connection to QuickBooks, Xero, or your accounting platform.
Expected result: Automated daily reconciliation with transaction-level detail matching between gateway and bank deposits.
Checkpoint: Receive your first automated settlement report and verify totals match your gateway dashboard.
Common failure: Webhook events not reaching your system. Fix: Verify the webhook URL is publicly accessible and returns a 200 response. Check for firewall rules blocking incoming requests from your gateway’s IP range.
Step 9: Test the Complete Transaction Flow
Action: Process test transactions through every payment scenario before going live.
Using test card numbers provided by your gateway, process: a successful transaction, a declined transaction (insufficient funds), a transaction requiring 3D Secure authentication, and a refund. Verify each event triggers the correct notification and appears in reporting.
Expected result: All test scenarios complete successfully with correct data flowing to all connected systems.
Checkpoint: Your test transactions appear in both gateway reports and your eCommerce platform order history with matching amounts and timestamps.
Common failure: 3D Secure test fails. Fix: Ensure your gateway’s 3D Secure enrollment is complete and your test cards support 3DS simulation. Some gateways require explicit 3DS enablement.
Step 10: Go Live and Monitor First Transactions
Action: Switch from test mode to production and verify real transactions process correctly.
Replace test API keys with production keys. Process a small real transaction (you can refund it afterward) to confirm live connectivity. Monitor your first batch of customer transactions closely for the first 24-48 hours.
Expected result: Real transactions processing, funds settling to your bank account within the promised timeframe.
Checkpoint: Your first production deposit arrives in your bank account on the expected date.
Common failure: First deposit delayed or missing. Fix: Verify your batch cutoff time. Transactions processed after the daily cutoff (often 9 PM or 10 PM local time) settle in the next batch. Check your processor dashboard for any held transactions requiring manual review.
Configuration Variables You May Need to Adjust
These settings depend on your specific business model. Review each and adjust from defaults where needed.
- Batch cutoff time: Default is often 10 PM Eastern. If you operate in Pacific time and want same-day capture, request an adjusted cutoff.
- Automatic capture delay: Default is immediate. For pre-orders or made-to-order products, set a delay matching your fulfillment timeline.
- Refund permissions: Default often requires admin approval. For faster customer service, enable refund capability for support staff up to a dollar threshold.
- Decline retry logic: Default is no retry. For subscription businesses, enable automatic retry 24 hours after soft declines.
The batch cutoff time is the most critical setting for deposit timing. Get this wrong and you add a full day to every settlement.
Verification: Confirming Your Integration Works
Run this verification sequence on day 3 of live operation to confirm everything functions correctly.
Pull your gateway transaction report for the previous 48 hours. Match each transaction to your bank deposits. Calculate the actual deposit timing. Compare your fraud filter decline rate to your baseline (should not exceed 2-3% for legitimate traffic).
Success definition: Deposits arriving within 24 hours of batch close, decline rate under 3%, all transactions reconciling automatically without manual intervention.
Edge cases to verify: weekend transactions (should settle Monday), transactions just before batch cutoff, and high-value transactions that may trigger manual review holds.
Common Errors and How to Fix Them
Error: “Gateway connection timeout”
Symptom: Checkout page hangs or displays connection error. Cause: API endpoint unreachable, often due to SSL certificate issues or firewall blocking. Fix: Verify SSL certificate is valid and not expired. Check that outbound connections to gateway IP range are permitted.
Error: “Invalid merchant account”
Symptom: All transactions decline with merchant error code. Cause: Account not fully activated or credentials mismatched between test and production. Fix: Confirm account status with your processor. Verify you are using production credentials, not test credentials.
Error: “Card declined – do not honor”
Symptom: High rate of declines with generic issuer response. Cause: Often indicates your merchant category code (MCC) triggers bank fraud rules. Fix: Review your MCC assignment with your processor. High-risk MCCs require additional verification or may need adjustment if incorrectly assigned.
Error: “Duplicate transaction”
Symptom: Second purchase attempt fails. Cause: Customer double-clicked or browser refreshed during processing. Fix: Implement idempotency keys in your integration to prevent duplicate charges while allowing legitimate retries.
Error: “Settlement amount mismatch”
Symptom: Bank deposit does not match expected total. Cause: Fees deducted from settlement, chargebacks processed, or refunds issued. Fix: Review detailed settlement report showing gross transactions minus fees, chargebacks, and refunds to reconcile net deposit.
Next Steps: Extending Your Payment Capabilities
With your core integration complete, consider these enhancements to further reduce friction and increase conversion.
Add one-click checkout for returning customers. This requires tokenization setup, which your gateway likely supports.
Implement Buy Now Pay Later options.
Consider understanding the difference between payment processors and payment gateways to optimize your full payment stack as transaction volume grows.
Frequently Asked Questions
What is a payment gateway and why is it important for eCommerce?
A payment gateway encrypts and transmits credit card data from your checkout page to the payment processor. It acts as the secure bridge between your customer’s browser and the financial networks that authorize transactions. Without a gateway, you cannot accept online payments. The gateway also handles fraud screening, 3D Secure authentication, and tokenization for repeat customers.
How do I choose the best payment gateway for my business?
Evaluate gateways on four criteria: deposit timing (next-day funding versus 2-3 day standard), fee structure (interchange-plus versus flat rate), platform compatibility (native integration with your eCommerce system), and support quality (dedicated account management versus ticket-based support). Request a rate comparison using your actual transaction volume and average ticket size.
When should I consider switching my payment gateway?
Switch when deposit delays consistently exceed 48 hours, when your effective rate creeps above 3% of transaction volume, when chargeback support is reactive rather than proactive, or when you spend more than 2 hours weekly on manual reconciliation. The integration effort pays back quickly if any of these apply.
Which payment gateways support international transactions?
Most major gateways support multi-currency processing, but fee structures vary significantly. Look for gateways offering dynamic currency conversion (customer pays in their currency, you receive your currency) with transparent exchange rate margins. Verify the gateway supports the specific card networks popular in your target markets.
How does next-day funding actually work?
Transactions processed before your daily batch cutoff time are submitted for settlement that evening. The processor initiates an ACH transfer to your bank account the following business day. This requires direct processor relationships (not aggregated accounts) and verified business banking. Weekend transactions settle on Monday.
What PCI compliance requirements apply to my integration?
Your compliance level depends on transaction volume and integration type. Most eCommerce businesses qualify for SAQ A (simplest) when using hosted payment pages or iframes where card data never touches your servers. Direct API integrations require SAQ D and more extensive security controls. Your gateway provider should offer guidance on your specific requirements.
Sources


