Apple Pay Chargeback Defense: A Step-by-Step Guide
Last Updated on October 15, 2026 by Dimitri Akhrin
Gather the right tokenized transaction evidence to win disputes tied to digital wallet payments
Learn exactly which documents to collect and how to build a bulletproof response for Apple Pay chargebacks. This step-by-step tutorial covers the unique evidence trail tokenized contactless payments create and how to package it by reason code.
TL;DR
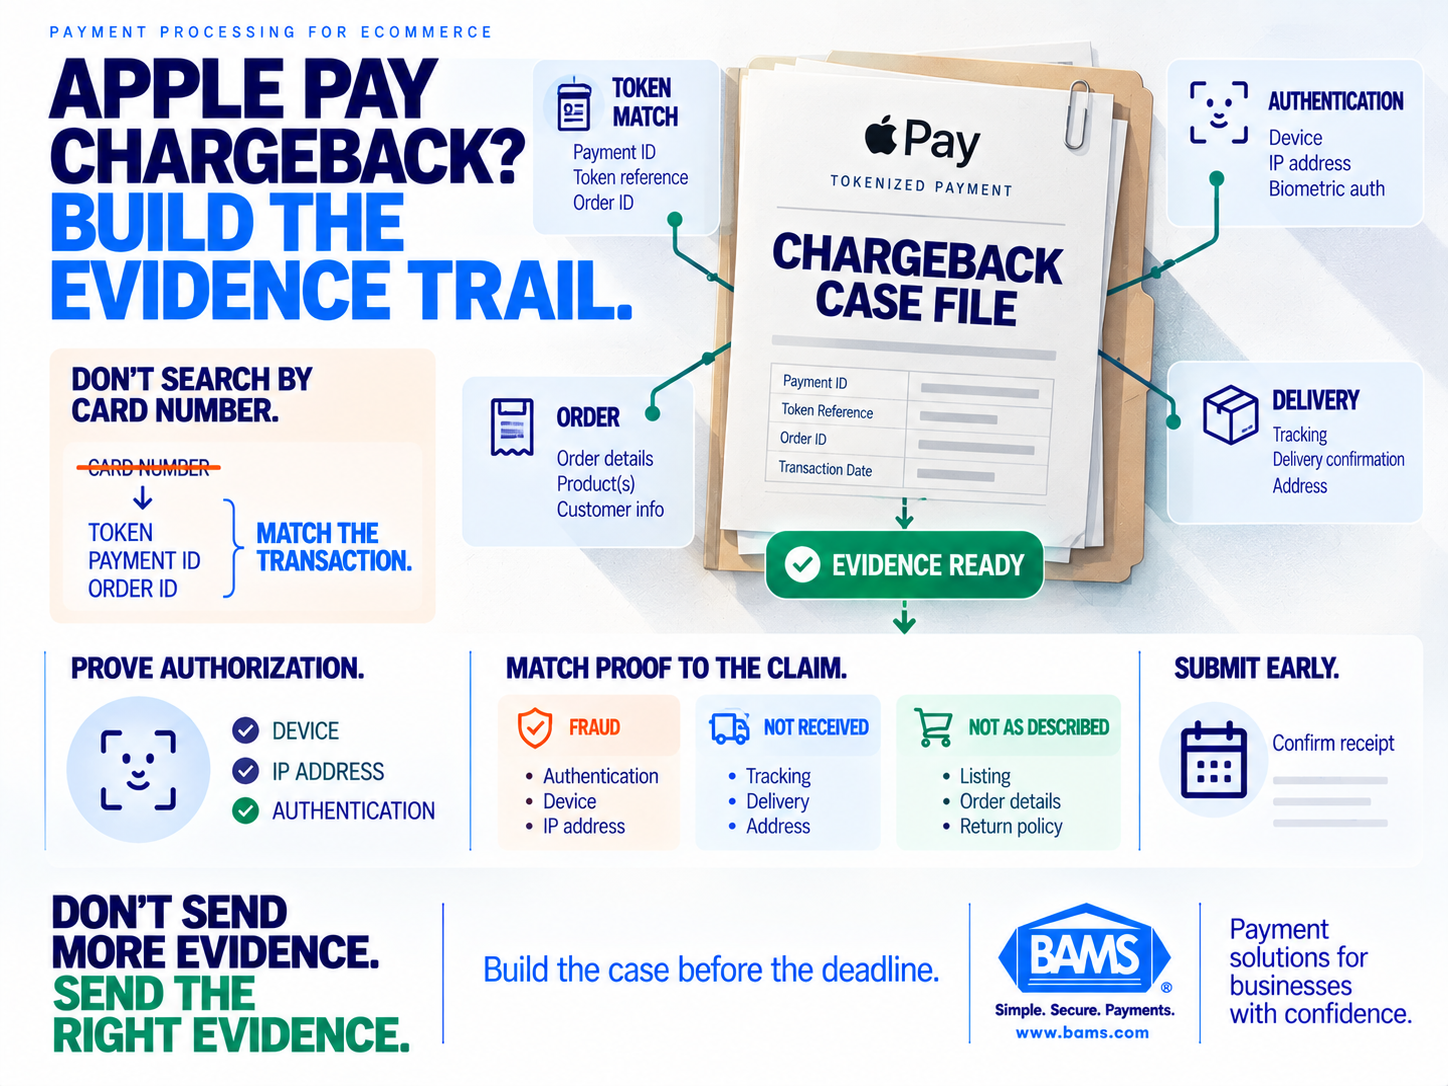
- Apple Pay disputes need different evidence – Tokenized transactions replace card numbers with Device Account Numbers, so you must match disputes using processor payment IDs and token references, not card numbers.
- Map evidence to the reason code – Fraud claims need biometric authentication proof; “not received” claims need delivery confirmation; “not as described” claims need product listings and return policies. Never submit a generic packet.
- Collect device and authentication data proactively – Ensure your gateway exposes Apple Pay metadata (device fingerprint, IP address, biometric status) before a dispute arrives. If it doesn’t, fix this gap now.
- Retain all records for at least 180 days – Chat transcripts, shipping logs, order details, and customer emails all expire if you don’t configure retention policies. Set 180 days minimum, 540 for subscriptions.
- Submit early and confirm receipt – Upload your response at least 48 hours before the deadline, use PDF and JPEG/PNG formats, and screenshot the submission confirmation for your records.
What You’ll Achieve: A Bulletproof Apple Pay Chargeback Defense
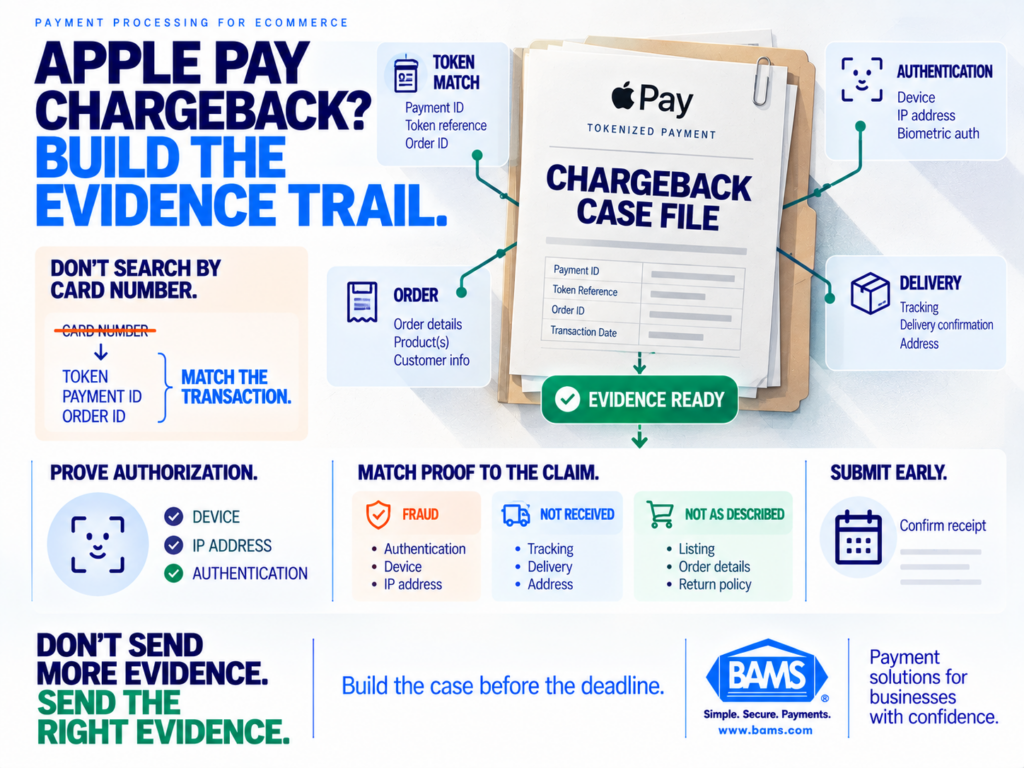
Apple Pay disputes create a different evidence trail from traditional card transactions. The strongest defense starts by matching the tokenized transaction and assembling proof that directly addresses the dispute reason.
By the end of this tutorial, you will have a repeatable, step-by-step process for defending Apple Pay chargebacks that accounts for the evidence trail created by tokenized payments. Apple explains that an Apple Pay payment object contains an encrypted payment token with information including a device-specific account number, the transaction amount and a unique one-time-use cryptogram. That means dispute preparation should focus on transaction and token data supplied through your payment service provider rather than relying on the customer’s physical card number.
Your success criteria are simple: you’ll know exactly which documents to collect, when to collect them, and how to package them into a response that matches the specific reason code on the dispute. The result is fewer lost chargebacks, faster deposit timelines, and a cash flow cycle that doesn’t stall every time a customer files a claim.
Prerequisites and Setup Checklist
Before you begin, confirm you have access to the following. Missing even one item can delay your response past the processor’s deadline.
- Payment processor dashboard with transaction-level detail (processor payment ID, token reference, timestamps)
- Order management system (Shopify, WooCommerce, or equivalent) with order IDs, line items, and customer records
- Shipping or fulfillment platform (ShipStation, EasyPost, carrier portals) with tracking numbers and delivery confirmations
- Customer service logs (email threads, chat transcripts, phone call notes) tied to order IDs
- Refund and credit records from your processor or gateway
- Device and authentication data from your fraud-prevention tool or gateway (IP address, device fingerprint, biometric verification status)
Time estimate: Building your first evidence packet takes 45–90 minutes. Subsequent disputes using this framework take 15–30 minutes. Key blocker: If your processor doesn’t surface token-level data, contact their support team before a dispute arrives. You need that data exposed in your dashboard now, not after a chargeback lands.
Why Apple Pay Disputes Require a Different Approach
A standard card chargeback ties directly to a 16-digit card number. An Apple Pay transaction replaces that number with a Device Account Number (DAN), a token unique to the customer’s device. This means the card number on the dispute notification won’t match anything in your transaction records unless you know how to cross-reference the token.
The tokenization layer also changes what counts as proof of authorization. With a physical card swipe, you have a signature or PIN. With Apple Pay, authorization comes through biometric authentication (Face ID, Touch ID, or passcode). Your evidence must reflect this difference. Generic chargeback response templates that reference “card present” or “signature on file” will fail.
This tutorial treats dispute defense as a signal-collection and evidence-assembly process tailored to the specific dispute condition rather than a one-size-fits-all packet. Visa’s Dispute Management Guidelines provide separate response guidance and evidence requirements for different dispute conditions, including fraud, merchandise or services not received and merchandise or services not as described. Your response should therefore address the specific claim identified by your processor or card network.
Step-by-Step: Building Your Apple Pay Chargeback Defense
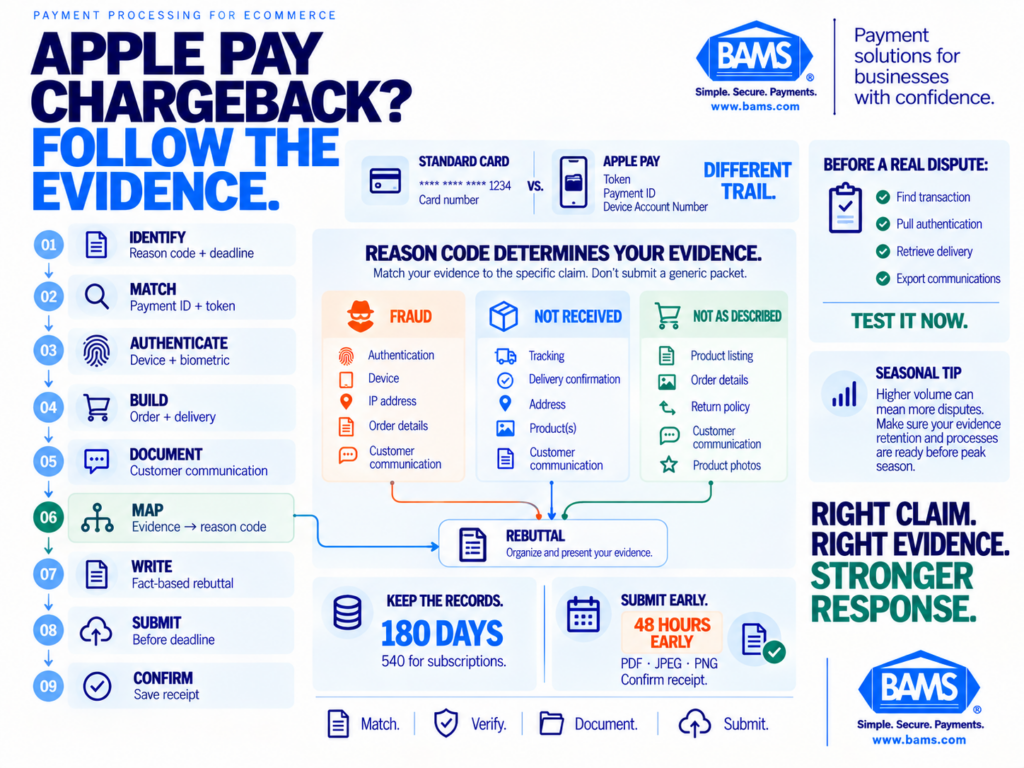
A strong Apple Pay chargeback response starts with the reason code, follows the tokenized transaction trail and organizes evidence around the specific claim before submission.
Step 1: Identify the Dispute and Extract the Reason Code
When a chargeback notification arrives, open your processor dashboard and locate the dispute. Record the reason code, the dispute amount, the response deadline, and the ARN (Acquirer Reference Number).
The dispute condition determines everything that follows. Visa Condition 10.4 covers other fraud in a card-absent environment, Condition 13.1 covers merchandise or services not received and Condition 13.3 covers merchandise or services not as described or defective. Visa provides different response and compelling-evidence guidance for each condition. For Mastercard or another network, use the specific dispute reason supplied by your processor and follow that network’s current requirements.
Checkpoint: You should have the reason code, ARN, dispute amount, and deadline written down before moving to Step 2. Common failure: Confusing a “pre-arbitration” notice with a first chargeback. Check the dispute phase. Pre-arbitration has a shorter response window and stricter evidence requirements.
Step 2: Match the Dispute to Your Transaction Using Token References
This is where Apple Pay disputes diverge from standard card disputes. The card number on the chargeback notification is the DAN (token), not the customer’s actual card number. You need to match it using the processor payment ID, the order ID, and the wallet/token reference in your gateway.
Open your payment gateway and search by the processor payment ID or ARN. Confirm the match by verifying the amount, currency, timestamp, and receipt number. Export or screenshot this matched record.
Checkpoint: You have a confirmed match between the dispute notification and your internal transaction record, with token reference visible. Common failure: Searching by card number instead of processor payment ID. The DAN won’t appear as a standard card number in most systems. Always search by transaction ID first.
Step 3: Pull Device and Authentication Data
For fraud-related disputes, this step is critical. Apple Pay requires the customer to authenticate the payment on their device, but merchants should not assume they will receive a raw Face ID or Touch ID result. Apple describes the payment data available for processing as an encrypted token containing the device-specific account number and a unique one-time-use cryptogram. The exact fields visible to you depend on your gateway and payment service provider.
Collect the following where your processor, gateway or fraud-prevention platform makes it available:
- Processor transaction or payment ID
- Apple Pay token or device payment account reference
- Cryptogram, ECI or other authentication indicators exposed by your processor
- Device ID or device fingerprint from your fraud platform, if collected
- IP address and other transaction context, if collected
Checkpoint: You have a processor or gateway export showing the available Apple Pay token and authentication-related transaction fields.
Common failure: Building your dispute process around a Face ID or Touch ID status field that your PSP does not actually expose. Confirm exactly which token and authentication fields are available before a dispute occurs.
Step 4: Assemble Order-Level Evidence
Regardless of the reason code, you need a complete picture of the order. Pull the following from your order management system:
- Order confirmation (with timestamp, items, quantities, and price)
- Customer name and email associated with the order
- Billing and shipping addresses
- Product descriptions and images (especially for “not as described” disputes)
- Terms of service, return policy, and refund policy as displayed at checkout
Checkpoint: You can produce a complete order summary that matches the disputed amount exactly. Common failure: The order total includes tax or shipping that doesn’t appear on the dispute amount. Itemize every component so the reviewer can reconcile the numbers.
Step 5: Gather Shipping and Delivery Proof
For “product not received” disputes, this is your strongest evidence. For fraud disputes, it serves as supporting proof that the product was delivered to the cardholder’s address.
- Carrier tracking number with full tracking history
- Delivery confirmation (date, time, and location)
- Signature confirmation if available
- Photo proof of delivery if the carrier provides it
If the shipping address matches the billing address on the Apple Pay transaction, state this explicitly in your rebuttal. Address match combined with biometric authentication is strong evidence against a fraud claim.
Checkpoint: You have a carrier-verified delivery record that shows the package reached the address on the order. Common failure: Tracking shows “delivered” but no specific address. Use carriers that provide address-level delivery confirmation for orders over a threshold you define (e.g., $50+).
Step 6: Compile Customer Communication Records
Pull every interaction between your team and the customer related to this order. This includes:
- Pre-purchase inquiries (product questions, sizing help)
- Order confirmation emails (sent and opened, if trackable)
- Shipping notification emails
- Post-purchase support tickets or chat logs
- Refund requests (whether granted, denied, or never made)
If the customer never contacted you before filing the dispute, note this in your rebuttal. It weakens a “not as described” or “not received” claim when the customer bypassed your support process entirely.
Checkpoint: You have a chronological record of all communications (or documented absence of communication). Common failure: Chat transcripts auto-delete after 30 days. Configure your support platform to retain all transcripts for at least 180 days.
Step 7: Map Evidence to the Reason Code
Now organize your evidence into a packet that directly addresses the reason code. Do not submit everything in a single dump. Reviewers have limited time. Lead with the most relevant proof.
For card-absent fraud claims such as Visa Condition 10.4:
- Apple Pay transaction and token details available from your processor
Cryptogram, ECI or other authentication indicators, if available - Device ID, device fingerprint or IP address where relevant and available
- Prior undisputed transaction history that meets the network’s compelling-evidence requirements
- Delivery and customer-account information relevant to the transaction
For “not received” claims (Visa 13.1, Mastercard 4855):
- Carrier delivery confirmation with address (primary)
- Tracking history showing transit and delivery
- Shipping notification emails sent to customer
- Absence of customer contact prior to dispute
For “not as described” claims (Visa 13.3, Mastercard 4853):
- Product listing with description and images (primary)
- Order confirmation matching the listing
- Return policy as displayed at checkout
- Customer communication (or lack thereof)
Checkpoint: Your evidence packet leads with the document most relevant to the specific reason code. Common failure: Submitting a generic “we shipped it” response to a fraud claim. Fraud claims need authentication proof, not shipping proof.
Step 8: Write a Clear, Fact-Based Rebuttal Letter
Your rebuttal letter should be concise and structured. Open with the transaction details (order ID, processor payment ID, date, amount). State the reason code and your position. Then reference each piece of evidence by name.
Example structure:
Transaction: Order #12345 | Processor ID: txn_abc123 | Date: [date] | Amount: $89.99
Reason Code: Visa 10.4 (Fraud)
Position: This transaction was authorized via Apple Pay with Face ID biometric authentication.
Evidence:
1. Biometric authentication log (Exhibit A)
2. Device fingerprint and IP address (Exhibit B)
3. Delivery confirmation to billing address (Exhibit C)
4. No customer contact prior to dispute (Exhibit D)
Keep the letter under one page. Let the exhibits do the heavy lifting.
Checkpoint: Your rebuttal references specific exhibits and directly addresses the reason code. Common failure: Emotional or argumentative language. Stick to facts. The reviewer is not your adversary.
Step 9: Submit Within the Deadline and Confirm Receipt
Upload your rebuttal and evidence through your processor’s dispute portal. Most processors give you 7–30 days depending on the card network and dispute phase. Do not wait until the last day.
After submitting, confirm receipt. Take a screenshot of the submission confirmation and note the case ID. If your processor doesn’t provide a confirmation, follow up with their support team within 24 hours.
Checkpoint: You have a timestamped confirmation that your response was received before the deadline. Common failure: Uploading files in unsupported formats (e.g., .pages, .heic). Use PDF for documents and JPEG/PNG for images. Check your processor’s file-size limits before uploading.
Configuration and Customization
The framework above works across most eCommerce platforms and processors, but you should adjust a few variables based on your business.
- Evidence retention period: Set your support platform, shipping logs, and gateway to retain data for at least 180 days (the maximum chargeback window for most networks). 540 days is safer if you sell subscription products.
- Signature confirmation threshold: Require carrier signature confirmation for orders above a dollar amount that makes sense for your margins. $75–$100 is a common starting point.
- Fraud tool sensitivity: If your fraud tool blocks too many legitimate Apple Pay transactions, it can create unnecessary checkout friction. Mastercard explains that digital-wallet security combines tokenization, on-device authentication and a unique cryptogram for each transaction. Account for those security signals when configuring fraud rules while continuing to apply your own risk controls.
- Processor data exposure: Not all processors surface token metadata by default. If yours doesn’t, this is a reason to evaluate whether your current processor supports the Apple Pay settlement and dispute data you need.
Verification and Testing
Before a real dispute arrives, test your readiness. Place a test Apple Pay order on your own store (or have a team member do it). Then walk through Steps 2–7 as if a chargeback had been filed against that order.
Verify that you can:
- Locate the transaction by processor payment ID within 5 minutes
- Access device authentication data from your gateway
- Pull a complete order record including line items, addresses, and timestamps
- Retrieve the carrier tracking and delivery confirmation
- Export customer communication logs tied to the order ID
If any step takes longer than 10 minutes or produces incomplete data, fix the gap now. A dispute deadline is not the time to discover your gateway doesn’t log token references.
Common Errors and Fixes for Apple Pay Chargeback Defense
Error: “Transaction not found” when searching by card number
Cause: You’re searching with the Device Account Number (token) instead of the processor payment ID. Apple Pay tokens don’t map to card numbers in most merchant dashboards.
Fix: Search by ARN, processor payment ID, or order ID. Cross-reference the amount and timestamp to confirm the match.
Error: Missing biometric authentication data in your evidence
Cause: Your payment gateway doesn’t surface Apple Pay authentication metadata by default.
Fix: Contact your processor and request that digital wallet authentication fields be enabled in your transaction reporting. If your processor can’t provide this, consider switching to one that does. BAMS, for example, offers proactive chargeback defense with access to the transaction-level data needed for tokenized dispute responses.
Error: Evidence submitted but case still lost
Cause: Evidence didn’t match the reason code. Shipping proof was submitted for a fraud claim, or authentication data was submitted for a “not received” claim.
Fix: Always map evidence to the specific reason code using the framework in Step 7. Lead with the primary document for that dispute type.
Error: Response rejected as “late”
Cause: Submission was uploaded on the deadline day but after the processor’s cutoff time (often 5:00 PM ET).
Fix: Submit at least 48 hours before the stated deadline. Set calendar reminders for 72 hours and 48 hours before expiration.
Error: Dispute escalates to pre-arbitration after winning first chargeback
Cause: The cardholder’s bank resubmitted with additional claims. Your original evidence may not cover the new reason.
Fix: Re-read the pre-arbitration notice carefully for any new reason code or claim. Supplement your original packet with evidence addressing the new angle. Pre-arbitration windows are shorter (typically 10–15 days), so act immediately.
Next Steps and Extensions
Once you’ve defended your first Apple Pay dispute using this framework, you’re positioned to scale it across all contactless payment methods. Google Pay and Samsung Pay follow similar tokenization patterns, so the evidence-collection process translates directly.
Consider these extensions:
- Automate evidence collection: Use your order management system’s API to auto-generate evidence packets when a dispute notification arrives.
- Build a dispute playbook: Create a shared document with reason-code-specific checklists so any team member can assemble a response.
- Analyze dispute patterns: Track which products, order values, and customer segments generate the most Apple Pay disputes. Use this data to tighten fraud filters and adjust policies before chargebacks occur.
Frequently Asked Questions
What is Apple Pay and how does it work for merchants?
Apple Pay is a digital wallet that lets customers pay using tokenized card credentials stored on their iPhone, Apple Watch, iPad, or Mac. Instead of transmitting the actual card number, Apple Pay generates a Device Account Number (token) and requires biometric authentication (Face ID or Touch ID) for each transaction. For merchants, the payment flows through your existing payment gateway, but the transaction data includes token references instead of raw card numbers. You can learn more about how Apple Pay works for merchants and setup requirements.
Why are Apple Pay chargebacks harder to defend than standard card disputes?
The tokenization layer means the card number on a dispute notification doesn’t match your transaction records in the usual way. You need to cross-reference using processor payment IDs and token references. Additionally, proof of authorization looks different because Apple Pay uses biometric authentication rather than signatures or PINs. Generic chargeback templates that reference “card present” verification will not satisfy the reviewer.
What evidence do I need to win an Apple Pay chargeback?
The evidence depends on the reason code. For fraud claims, you need biometric authentication logs, device fingerprints, and IP addresses. For “not received” claims, you need carrier delivery confirmation with address-level detail. For “not as described” claims, you need product listings, order confirmations, and return-policy screenshots. In all cases, include the order ID, processor payment ID, wallet/token reference, amount, currency, and timestamp.
How long do I have to respond to an Apple Pay chargeback?
Response windows vary by card network and dispute phase. First chargebacks typically allow 7–30 days. Pre-arbitration windows are shorter, usually 10–15 days. Always check the specific deadline on your dispute notification and submit at least 48 hours early to avoid cutoff-time issues.
Does accepting Apple Pay increase my chargeback risk?
Apple Pay adds security mechanisms that aren’t present in a manually entered card transaction. Tokenized digital-wallet payments use an alternate payment credential, on-device authentication and a transaction-specific cryptogram. Those controls help protect payment credentials, but they do not eliminate disputes or first-party misuse. Merchants still need transaction records, fulfillment evidence and network-specific compelling evidence to respond effectively when a dispute occurs.
Can my payment processor help me access Apple Pay token data for disputes?
Yes, but not all processors expose this data by default. Contact your processor’s support team and ask them to enable tokenized transaction metadata in your reporting dashboard. If they can’t provide device authentication status, IP addresses, or token references, this is a significant gap in your dispute-defense capability. Look for a merchant services partner that surfaces this data proactively and offers dedicated support for chargeback responses.