Transparent Checkout: Build a High-Converting Checkout
Last Updated on August 28, 2026 by Dimitri Akhrin
How to Build a Transparent, High-Converting Checkout
Set up guest checkout, multiple payment options, and zero hidden fees in under 45 minutes
Learn to configure payment gateway solutions that eliminate cart abandonment. This step-by-step tutorial covers guest checkout setup, payment method variety, and transparent pricing displays.
TL;DR
- Enable guest checkout options to eliminate the 24% of cart abandonment caused by forced account creation
- Show all fees on the cart page before checkout begins so customers never encounter surprise charges
- Offer at least four payment methods including cards, digital wallets, and Buy Now Pay Later to reach 67% conversion rates versus 54% with one option
- Optimize for mobile since mobile-friendly checkouts can increase conversions by up to 35%
- Add trust signals near the payment button including security badges, payment logos, and a clear transparency statement about pricing
What You Will Build: A Transparent, High-Converting Checkout

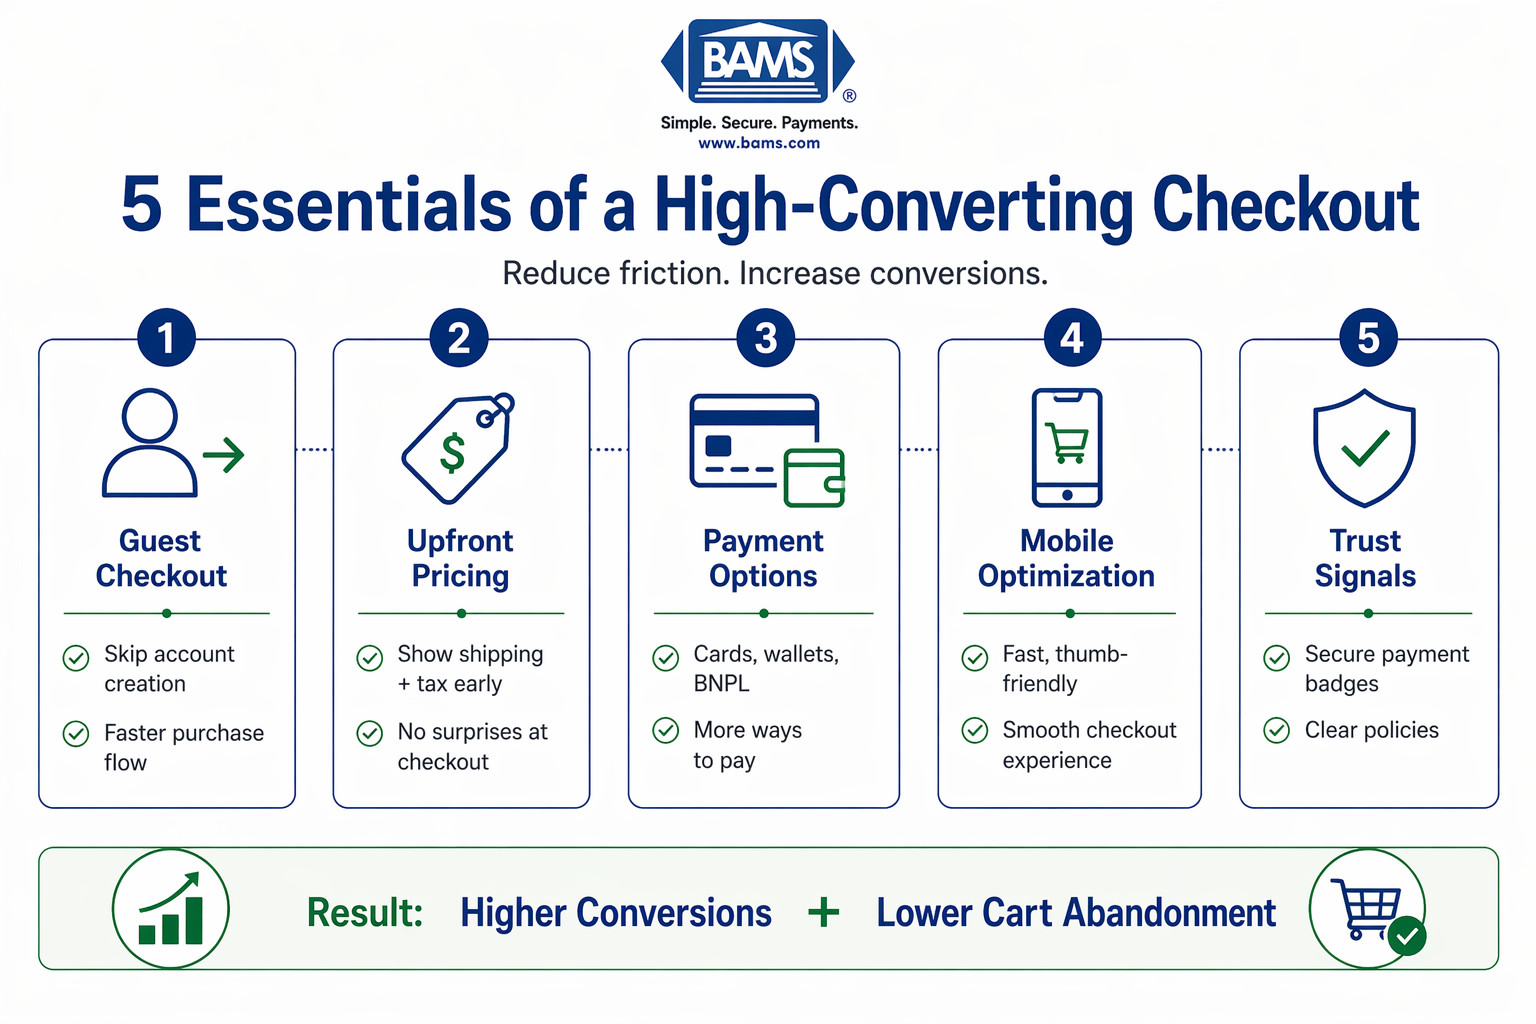
The five essential elements that drive a high-converting eCommerce checkout and reduce cart abandonment.
By the end of this tutorial, you will have a checkout system that shows customers exactly what they pay, offers multiple ways to pay, and lets them buy without creating an account. Your success criteria: a checkout flow under 3 minutes, zero hidden fees at final confirmation, and at least four payment options visible to every customer.
This approach directly addresses why shoppers abandon carts. Modern payment experiences are shifting toward faster, frictionless checkout flows that reduce abandonment and improve completion rates, driven by advancements in payment infrastructure and user experience design according to Modern Treasury.
Prerequisites and Setup Checklist
Before starting, confirm you have these elements in place. Missing any one can block your progress.
- Admin access to your eCommerce platform (Shopify, WooCommerce, BigCommerce, or similar)
- Current payment gateway credentials and login information
- SSL certificate active on your checkout pages (check for the padlock icon)
- Tax settings configured for your selling regions
- Shipping rates established for all delivery zones
- 30 to 45 minutes of uninterrupted setup time
Potential blockers include outdated platform versions, expired payment gateway API keys, or pending SSL renewals. Resolve these before proceeding.
Why Transparent Pricing Wins
Hidden fees kill conversions. When customers see unexpected charges at the final step, they leave. This tutorial uses a “show everything early” approach that builds trust before the buy button appears.
The alternative, hiding fees until checkout, might seem like it gets more people into the funnel. But it creates abandonment at the worst possible moment. You lose both the sale and the customer’s trust. Our method prioritizes clarity over tricks, which converts better and creates repeat buyers.
Expect moderate difficulty if you have never adjusted checkout settings before. Each step includes exact navigation paths and screenshots descriptions to guide you.
Transparent pricing at checkout starts with transparency in your own cost structure. With transparent interchange plus pricing, businesses can confidently show full costs upfront without padding prices or adding last-minute fees.

A step-by-step checklist to build a transparent checkout that reduces cart abandonment and improves eCommerce conversions.
Step 1: Enable Guest Checkout Options
Action: Navigate to your platform’s checkout settings and activate guest checkout.
In Shopify, go to Settings → Checkout → Customer accounts and select “Accounts are optional.” In WooCommerce, go to WooCommerce → Settings → Accounts & Privacy and check “Allow customers to place orders without an account.” For BigCommerce, find Store Setup → Checkout Settings and enable “Allow guest checkout.”
Expected result: New customers see a “Continue as guest” option before any account creation fields. Test this by opening an incognito browser window and adding a product to cart.
Common failure: Guest option does not appear. Fix: Clear your site cache and check for conflicting apps or plugins that override checkout behavior. For more strategies, see our guide on reducing cart abandonment with guest checkout.
Step 2: Audit Your Current Fee Display
Action: Complete a test purchase on your own store and document every screen where costs appear.
Add your highest-priced item to cart. Proceed through checkout without completing payment. Screenshot each page. Note where subtotal, shipping, taxes, and any other fees first become visible.
Expected result: You have 3 to 5 screenshots showing your current cost revelation sequence.
Common failure: You cannot complete test checkout. Fix: Use your platform’s “test mode” or create a 100% discount code for testing purposes. Remember to disable the code after testing.
Step 3: Move All Fees to the Cart Page
Action: Configure your cart to show estimated shipping and taxes before checkout begins.
In your platform settings, look for “Show shipping calculator on cart” or similar options. Enable tax display on cart pages. For Shopify, this requires the cart.liquid template edit or a shipping calculator app. WooCommerce users enable this under WooCommerce → Settings → Tax → Display prices during cart and checkout.
Expected result: Customers see their total (including shipping and tax estimates) on the cart page, before entering any personal information.
Common failure: Shipping shows as “Calculated at checkout.” Fix: Install a shipping estimator that uses zip code input on the cart page. This gives customers a real number rather than a placeholder.
Step 4: Add Payment Method Variety
Action: Enable at least four payment options in your integrated payment gateway solutions settings.
Your baseline should include credit/debit cards, PayPal, Apple Pay or Google Pay, and a Buy Now Pay Later option like Klarna or Afterpay.
For each payment method, navigate to your payment provider dashboard and enable the option. Then verify it appears in your platform’s payment settings. Optimized payment flows improve authorization rates and reduce checkout friction through tokenization and secure authentication, as outlined by Visa.
Expected result: Your checkout page displays four or more payment icons. Each one functions when clicked.
Common failure: Apple Pay does not appear on desktop. Fix: Apple Pay only shows on Safari browsers and Apple devices. This is expected behavior. Test on an iPhone or iPad to confirm it works. For detailed setup instructions, see our guides on Apple Pay and WooCommerce or Apple Pay and BigCommerce.
Step 5: Implement Buy Now Pay Later
Action: Add at least one BNPL option and display it on product pages, not just checkout.
Install your chosen BNPL provider’s app or plugin. Configure it to show installment pricing on product pages (for example, “or 4 payments of $25”).
Expected result: Product pages show BNPL messaging. Checkout includes the BNPL option alongside other payment methods.
Common failure: BNPL messaging shows incorrect installment amounts. Fix: Check that your product prices meet the BNPL provider’s minimum order threshold. Most require at least $35 to $50 order value.
Step 6: Create a Pricing Transparency Statement
Action: Write and display a clear statement about your pricing policy near the cart total.
Draft 2 to 3 sentences that confirm: no hidden fees, what the total includes, and when charges occur. Example: “Your total includes all taxes and shipping. This is the exact amount charged to your payment method. No additional fees at any step.”
Add this text near your cart subtotal using your platform’s theme editor or a custom HTML block.
Expected result: Every customer sees your transparency statement before proceeding to payment.
Common failure: Text appears but looks unprofessional. Fix: Match the font size and color to your existing cart text. Use a subtle background color or border to make it noticeable without being jarring.
Step 7: Optimize for Mobile Checkout
Action: Test and adjust your checkout on actual mobile devices.
Open your checkout on your phone. Complete a test purchase. Note any friction: tiny buttons, hard to read text, or awkward scrolling.
Address issues through your theme’s mobile settings. Prioritize: larger tap targets (minimum 44×44 pixels), readable text without zooming, and auto-advancing form fields.
Expected result: You can complete checkout on mobile in under 3 minutes using only your thumb.
Common failure: Payment buttons are cut off on smaller screens. Fix: Check your theme’s responsive CSS. Payment button containers may need a “width: 100%” rule for mobile breakpoints.
Step 8: Add Trust Signals Near Payment
Action: Display security badges and guarantees within view of the payment button.
Include: SSL/secure checkout badge, accepted payment method logos, money-back guarantee (if offered), and customer service contact information. Position these below the payment button but above the fold on desktop. Strong security standards help protect payment data and build customer confidence during checkout, as defined by the PCI Security Standards Council.
Expected result: Customers see security confirmation without scrolling away from the buy button.
Common failure: Too many badges create visual clutter. Fix: Limit to 4 to 5 trust elements maximum. Use small, consistent icon sizes. Grey or muted colors prevent them from competing with your primary action button.
Configuration and Customization Options
These settings affect performance. Adjust based on your specific business model.
Guest checkout email collection: Always require email for order confirmation and shipping updates. This is non-negotiable for customer service.
Shipping calculator accuracy: If your shipping costs vary significantly by weight or destination, invest in a real-time carrier rate calculator rather than flat rate estimates.
BNPL provider selection: Choose based on your average order value. Klarna and Afterpay work well for $50 to $500 orders. Affirm handles larger purchases better.
Payment gateway solutions priority: Display the most popular payment methods first. Check your analytics to see which methods your customers actually use, then reorder accordingly.
Safe defaults: Enable all payment methods initially. Disable only if you see fraud patterns or excessive fees on specific methods.
Verification and Testing Protocol
Complete these tests before considering your implementation finished.
Test 1: New customer flow. In incognito mode, add items to cart and complete checkout as a guest. Verify all costs appear on cart page. Confirm checkout completes in under 3 minutes.
Test 2: Payment method variety. Attempt checkout with each enabled payment method. Verify each one processes correctly in test mode.
Test 3: Mobile experience. Repeat Test 1 on an actual smartphone (not just browser dev tools). Use both iOS and Android if possible.
Test 4: Price transparency. Have someone unfamiliar with your store complete a purchase. Ask them: “Were there any surprise fees?” Their answer reveals if your transparency efforts succeeded.
Success definition: All four tests pass without issues. Any failure means returning to the relevant step above.
Common Errors and Fixes
Error: “Payment method not available”
Symptom: Customer selects a payment option but receives an error. Cause: API credentials expired or payment method not enabled for your region. Fix: Log into your payment gateway dashboard. Verify API keys are current. Check that the payment method is activated for your business country.
Error: Shipping shows $0 then changes
Symptom: Cart shows free shipping, but checkout reveals actual cost. Cause: Shipping calculator not configured for cart page, only checkout. Fix: Return to Step 3 and ensure shipping estimator is active on cart, not just checkout.
Error: Guest checkout creates account anyway
Symptom: Customers report receiving account creation emails after guest checkout. Cause: Platform setting creates accounts automatically from guest orders. Fix: In account settings, disable “Create account from order” or similar auto-generation options.
Error: BNPL option missing on some products
Symptom: Buy Now Pay Later appears on some products but not others. Cause: Products below minimum order threshold or in excluded categories. Fix: Check BNPL provider’s product restrictions. Adjust minimum cart value settings if needed.
Error: Trust badges not showing on mobile
Symptom: Security badges visible on desktop disappear on phone. Cause: CSS hiding elements at mobile breakpoints. Fix: Inspect your theme’s responsive styles. Remove any “display: none” rules affecting trust badge containers on mobile.
Next Steps and Extensions
With your transparent, multi-option checkout live, consider these enhancements.
Abandoned cart recovery: Set up automated emails that remind customers of items left in cart. Include the transparent total they saw to reinforce trust.
One-click checkout for returning customers: Enable saved payment methods so repeat buyers can purchase with a single click while still seeing their total upfront.
A/B test your transparency statement: Try different wording and placements to see which version correlates with higher conversion rates.
Your checkout now removes the friction that causes most abandonment. Customers see exactly what they pay, choose how they pay, and buy without account hassles. Monitor your conversion rate over the next 30 days to measure the impact of these changes.
Frequently Asked Questions
What is checkout optimization and why is it important?
Checkout optimization means removing friction from the buying process so more shoppers complete their purchases. It matters because small improvements here directly increase revenue. A checkout that takes 5 minutes loses customers to one that takes 2 minutes. Every extra field, hidden fee, or confusing step gives shoppers a reason to leave.
How can I reduce cart abandonment during the checkout process?
Focus on three areas: enable guest checkout options so customers skip account creation, show all fees on the cart page before checkout begins, and offer payment method variety so customers can pay their preferred way. These changes address the top reasons shoppers abandon carts. For more detailed strategies, see our complete guide on preventing shopping cart abandonment.
What are the key features of an effective payment gateway?
Look for transparent pricing with no hidden fees, support for multiple payment methods (cards, digital wallets, BNPL), fast deposit times so you get your money quickly, and strong fraud protection that does not block legitimate sales. The best payment gateway solutions also offer responsive support when issues arise.
When should I consider implementing a one-page checkout solution?
Consider single-page checkout if your analytics show high drop-off between checkout steps, if you sell simple products that do not need extensive customization, or if mobile users make up more than 50% of your traffic. One-page checkout works best when customers already know what they want and just need to pay quickly.
Which payment methods should I offer to optimize my checkout experience?
Start with credit and debit cards as your baseline. Add PayPal for customers who prefer not to enter card details. Include Apple Pay and Google Pay for fast mobile checkout. Add at least one Buy Now Pay Later option for higher-priced items. Research shows stores with four payment options convert significantly better than those with fewer choices.
How can I build trust with customers during the checkout process?
Display security badges near the payment button. Show accepted payment logos clearly. Include a brief transparency statement confirming no hidden fees. Make your contact information visible so customers know they can reach you if something goes wrong. These trust signals reassure customers that their payment information is safe and their purchase is protected.