How to Set Up Multi-Currency Payment Processing Shopify
Configure local pricing, connect a secure payment gateway, and protect cross-border sales with chargeback defense
Learn to accept payments in multiple currencies on your Shopify store. This tutorial covers currency settings, payment gateway setup, and chargeback protection for international sales.
TL;DR
- Enable Shopify Markets first – This unlocks multi-currency display and international selling features that your payment gateway builds upon
- Connect a dedicated merchant account – Get transparent interchange-plus pricing, next-day funding, and better control than aggregated payment services
- Implement chargeback defense before going live – International transactions carry higher dispute risk, and proactive protection prevents costly chargebacks
- Test with real transactions in each market – VPN testing with actual payments reveals issues that test mode cannot detect
- Adjust pricing per market – Factor in conversion fees, duties, and local competition to maintain margins while staying competitive internationally
What You Will Achieve: A Fully Functional Multi-Currency Shopify Store
Setting up multi-currency payments on Shopify requires proper market configuration, payment gateway setup, pricing adjustments, and testing before launch.
By the end of this tutorial, your Shopify store will accept payments in multiple currencies, display local pricing to international customers, and process transactions through a payment gateway for Shopify that protects your revenue. You will have configured currency conversion settings, connected a reliable payment processor, and implemented a chargeback defense program to safeguard cross-border transactions.
Your success criteria: a customer in Germany sees prices in euros, a customer in Canada sees Canadian dollars, and both complete purchases that settle to your account with transparent fees and guaranteed next-day funding.
Prerequisites and Setup Checklist
Before starting, verify you have the following in place. Missing any item will block your progress at specific steps.
- Shopify plan: Basic Shopify or higher (Starter plan lacks multi-currency features)
- Admin access: Owner or staff permissions with “Manage settings” enabled
- Business verification documents: EIN, business bank account, government ID for payment processor setup
- Market research: List of 3-5 target countries where you want to sell
- Current payment processor details: Existing gateway credentials if migrating
Time estimate: 45-90 minutes for initial setup, plus 1-3 business days for payment processor account approval. The most common blocker is incomplete business verification, so gather documents before starting.
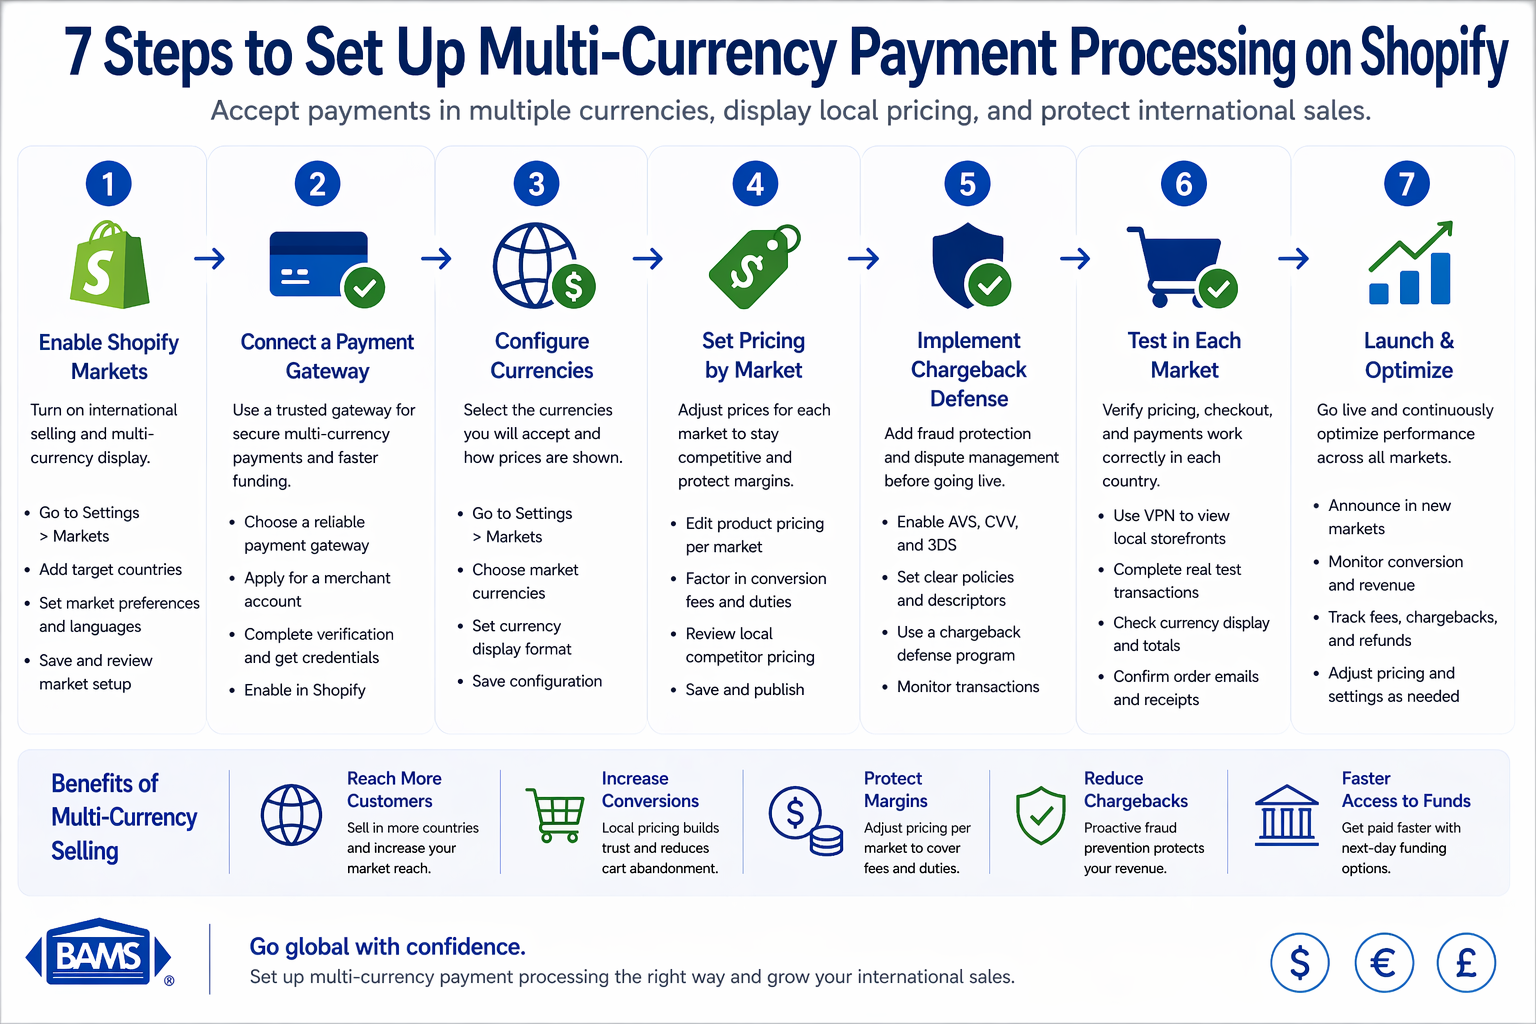
Why Multi-Currency Processing Matters for Your Store
Displaying prices in a customer’s local currency removes friction at checkout. When shoppers see familiar currency symbols and amounts, they convert at higher rates and abandon carts less frequently.
This tutorial uses a dedicated merchant account approach rather than relying solely on Shopify Payments. According to Visa, modern payment systems are designed to handle secure, efficient, and cross-border transactions at scale.
A dedicated eCommerce payment gateway gives you more control over transaction fees, faster fund access, and stronger dispute protection. The tradeoff is slightly more setup complexity, but the long-term benefits for established stores outweigh the initial effort.
Step 1: Enable Shopify Markets for International Selling
Action: Navigate to Settings → Markets in your Shopify admin. Click “Add market” and select your first target country or region.
Shopify Markets is the foundation for multi-currency payment processing. It controls which countries see your store, what currencies they use, and how prices convert. Without this enabled, currency options remain locked regardless of your payment gateway configuration.
Expected result: You see your new market listed with “Inactive” status. The market card shows currency, language, and domain options.
Common failure: “Markets unavailable” message appears. This means you are on the Starter plan. Upgrade to Basic Shopify or higher to proceed.
Step 2: Configure Currency Settings for Each Market
Action: Click on your newly created market, then select “Currency” under the Products and pricing section. Choose whether to use automatic conversion or set manual price adjustments.
Automatic conversion applies real-time exchange rates plus a rounding rule you specify. Manual pricing lets you set fixed prices in each currency, useful for psychological pricing (€49.99 instead of €51.23). Most stores start with automatic conversion and refine later.
Expected result: Currency settings show your selected currency with conversion method. Preview shows sample product prices in the new currency.
Common failure: Prices appear with excessive decimal places. Fix by setting rounding rules to “Round to nearest 0.99” or your preferred increment under currency settings.
Step 3: Review and Adjust International Pricing Strategy
Action: Under your market settings, click “Products and pricing” then “Price adjustment.” Enter a percentage increase or decrease to account for international shipping costs, duties, or competitive positioning.
A 5-10% increase is common to offset currency conversion fees and international transaction costs. Some merchants decrease prices for high-competition markets. Document your reasoning for each adjustment.
Expected result: Price adjustment percentage appears next to the market. Product prices in that currency reflect the adjustment when you preview your store.
Checkpoint: Open your store in an incognito browser with a VPN set to your target country. Verify prices display in the correct currency with your adjustment applied.
Step 4: Set Up Your Payment Gateway for Multi-Currency Acceptance
Action: Navigate to Settings → Payments. Under “Payment providers,” click “Add payment methods” or “Manage” if you have existing providers.
This step connects your payment gateway for Shopify to process transactions in multiple currencies. You have two paths: use Shopify Payments with multi-currency enabled, or connect a dedicated merchant account through a third-party gateway. For stores processing over $10,000 monthly, a dedicated merchant account typically offers better rates and faster funding.
Expected result: Your payment provider appears under active payment methods with supported currencies listed.
Common failure: “Currency not supported” error when adding a market. Your payment provider may not support that currency. Contact your provider to add currency support or use a different provider for that market.
Step 5: Connect a Dedicated Merchant Account for Better Control
Action: If using a third-party processor like BAMS, log into your merchant account dashboard. Locate API credentials or integration keys. Return to Shopify Settings → Payments and enter these credentials in the appropriate gateway configuration fields.
Dedicated merchant accounts provide interchange-plus pricing, which separates card network fees from processor markup. This transparency lets you see exactly what each transaction costs. Combined with next-day funding, you maintain healthier cash flow than standard 2-3 day settlement cycles.
The NACHA ACH Network supports efficient electronic fund transfers, enabling faster settlement timelines and making next-day deposits possible for international eCommerce businesses.
Expected result: Test transaction completes successfully in your merchant account dashboard. Shopify shows the payment method as active.
Common failure: API credentials rejected. Verify you copied the production keys (not sandbox/test keys) and that your merchant account is fully approved and activated.
Step 6: Implement Chargeback Defense Before Going Live
Action: Contact your payment processor to enable their chargeback defense program. For BAMS merchants, request activation of the Dispute Assistant Manager. Configure alert thresholds and notification preferences.
The PCI Security Standards Council emphasizes that strong security and compliance standards are essential for protecting cross-border transactions and reducing dispute risk.
A proactive chargeback defense strategy catches disputes before they escalate. This protects your merchant account standing and prevents processing cost increases from high dispute ratios.
Expected result: Chargeback alerts enabled in your merchant dashboard. You receive a test notification confirming the system works.
Checkpoint: Review your dispute response workflow. Know who on your team handles alerts and what evidence you need to submit (tracking numbers, customer communication logs, signed delivery confirmations).
Step 7: Configure Tax and Duty Settings for International Markets
Action: Go to Settings → Taxes and duties. Click on each market and configure whether prices include or exclude tax, and whether you collect duties at checkout (DDP) or let customers pay on delivery (DDU).
Collecting duties at checkout (Delivered Duty Paid) reduces cart abandonment from unexpected fees but requires you to remit those duties. Letting customers pay (Delivered Duty Unpaid) simplifies your accounting but creates friction. Most successful international sellers choose DDP for better customer experience.
Expected result: Tax and duty settings display correctly for each market. Checkout preview shows duty estimates for applicable products.
Common failure: Duties not calculating. Ensure you have entered HS codes (Harmonized System codes) for your products under each product’s shipping details.
Step 8: Activate Your International Markets
Action: Return to Settings → Markets. For each configured market, click the market card and toggle the status from “Inactive” to “Active.”
This makes your store visible and purchasable in those countries.
Expected result: Market status shows “Active” with a green indicator. Your store is now accessible to customers in those regions.
Common failure: Market activates but customers still see your default currency. Clear your browser cache and verify the customer’s IP detection is working. Check that your theme supports Shopify Markets currency switching.
Step 9: Test the Complete Purchase Flow
Multi-currency payment processing connects local checkout experiences with secure gateway processing and fast settlement to your business account.
Action: Using a VPN set to each target country, complete a test purchase on your store. Verify currency display, checkout totals, payment processing, and order confirmation.
Test with actual payment methods, not just Shopify’s test mode. A small real transaction reveals issues that test mode cannot detect, such as currency conversion discrepancies or payment authorization failures. Refund the test order after confirming success.
Expected result: Order appears in your Shopify admin with correct currency noted. Payment settles in your merchant account with accurate amounts. Customer receives confirmation email with local currency pricing.
Checkpoint: Verify the transaction appears in your chargeback defense system. Confirm you can access order details needed for potential dispute response.
Configuration and Customization Options
After completing basic setup, consider these adjustments based on your business model.
Currency rounding rules: Change from default rounding to psychological pricing (prices ending in .99 or .95). Access this under Markets → Currency → Rounding rules. Safe default: round to nearest 0.99.
Price adjustment by market: Increase or decrease prices per market to account for local competition, shipping costs, or purchasing power. Start with 0% and adjust based on conversion data after 30 days.
Payout currency: Choose whether to receive funds in your local currency (with conversion fees) or hold balances in transaction currencies. If you have expenses in multiple currencies, holding balances can reduce conversion costs.
Notification thresholds: In your chargeback defense settings, adjust alert sensitivity. More alerts mean more manual review but earlier dispute detection. Start with medium sensitivity and refine based on your dispute volume.
Verification and Testing Procedures
Your multi-currency setup succeeds when these conditions are met:
- Customers in each target country see prices in their local currency without manual selection
- Checkout totals include accurate tax and duty calculations
- Payments process without authorization failures
- Funds appear in your merchant account within your agreed settlement timeframe
- Chargeback alerts trigger for test disputes
Edge cases to verify: Test a purchase with a currency that uses different decimal conventions (Japanese yen has no decimal places). Test a high-value order to confirm it does not trigger fraud blocks. Test a mobile purchase.
Common Errors and How to Fix Them
Error: “Payment method not available in this region”
Cause: Your payment gateway does not support the customer’s country or currency. Fix: Contact your payment processor to add currency support, or configure a secondary payment method for that market under Settings → Payments → Payment methods by market.
Error: Prices showing in wrong currency after market activation
Cause: Theme does not support Shopify Markets geolocation, or customer has cached session. Fix: Update your theme to a Markets-compatible version, or add the Geolocation app from the Shopify App Store to enable manual currency switching.
Error: “Transaction declined” on international cards
Cause: Your fraud filters are blocking legitimate international transactions. Fix: Review your payment gateway’s fraud settings and whitelist trusted countries. Consider adding 3D Secure authentication for international orders instead of blocking them.
Error: Settlement amounts do not match expected totals
Cause: Currency conversion fees applied at settlement. Fix: Review your merchant account agreement for conversion fee rates. Consider holding multi-currency balances if your processor supports it, or factor conversion costs into your market price adjustments.
Error: Chargeback alerts not appearing
Cause: Alert system not properly connected or notification email going to spam. Fix: Verify webhook URLs in your merchant dashboard, check spam folders, and confirm the email address matches an active monitored inbox.
Next Steps and Extensions
With multi-currency processing active, consider these enhancements to maximize international revenue.
Add localized content: Translate product descriptions and checkout pages for your top-performing markets. Shopify Markets supports multiple languages per market.
Optimize for mobile payments: Add digital wallet options (Apple Pay, Google Pay) that streamline mobile checkout for international customers.
Monitor and refine: After 30 days, review your Shopify Analytics for conversion rates by market. Adjust price markups, shipping options, or payment methods based on performance data. Understanding how refund fees impact your margins helps you set sustainable pricing.
Frequently Asked Questions
What is a payment gateway and why is it important for eCommerce?
A payment gateway securely transmits transaction data between your online store and financial institutions. It encrypts sensitive card information, verifies funds availability, and authorizes payments in real-time. Without a reliable gateway, you cannot accept credit cards, and poor gateway performance directly causes abandoned carts and lost sales.
How do I choose the best payment gateway for my business?
Evaluate gateways based on supported currencies, transaction fees, settlement speed, and chargeback protection features. For multi-currency stores, confirm the gateway supports all your target currencies without excessive conversion fees. Prioritize providers offering next-day funding and transparent interchange-plus pricing over flat-rate processors that hide true costs.
Which payment gateways support international transactions?
Most major gateways support international transactions, but currency support varies significantly. Dedicated merchant account providers typically support more currencies and offer better rates for cross-border transactions than aggregated payment services. Verify specific currency support before committing, as adding currencies later may require account changes.
How does a chargeback defense program protect my business?
A chargeback defense program monitors transactions for dispute signals, alerts you to filed chargebacks immediately, and helps you compile evidence for representment. Early detection gives you time to resolve issues directly with customers before disputes escalate. Strong defense keeps your chargeback ratio low, which protects your processing rates and merchant account standing.
When should I consider switching my payment gateway?
Switch when your current provider cannot support your growth, such as lacking currencies you need, charging excessive fees for your transaction volume, or providing slow fund settlement. If you experience frequent authorization failures on legitimate transactions or lack adequate chargeback support, these are also strong signals to evaluate alternatives.
Will multi-currency processing increase my transaction fees?
Multi-currency transactions typically incur slightly higher fees than domestic transactions due to currency conversion and cross-border interchange rates. However, the revenue increase from capturing international sales usually far exceeds the additional fees. Transparent pricing from your processor helps you accurately factor these costs into your market-specific pricing strategy.
Sources


