
Apple Pay Integration: Cut Fees and Chargebacks
Last Updated on October 14, 2026 by Dimitri Akhrin
Configure tokenization, Level 2/3 data, and fraud rules to unlock lower interchange tiers most guides ignore
Learn the post-setup configuration steps that turn Apple Pay from a basic checkout option into a cost-optimization tool. This tutorial covers interchange qualification, chargeback reduction, and fraud rule tuning with measurable results within one billing cycle.
TL;DR
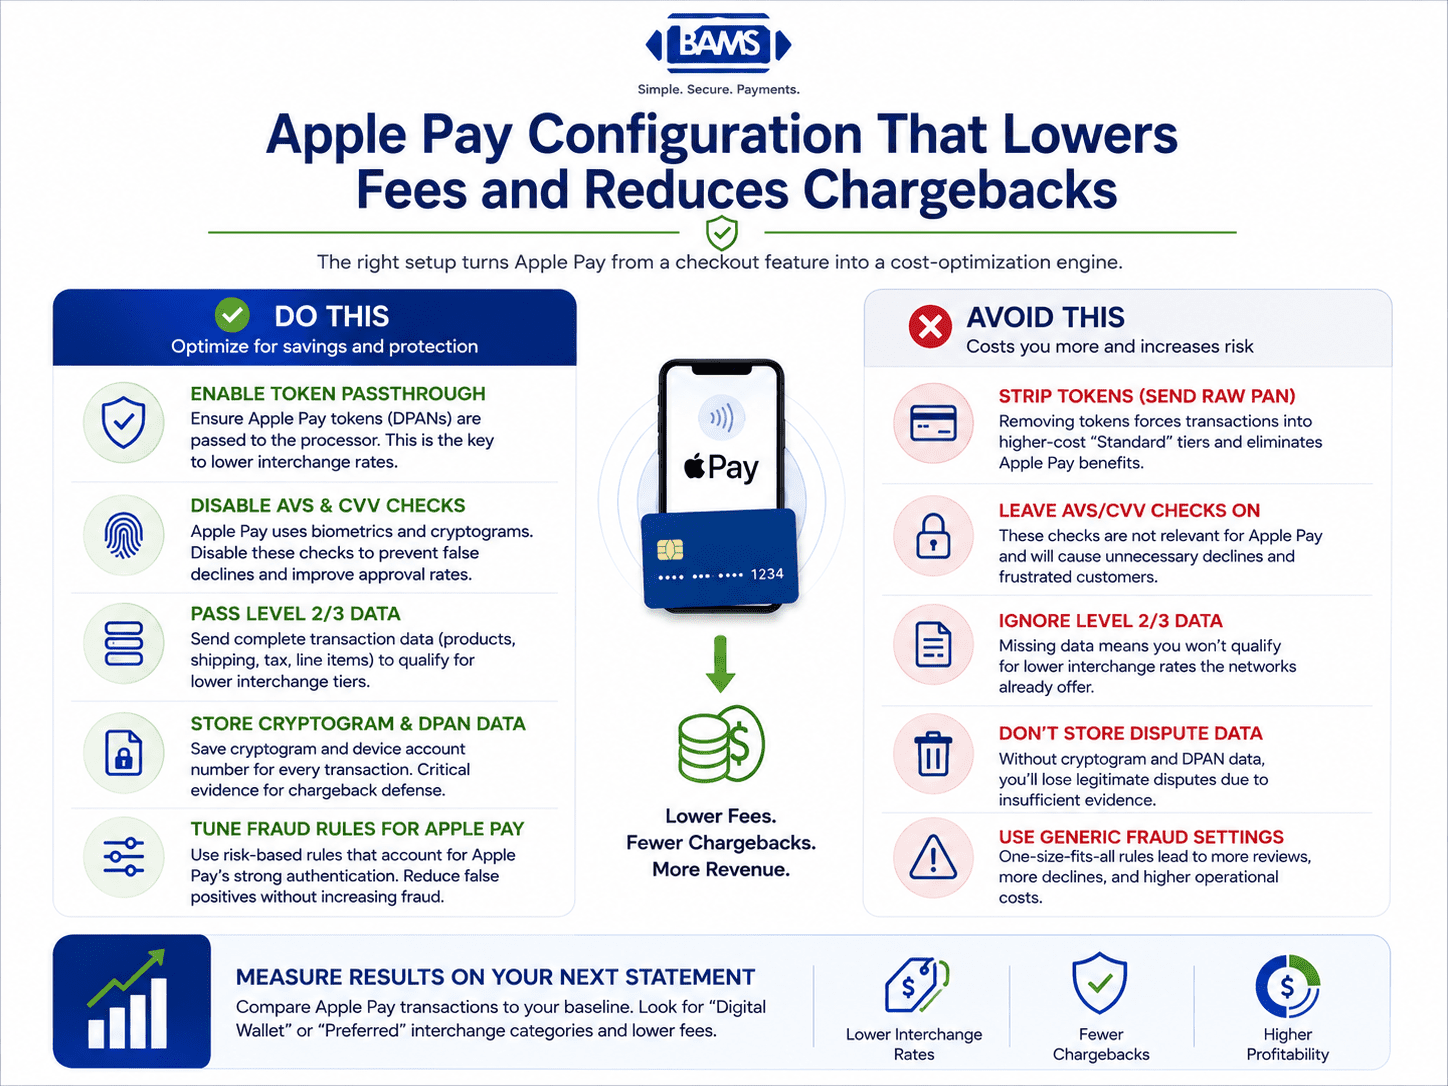
- Apple Pay integration is a cost lever, not just a checkout feature – Proper configuration (token passthrough, Level 2/3 data, tuned fraud rules) can lower your interchange fees by 20 to 40 basis points per transaction.
- Token passthrough is the single most important setting – If your gateway strips the Apple Pay token and sends a raw card number, you lose all interchange benefits and your transactions land in expensive “standard” tiers.
- Disable AVS and CVV checks for Apple Pay – Apple Pay uses biometric authentication and cryptograms instead. Leaving these checks on causes false declines that hurt approval rates and can lead to customer complaints.
- Store cryptogram and DPAN data for every transaction – This evidence is your strongest defense in chargeback disputes. Without it, you’ll lose representment even on legitimate Apple Pay purchases.
- Measure results on your next merchant statement – Compare Apple Pay interchange categories against your baseline. If transactions aren’t landing in “Preferred” or “Digital Wallet” tiers, revisit your gateway’s token and data passthrough settings.
What You’ll Achieve: Lower Chargebacks, Better Interchange Rates, Real Savings
By the end of this tutorial, your Apple Pay integration will do more than accept payments. It will actively reduce your chargeback exposure, qualify your transactions for lower interchange tiers, and give you a measurable drop in processing costs. Most setup guides stop at “it works.” This one walks you through the configuration decisions that turn Apple Pay from a checkout convenience into a cost-optimization tool.
Your success criteria are concrete: tokenized transactions flowing with Level 2/3 data, fraud rules tuned to Apple Pay’s authentication model, and interchange qualification you can verify on your next merchant statement. If your transaction fees don’t improve within one billing cycle, you’ll know exactly which step to revisit.
Prerequisites and Setup Checklist
Before you start, confirm you have the following in place. Missing any of these will stall the process.
- Active merchant account with a payment processor that supports Apple Pay tokenization (check your processor’s documentation or ask your account manager)
- Payment gateway that passes Level 2 and Level 3 transaction data (not all gateways do this by default)
- Apple Developer account with a valid Merchant ID configured in the Apple Developer portal
- SSL certificate on your domain (required for Apple Pay on the web)
- Access to your gateway’s admin panel for fraud rule configuration
- Recent merchant statement (you’ll use this to benchmark current interchange costs)
Time estimate: 2 to 4 hours for configuration, plus 1 to 2 billing cycles to measure results. Potential blocker: If your gateway doesn’t support enhanced data fields, you may need to switch gateways or request an upgrade before proceeding.
Why This Approach Works (and What Others Miss)
Most Apple Pay integration guides treat setup as a binary: connected or not connected. But the way you configure tokenization handling, fraud rules, and data passthrough directly affects which interchange tier your transactions land in. The difference between a standard eCommerce rate and a preferred digital wallet rate can be 20 to 40 basis points per transaction. On a $500,000 annual volume, that’s $1,000 to $2,000 in savings from interchange alone.
Apple Pay’s built-in tokenization and biometric authentication already give you a structural advantage over traditional card-not-present transactions. Apple Pay is projected to process around $8 trillion in global payments in 2025, and card networks have responded by creating favorable interchange categories for authenticated digital wallet transactions. But you only qualify if your system passes the right data. This tutorial covers that gap.
Authorize.Net’s API Reference documents the transaction fields available for payment processing, including support for enhanced transaction data used by many payment gateways.

Proper Apple Pay configuration goes beyond enabling digital wallet payments. Token passthrough, enhanced transaction data, and optimized fraud rules help merchants lower processing costs while strengthening chargeback defense.
Step-by-Step: Configure Apple Pay for Cost Optimization
Step 1: Audit Your Current Interchange Costs
Open your most recent merchant statement and identify the interchange categories your transactions currently fall into. Look for line items labeled “EIRF” (Electronic Interchange Reimbursement Fee), “Standard,” or “Non-Qualified.” These are the expensive tiers. Write down the percentage and per-transaction fee for each.
Expected result: A clear baseline of what you’re paying per transaction category. Checkpoint: If your statement doesn’t break out interchange by category, contact your processor and request an interchange detail report. If they can’t provide one, that’s a sign your pricing model may lack the transparency you need.
Common failure: Bundled or “flat rate” pricing hides interchange detail. If you’re on flat-rate pricing, you won’t see per-category savings from Apple Pay optimization. Consider requesting an interchange-plus pricing model from your processor.
Step 2: Verify Your Merchant ID and Certificate Configuration
Log into the Apple Developer portal and navigate to Certificates, Identifiers & Profiles. Confirm your Merchant ID is active and your Payment Processing Certificate is current (not expired). If you’re using Apple Pay on the web, also verify your Merchant Identity Certificate.
Expected result: Both certificates show “Active” status with expiration dates at least 6 months out. Checkpoint: Download and re-upload your Payment Processing Certificate to your gateway if it was generated more than 18 months ago. Apple recommends periodic rotation.
Common failure: Expired certificates cause silent transaction failures. Your gateway may fall back to manual card entry, which lands in the highest interchange tier. Check certificate expiration dates quarterly.
Step 3: Enable Tokenization Passthrough in Your Gateway
In your payment gateway’s admin panel, locate the Apple Pay or digital wallet settings. Enable network token passthrough (sometimes called DPAN or MPAN forwarding). This ensures your gateway sends the device-specific token to the card network rather than decrypting and re-encrypting the card number. Mastercard Developers provides technical documentation describing tokenized payment credentials, digital wallets, and secure payment processing.
Why this matters: When the card network receives a valid device token with cryptogram, it recognizes the transaction as authenticated. This qualifies it for lower interchange categories reserved for tokenized, device-authenticated payments. If your gateway strips the token and sends a raw PAN instead, you lose this qualification.
Expected result: Test transactions show “Token” or “DPAN” in the transaction detail, not a standard card number. Common failure: Some older gateway integrations decrypt Apple Pay tokens server-side. If your test transactions show a standard 16-digit PAN, contact your gateway provider about enabling token passthrough.
Step 4: Configure Level 2 and Level 3 Data Fields
The biggest savings from Apple Pay come from proper configuration. Passing tokenized payment data and enhanced transaction information helps merchants qualify for lower interchange fees and stronger dispute protection.
This is the step most guides skip entirely. Card networks (Visa and Mastercard specifically) offer lower interchange rates when transactions include enhanced data: customer code, tax amount, item-level detail (descriptions, quantities, unit costs). These are called Level 2 and Level 3 data.
Many payment gateways require additional configuration before enhanced transaction fields are transmitted. Reviewing your gateway’s API documentation helps confirm these fields are included in authorization and settlement requests.
In your gateway or eCommerce platform, enable the following fields for every Apple Pay transaction:
- Level 2: Tax amount, customer reference/PO number, merchant postal code
- Level 3: Line-item detail (product description, quantity, unit price, commodity code)
Expected result: Your gateway’s transaction log shows L2/L3 data populated for Apple Pay orders. Checkpoint: Run 5 to 10 test transactions and verify the data appears in your processor’s reporting portal. Common failure: eCommerce platforms often populate these fields for invoice payments but leave them blank for consumer checkout. You may need a plugin or custom integration to auto-populate line-item data.
Step 5: Tune Fraud Rules for Apple Pay’s Authentication Model
Apple Pay transactions arrive pre-authenticated via Face ID, Touch ID, or device passcode. Layering aggressive fraud filters on top of this authentication creates unnecessary declines, which hurt your mobile conversion rates and generate customer complaints that can escalate into chargebacks.
In your fraud tool or gateway settings, create a rule set specifically for Apple Pay transactions:
- Reduce velocity limits for Apple Pay by 1 to 2 tiers (e.g., if you block after 3 attempts in 10 minutes for card entry, allow 5 for Apple Pay)
- Disable AVS (Address Verification) checks for Apple Pay. Tokenized transactions don’t carry billing addresses the same way, and AVS mismatches cause false declines
- Keep CVV checks off. Apple Pay replaces CVV with a dynamic security code (cryptogram). Requiring CVV will fail every time
Expected result: Apple Pay approval rates increase by 2 to 5 percentage points. Common failure: Applying one-size-fits-all fraud rules to all payment methods. Apple Pay’s biometric authentication already provides strong fraud defense. As Tom Shah, Chief Analyst at PYMNTS Intelligence, has noted, merchants must configure backend fraud rules specifically for token validation to fully leverage Apple Pay’s lower chargeback rates.
Step 6: Set Up Chargeback Alerts and Representment Workflows
Apple Pay’s tokenization gives you a structural advantage in chargeback disputes because every transaction carries a device-specific cryptogram proving the cardholder authenticated. But you only win disputes if you capture and store this evidence.
Configure your system to retain the following for every Apple Pay transaction:
- Transaction cryptogram (from the Apple Pay token payload)
- Device account number (DPAN)
- Timestamp with timezone
- Delivery confirmation or digital fulfillment proof
If your processor offers proactive chargeback alerts (where you’re notified before a dispute formally posts), enable them. Services like those from BAMS include proactive chargeback defense as part of their merchant services, which can resolve disputes before they hit your chargeback ratio. This matters because card networks penalize merchants whose chargeback ratios exceed 1%, and the penalties compound with higher fees and potential account termination.
Expected result: A documented evidence trail for every Apple Pay transaction, ready for representment within 24 hours of a dispute notification.
Step 7: Enable Network Tokenization for Recurring Payments
If you offer subscriptions or recurring payments, Apple Pay’s network tokens update automatically when a customer’s card is reissued. This eliminates the “card on file expired” problem that causes involuntary churn and retry declines (which card networks flag as potential fraud).
In your gateway, enable Merchant Token (MPAN) storage for recurring billing. This links the customer’s device token to your merchant ID, so card updates propagate automatically via the network’s token vault.
Expected result: Recurring transaction decline rates drop by 5 to 15% as expired-card failures disappear. Checkpoint: Monitor your retry/decline report for Apple Pay recurring charges over 2 billing cycles. Common failure: Storing the DPAN as a static card-on-file instead of using MPAN. The DPAN is device-specific and will fail if the customer changes devices.
Step 8: Promote Apple Pay at Checkout Strategically
Configuration alone won’t save you money if customers don’t use Apple Pay. Making Apple Pay highly visible throughout the checkout experience encourages adoption by customers who already prefer digital wallet payments, helping merchants benefit from faster checkout and stronger payment authentication.
Place the Apple Pay button above the fold on mobile checkout. Use Apple’s Human Interface Guidelines for button styling (the black button with the Apple Pay mark performs best). On product pages, consider adding an “Express Checkout” option that bypasses the cart entirely.
For more on how checkout transparency reduces cart abandonment, review your full checkout flow for hidden fees or surprise shipping costs that undermine the speed advantage Apple Pay provides.
Expected result: Apple Pay transaction share increases from your current baseline by 3 to 8 percentage points within 30 days. Higher Apple Pay share means more transactions qualifying for preferred interchange rates.
Configuration and Customization
Not every setting needs to match this tutorial exactly. Here are the key variables you should adjust for your business:
- Fraud velocity limits: The thresholds above are starting points. If you sell high-value items ($200+), keep tighter limits even for Apple Pay. If your average ticket is under $50, you can loosen further.
- Level 3 data fields: Consumer eCommerce transactions benefit from Level 2 data. Full Level 3 (line-item detail) provides the biggest savings on B2B and government card transactions. If your customer base is primarily consumer, Level 2 is sufficient.
- Recurring token type: Use MPAN for subscriptions. For one-time purchases, DPAN passthrough is correct. Don’t mix them.
- Apple Pay button placement: Test above-the-fold vs. within the payment method selector. Mobile-heavy sites (over 60% mobile traffic) see better results with express checkout on product pages.
Safe defaults: Enable token passthrough, populate Level 2 data, and disable AVS for Apple Pay. These three changes carry minimal risk and deliver the most immediate interchange savings.
Verification and Testing
After completing all steps, run this verification sequence:
- Test transaction check: Process 3 Apple Pay transactions on your live site (use small amounts). In your gateway’s transaction detail, confirm each shows a DPAN/token, populated tax fields, and a cryptogram.
- Interchange qualification check: After your next statement closes, compare Apple Pay transactions against your Step 1 baseline. Look for category shifts from “Standard” or “EIRF” to “Preferred” or “Digital Wallet” tiers.
- Approval rate check: Pull approval/decline rates for Apple Pay vs. manual card entry. Apple Pay should be 2 to 5 points higher.
- Chargeback evidence check: Simulate a dispute (or wait for one) and verify you can retrieve the cryptogram and DPAN within minutes.
Success definition: Apple Pay transactions land in a lower interchange category than equivalent card-not-present transactions, approval rates are higher, and you have retrievable authentication evidence for every Apple Pay order.
Common Errors and Fixes for Apple Pay Integration
Error: “Payment Not Completed” on Checkout
Symptom: Customers see a generic failure after Face ID/Touch ID authentication. Cause: Expired Payment Processing Certificate in the Apple Developer portal. Fix: Generate a new certificate, upload it to your gateway, and test again. This resolves the issue immediately.
Error: Transactions Falling Into “Standard” Interchange
Symptom: Your statement shows Apple Pay transactions at the same rate as manual card entry. Cause: Gateway is decrypting the token and sending a raw PAN to the network. Fix: Enable token passthrough (Step 3). If your gateway doesn’t support it, this is a gateway limitation you’ll need to escalate or resolve by switching providers.
Error: High Decline Rate on Apple Pay
Symptom: Apple Pay declines exceed 10%. Cause: AVS or CVV checks are enabled for Apple Pay transactions. Fix: Disable AVS and CVV for the Apple Pay payment method in your fraud rules (Step 5). Apple Pay uses cryptographic authentication instead.
Error: Recurring Charges Failing After Card Reissue
Symptom: Subscription renewals decline with “Card Not on File” errors. Cause: You stored a DPAN instead of an MPAN for recurring billing. Fix: Re-enroll recurring customers using MPAN tokenization (Step 7). The MPAN persists across device changes and card reissues.
Error: Chargeback Lost Despite Apple Pay Authentication
Symptom: You lose a dispute on an Apple Pay transaction. Cause: Cryptogram and token data weren’t submitted with the representment. Fix: Configure your system to store and retrieve Apple Pay authentication data (Step 6). Submit the cryptogram, DPAN, and timestamp with every representment response.
Next Steps: Extend Your Savings
With Apple Pay optimized, apply the same interchange-qualification logic to Google Pay and other mobile commerce payment methods. The token passthrough and Level 2/3 data configuration steps are nearly identical.
Consider these follow-on actions:
- Benchmark quarterly: Compare Apple Pay interchange costs against your other payment methods every billing cycle. The gap should widen as Apple Pay volume grows.
- Explore dual pricing: If your processor supports it, consider offering a small incentive for Apple Pay (or digital wallet) payments, since they cost you less to process.
- Review your full checkout flow: If you’re on BigCommerce, see how Apple Pay integrates with BigCommerce for platform-specific optimization tips.
The merchants who treat Apple Pay as a cost-optimization channel (not just a checkout button) are the ones who see compounding savings over time. Start measuring, and the numbers will guide your next move.
Frequently Asked Questions
What fees do merchants incur when accepting Apple Pay?
Apple charges merchants nothing for Apple Pay itself. Your costs come from your payment processor’s markup and the interchange fees set by card networks (Visa, Mastercard). The good news: Apple Pay transactions can qualify for lower interchange tiers than standard card-not-present transactions because they carry tokenized, device-authenticated data. The key is configuring your gateway to pass that data correctly.
How does Apple Pay reduce fraud and chargeback costs?
Every Apple Pay transaction requires biometric authentication (Face ID or Touch ID) and generates a one-time cryptogram tied to the specific device. This makes it extremely difficult for fraudsters to use stolen card numbers through Apple Pay. For merchants, this means fewer fraudulent transactions and stronger evidence for disputing chargebacks, since you can prove the cardholder’s device authenticated the purchase.
How does Apple Pay compare to traditional credit card processing fees?
Apple Pay transactions that are properly configured (with token passthrough and enhanced data) typically qualify for interchange rates 20 to 40 basis points lower than standard eCommerce card-not-present rates. The savings come from the card networks recognizing tokenized, authenticated transactions as lower risk. However, you only get these rates if your gateway passes the token and cryptogram to the network correctly.
When should businesses actively promote Apple Pay to customers?
Promote Apple Pay when your mobile traffic exceeds 50% of total site visits, when your average cart abandonment rate on mobile is above industry benchmarks, or when you’re seeing high decline rates on traditional card-not-present transactions. Since around 70% of Gen Z mobile wallet users choose Apple Pay first, businesses targeting younger demographics should prioritize visibility immediately.
Do I need interchange-plus pricing to benefit from Apple Pay optimization?
Yes, practically speaking. Flat-rate pricing (like 2.9% + $0.30 per transaction) charges the same regardless of interchange category. You won’t see savings from better interchange qualification because your rate doesn’t change. Interchange-plus pricing passes the actual interchange cost to you with a fixed markup, so when Apple Pay qualifies for a lower tier, your total cost drops. Ask your processor about switching if you’re on flat-rate.
Which payment processors support Apple Pay for merchants?
Most major processors support Apple Pay, including those serving small-to-midsize businesses. The more important question is whether your processor supports token passthrough, Level 2/3 data, and proactive chargeback alerts. These capabilities determine whether you can optimize costs or just accept payments. BAMS, for example, combines Apple Pay support with proactive chargeback defense and next-day funding, which addresses both the cost and cash-flow sides of the equation.


