Transaction Data Optimization: A Field Mapping Guide
Last Updated on October 7, 2026 by Dimitri Akhrin
How to configure tax and freight fields on your eCommerce platform to unlock Level 3 interchange rates
Learn how to map the exact tax and freight fields your processor needs to qualify transactions for Level 3 interchange pricing. Covers Shopify, WooCommerce, BigCommerce, and Magento with platform-specific configuration steps.
TL;DR
- Your platform probably strips tax and freight data before it reaches the processor – Most eCommerce platforms don’t pass Level 3 fields by default, causing every commercial card transaction to downgrade to higher interchange rates.
- The fix is field mapping, not rate negotiation – Match your platform’s tax and shipping fields to your gateway’s Level 3 field requirements, then configure the passthrough. Tax, freight, and ship-to postal code are the critical fields most often missing.
- Interchange-plus pricing is the prerequisite – Flat-rate pricing hides downgrades entirely. You need interchange-plus to see which transactions are qualifying poorly and to measure the impact of your optimization.
- Watch for edge cases that break qualification – Free shipping orders need $0.00 (not null) in the freight field. Tax-exempt orders need an exempt flag, not just a zero amount. Digital-only orders still need freight fields populated.
- Monitor monthly, not once – Platform updates, gateway changes, and new product types can silently break your field mapping. Track your effective processing rate on commercial cards every billing cycle to catch regressions early.
Guide Orientation: What This Covers and Who It’s For
This guide walks you through the exact process of mapping tax and freight fields across eCommerce platforms so your transactions qualify for Level 3 interchange pricing. Transaction data optimization is the single most overlooked lever for reducing payment processing fees, and this guide treats it as a concrete, recoverable cost gap rather than a technical curiosity. According to the Federal Reserve’s 2025 Small Business Credit Survey, managing operating expenses remains a significant challenge for many businesses, increasing the value of reducing avoidable payment acceptance costs.
It’s written for eCommerce managers at established online businesses who process commercial card orders and suspect they’re overpaying on interchange. If your company handles B2B transactions, government purchase cards, or corporate cards, this is especially relevant.
By the end, you’ll understand exactly which tax and freight fields need to reach your processor, why most platforms strip them by default, and how to configure your specific stack to pass them correctly. We cover Shopify, WooCommerce, BigCommerce, and Magento. We do not cover in-person POS systems or card-present transactions.
Why Tax and Freight Field Mapping Matters for Payment Processing Fees
Every credit card transaction you process carries an interchange fee set by the card networks (Visa, Mastercard). That fee isn’t fixed. It varies based on how much data you send with the transaction. The more detail you provide (tax amount, freight charges, line-item data), the lower the interchange tier your transaction qualifies for.
Most eCommerce merchants pay standard interchange rates on every order because their platform never sends those qualifying fields. The data exists in your system. Your cart calculates tax. Your checkout collects shipping costs. But somewhere between the “Place Order” button and the processor, those fields get dropped.
The cost of this gap is measurable. A 0.5% reduction in processing rate on $500,000 in annual commercial card volume equals $2,500 recovered. Scale that to higher volumes or multiple card types and the number climbs fast. For a mid-size eCommerce operation running $2M in annual B2B card volume, the gap can exceed $10,000 per year.
This isn’t a theoretical problem. Most platforms don’t pass Level 3 data automatically, so merchants must explicitly configure enhanced data passthrough. If you haven’t done that configuration work, you are almost certainly paying retail interchange rates on transactions that already qualify for lower B2B pricing. The money is leaving your account every month, and it doesn’t show up as a line item labeled “overpayment.”
Core Concepts: Interchange Tiers, Level 3 Data, and Downgrades
Interchange Tiers Explained
Visa and Mastercard categorize transactions into tiers based on the richness of data attached to each authorization. The three tiers are Level 1 (basic), Level 2 (enhanced), and Level 3 (full line-item detail). Each tier carries a progressively lower interchange rate. Level 1 is what you get by default when your platform sends only the card number, amount, and merchant ID.
What Level 3 Data Actually Includes
The Visa Commercial Enhanced Data Program highlights the role of enhanced transaction data in commercial card qualification and interchange optimization. Level 3 qualification requires specific fields beyond the basics: tax amount, tax indicator, freight/shipping amount, ship-to postal code, product commodity codes, unit of measure, and line-item detail (quantity, description, unit price). The tax and freight fields are the two most commonly missing pieces because platforms treat them as display data for the customer, not as processor-bound transaction fields.
What a Downgrade Means
When required fields are absent, the card network “downgrades” the transaction to a higher interchange tier. This isn’t a penalty in the traditional sense. It’s the default behavior. Your transaction simply fails to qualify for the lower rate and gets charged at the standard or non-qualified tier. The key misconception: many merchants believe their processor controls this. They don’t. The card networks set the qualification criteria, and your platform determines whether the data reaches the network. Visa’s payment processing guidance emphasizes the importance of complete and accurate transaction data throughout the payment lifecycle. Your processing statement will show these downgrades if you’re on interchange-plus pricing, but flat-rate pricing hides them entirely.
Why Interchange-Plus Pricing Makes This Visible
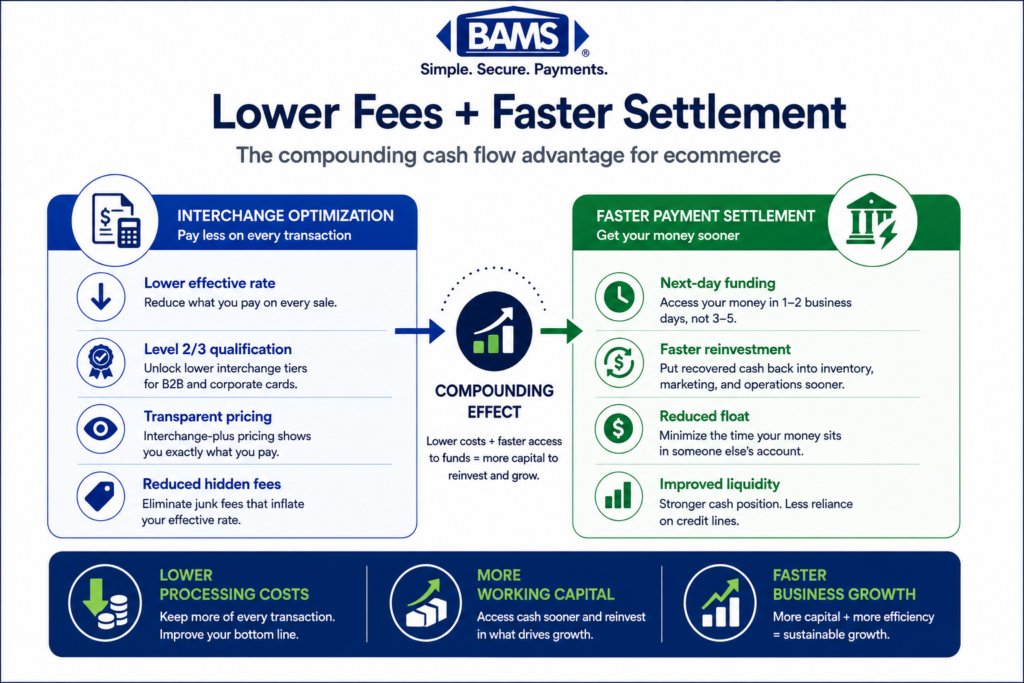
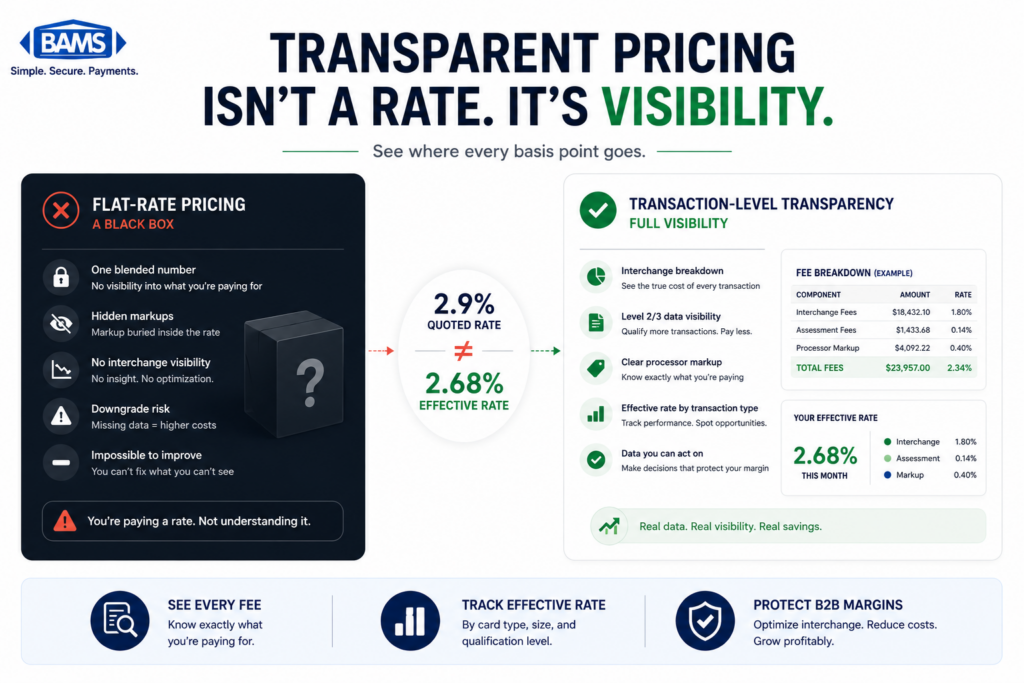
Interchange-plus pricing is important because it makes downgrades visible, letting you see exactly which transactions qualified at suboptimal rates. If you’re on flat-rate pricing, you pay the same percentage regardless of data quality, which means your processor absorbs the upside when transactions qualify well and you absorb the downside when they don’t. Transparent pricing models are the prerequisite for this entire optimization effort.
The Field Mapping Framework: Four Phases
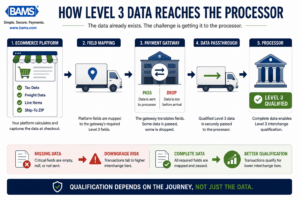
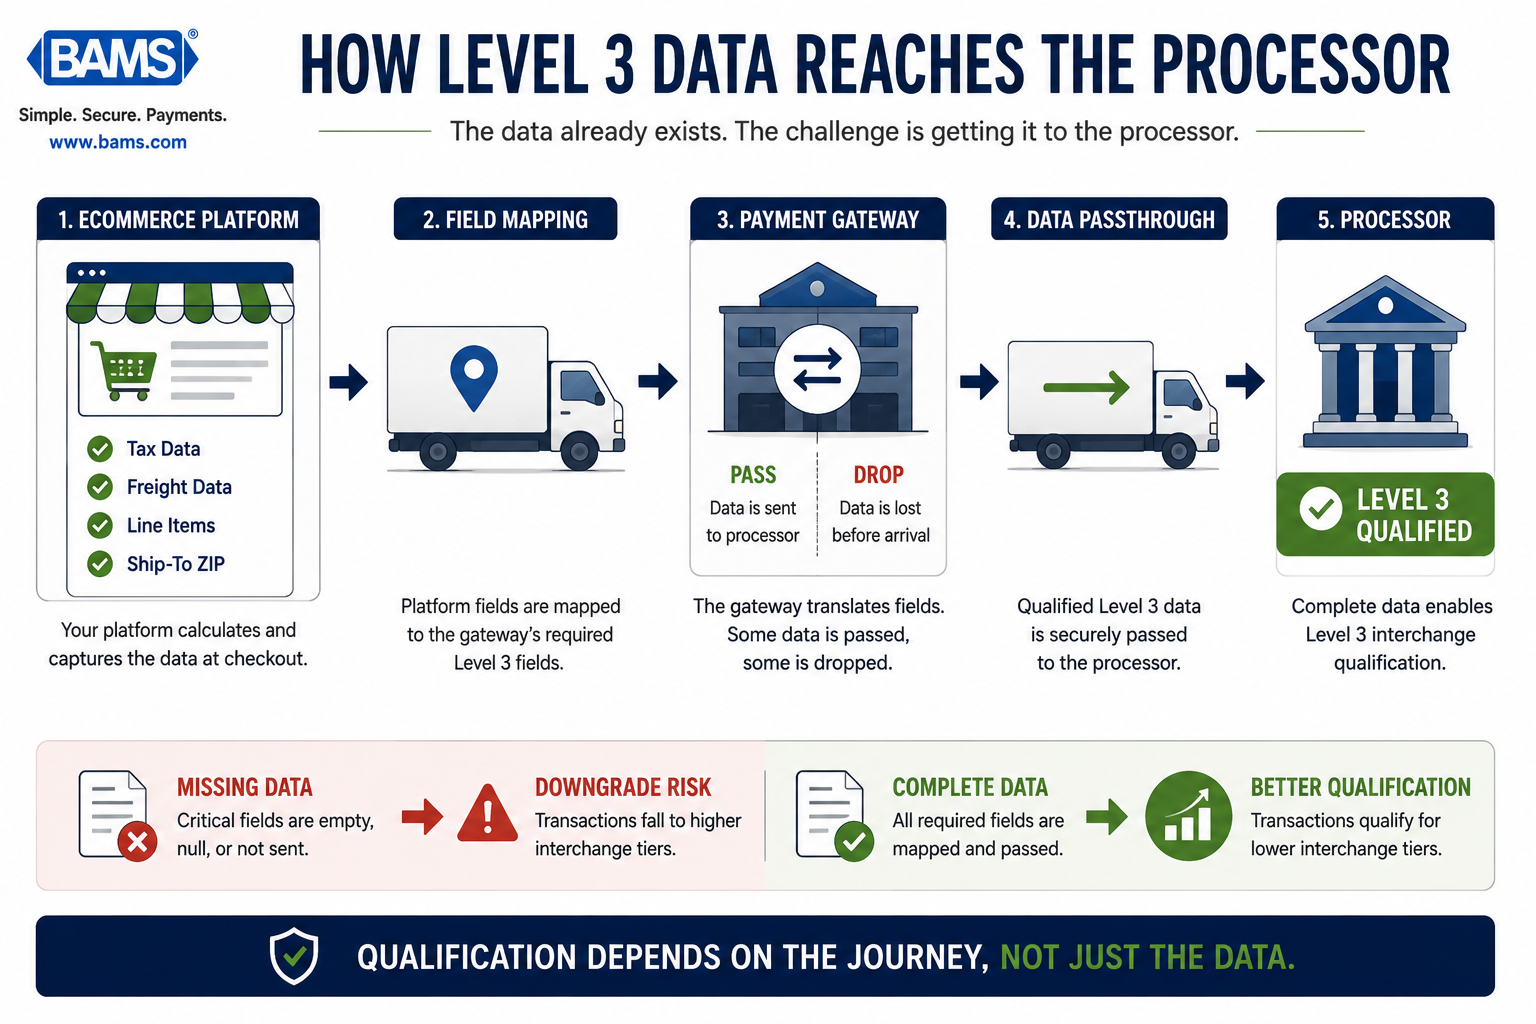
The data already exists. The challenge is getting it to the processor.
Mapping tax and freight fields across platforms follows a four-phase process. Each phase builds on the previous one, and skipping ahead creates blind spots that undermine the work.
- Phase 1: Audit — Identify which fields your platform currently sends to the processor and which are missing.
- Phase 2: Map — Match your platform’s internal field names to the processor’s required Level 3 field names.
- Phase 3: Configure — Implement the field passthrough in your payment gateway integration, plugin, or API layer.
- Phase 4: Verify — Confirm that transactions are qualifying at the expected interchange tier after configuration.
These phases apply regardless of which eCommerce platform you use. The specific field names and configuration steps differ by platform, but the logic is universal. Think of it as a translation problem: your cart speaks one language, your processor speaks another, and your payment gateway integration is the translator that either passes or drops the critical fields.
Step-by-Step Breakdown: Mapping Tax and Freight Fields for Level 3 Qualification
Step 1: Audit Your Current Data Passthrough
Objective: Determine exactly which transaction fields currently reach your processor, and identify the gaps.
Start by pulling a recent processing statement. If you’re on interchange-plus pricing, look for transaction-level detail that shows the interchange category each transaction qualified under. Transactions labeled as “Standard,” “Non-Qualified,” or “EIRF” (Electronic Interchange Reimbursement Fee) are almost always downgrades caused by missing data fields.
Next, check your payment gateway’s transaction log. Most gateways (Authorize.Net, Braintree, Stripe) provide a detailed view of what data was sent with each authorization request. Look specifically for: tax amount, tax exempt indicator, freight/shipping amount, ship-to zip code, and line-item array. If any of these fields show as null, empty, or absent, you’ve found your gap.
Anti-patterns to avoid: Don’t assume your platform handles this automatically. Don’t rely on your processor’s word alone. Verify by examining the raw transaction data in your gateway dashboard. Also avoid auditing only one transaction type. Check both B2B and B2C orders, as commercial cards are where Level 3 savings apply.
Success indicators: You have a documented list of which Level 3 fields are currently populated and which are missing, broken down by transaction type. You can identify the interchange categories your commercial card transactions are qualifying under. If you need a detailed diagnostic, this checklist of seven commonly missing L3 fields maps each gap to the specific downgrade it triggers.
Step 2: Map Platform Fields to Processor Requirements
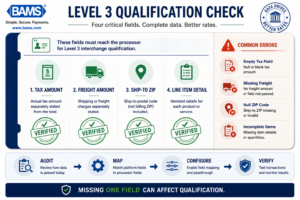
Most qualification failures come from a small number of missing fields.
Objective: Create a one-to-one mapping between your eCommerce platform’s internal field names and the Level 3 field names your processor expects.
This is where platform-specific knowledge matters. Every eCommerce system stores tax and shipping data, but they label it differently. Here’s where the critical fields live in the four major platforms:
- Shopify: Tax fields are stored in
tax_lineson the order object. Shipping is inshipping_lines. These fields are available via Shopify’s API but are not passed to most payment gateways by default. You’ll need a middleware app or custom integration to extract and forward them. - WooCommerce: Tax totals live in
order->get_total_tax()and shipping inorder->get_shipping_total(). WooCommerce payment gateway plugins vary widely in whether they pass these fields. Check your specific gateway plugin’s settings for “Level 2/3 data” or “enhanced data” options. - BigCommerce: Tax is in the order’s
total_taxfield, shipping inshipping_cost_total. BigCommerce’s native integrations with certain processors support Level 2 data, but Level 3 (line-item detail) typically requires API-level customization. - Magento/Adobe Commerce: Tax and shipping are in the order’s
tax_amountandshipping_amountfields. Magento has the most mature Level 3 support through extensions, but the default checkout does not pass this data without configuration.
Anti-patterns to avoid: Don’t map fields based on documentation alone. Test with a live transaction to confirm the field names match what actually gets sent. Don’t confuse display fields (what the customer sees on the receipt) with API fields (what gets sent to the processor). They are often different objects entirely.
Success indicators: You have a written mapping document that shows: platform field name → gateway field name → processor field name, for tax amount, freight amount, ship-to postal code, and at least one line-item field. This document becomes your configuration blueprint.
Step 3: Configure the Gateway Passthrough
Objective: Implement the actual field mapping in your payment gateway so tax, freight, and line-item data reach the processor with every qualifying transaction.
The configuration method depends on your gateway integration type. There are three common approaches:
Plugin/Extension Settings: Some gateway plugins (particularly for WooCommerce and Magento) include a “Level 2/3 Data” toggle or section in their settings panel. If your plugin has this, enable it and map the fields according to your Step 2 document. This is the lowest-effort path.
Middleware or App: For Shopify and platforms where the native gateway plugin doesn’t support enhanced data, you’ll need a middleware layer. This is typically a server-side application that intercepts the order data after checkout, enriches the payment authorization with the required fields, and forwards it to the processor. Some merchant services providers, including BAMS, offer guidance on configuring these integrations as part of their account management, helping merchants identify which middleware solutions work with their specific platform and processor combination.
Direct API Integration: If you have developer resources, the most reliable method is to modify your payment authorization call to include Level 3 fields directly. This means editing the API request to your gateway to include tax, freight, line-item arrays, and ship-to postal code. Most major gateway APIs (Authorize.Net, Braintree, NMI) document their Level 3 fields in their developer references.
Anti-patterns to avoid: Don’t enable Level 3 fields without testing in a sandbox environment first. Malformed data (negative tax values, missing decimal places, freight amounts that don’t match the order total) can cause authorization failures. Don’t assume one configuration works for all card types. Visa and Mastercard have slightly different Level 3 field requirements.
Success indicators: A test transaction in your sandbox or staging environment shows all required Level 3 fields populated in the gateway’s transaction detail view. The authorization response does not return errors related to data formatting.
Step 4: Validate Tax Field Accuracy
Objective: Ensure the tax amount passed to the processor matches the tax amount on the order, and that tax-exempt transactions are flagged correctly.
Tax field errors are the most common cause of Level 3 qualification failures even after configuration. The processor expects the tax amount to be a positive decimal value that matches the tax calculated on the order. If your platform calculates tax using a third-party service (Avalara, TaxJar, Vertex), there can be a timing mismatch where the tax amount is calculated after the payment authorization is sent.
For tax-exempt orders (common in B2B and government purchasing), you must pass a tax-exempt indicator rather than a zero tax amount. The distinction matters: a zero tax amount without the exempt flag can trigger a downgrade because the network interprets it as missing data rather than a legitimate exemption.
Anti-patterns to avoid: Don’t hardcode tax amounts. Always pull the calculated tax from the order object dynamically. Don’t ignore tax-exempt scenarios. If you sell to businesses or government agencies, your tax-exempt flag logic is just as important as your tax amount logic.
Success indicators: Tax amounts in your gateway transaction logs match tax amounts on corresponding orders in your eCommerce platform, across at least 20 test transactions. Tax-exempt orders show the exempt indicator in the gateway log.
Step 5: Validate Freight Field Accuracy
Objective: Ensure the freight/shipping amount passed to the processor matches the shipping charge on the order, including handling free shipping and multi-shipment orders correctly.
Freight field mapping introduces edge cases that tax fields don’t have. Free shipping orders should pass a freight amount of $0.00 (not null or empty). Orders with multiple shipments need the total freight amount, not individual shipment amounts. Orders where shipping is calculated after authorization (common with real-time carrier rate plugins) may require a post-authorization update to include the final freight amount.
The most overlooked scenario is digital-only orders. If your store sells both physical and digital products, digital orders have no freight. Your configuration needs to handle this gracefully by passing $0.00 for freight on digital orders rather than omitting the field entirely.
Anti-patterns to avoid: Don’t leave the freight field null on free shipping orders. A null field is interpreted as missing data, while $0.00 is interpreted as a valid value. Don’t pass estimated shipping amounts. If your shipping calculation finalizes after authorization, use a capture-time update to pass the final amount.
Success indicators: Freight amounts in gateway logs match shipping charges across all order types: standard shipping, free shipping, expedited, and digital-only. No freight fields show as null or empty.
Step 6: Test End-to-End Qualification
Objective: Confirm that live transactions are actually qualifying at the lower interchange tier after all field configurations are in place.
Configuration is not qualification. Just because your gateway shows the fields as populated doesn’t guarantee the card network accepted them and applied the lower rate. The only way to verify is to process live transactions and check the interchange qualification on your next processing statement.
Run at least 10 live commercial card transactions (corporate cards, purchasing cards, or government cards) through your configured checkout. Wait for the transactions to settle and appear on your processing statement. Check the interchange category for each transaction. You’re looking for categories like “Commercial Level III” or “Purchasing Card Level III” rather than “Standard” or “EIRF.”
If transactions are still downgrading after configuration, the most likely causes are: a field formatting error (wrong decimal places, wrong data type), a missing required field you didn’t identify in the audit, or a gateway that silently strips enhanced data before forwarding to the processor. Go back to Step 1 and re-audit the specific transactions that downgraded.
Anti-patterns to avoid: Don’t declare success based on gateway logs alone. Only the processing statement confirms actual interchange qualification. Don’t test with consumer credit cards. Level 3 rates only apply to commercial, corporate, and purchasing cards.
Success indicators: At least 80% of commercial card transactions on your next statement qualify at Level 2 or Level 3 interchange categories. Your effective processing rate on commercial card volume has decreased compared to the pre-configuration baseline.
Step 7: Monitor and Maintain Over Time
Objective: Establish ongoing monitoring to catch qualification regressions caused by platform updates, gateway changes, or new product types.
Field mapping is not a one-time project. Platform updates can reset gateway plugin settings. New product types (subscriptions, bundles, digital goods) may not pass through the same field mapping logic. Gateway provider updates can change API field names or deprecate endpoints.
Set a monthly review cadence. Pull your processing statement and check the percentage of commercial card transactions qualifying at Level 3. Track your effective processing rate on commercial card volume as a single metric. If it rises without a change in your card mix, something in your field mapping has broken.
Leveraging payments data can deliver a 20% increase in operational efficiency when monitored consistently. The merchants who benefit most from Level 3 optimization are the ones who treat it as an ongoing process, not a one-time fix.
Anti-patterns to avoid: Don’t assume that once configured, the mapping will persist indefinitely. Don’t ignore small effective rate increases. A 0.1% drift on a high-volume month can cost hundreds of dollars.
Success indicators: Monthly effective processing rate on commercial cards remains stable or improves. Qualification regressions are caught within one billing cycle. You have a documented escalation path for when downgrades reappear.
Practical Examples: Before and After Field Mapping
Scenario 1: B2B Wholesaler on WooCommerce
A wholesale distributor processing $80,000/month in corporate card orders on WooCommerce was paying an effective rate of 2.95% on commercial transactions. Their gateway plugin (WooCommerce Authorize.Net) had Level 2/3 fields available but disabled by default. After enabling the enhanced data settings and mapping get_total_tax() and get_shipping_total() to the gateway’s Level 3 fields, their commercial card effective rate dropped to 2.35%. That 0.60% reduction on $80,000/month recovered $480/month, or $5,760 annually.
Scenario 2: Industrial Supplier on Shopify
An industrial parts supplier on Shopify Plus processed $150,000/month in government purchase card orders. Shopify’s native checkout doesn’t pass Level 3 data to most gateways. They implemented a middleware solution that pulled tax and freight from Shopify’s order API and appended it to the payment authorization via a custom gateway integration. The result: 85% of government card transactions qualified at Level 3, down from 0% previously. Their annual savings exceeded $12,000. BAMS’ dedicated account management helped them identify the right middleware approach and verify qualification on their statements.
Scenario 3: The Free Shipping Trap
A B2B eCommerce brand offering free shipping on all orders over $500 configured their Level 3 fields correctly for tax and line items but left the freight field empty on free shipping orders (instead of passing $0.00). Every free-shipping order downgraded to Standard interchange. Since 70% of their orders qualified for free shipping, the majority of their commercial card volume was still paying retail rates. The fix took five minutes: set the freight field default to $0.00 instead of null. The impact was immediate on the next billing cycle.
Common Mistakes and Pitfalls
The most predictable failure is assuming your platform handles Level 3 data automatically. It almost certainly doesn’t. Merchants who skip the audit phase and jump straight to configuration often miss fields they didn’t know were required.
Another common mistake is testing with consumer cards. Level 3 rates only apply to commercial, corporate, purchasing, and government cards. Running a test with your personal Visa and seeing no rate change doesn’t mean the configuration failed.
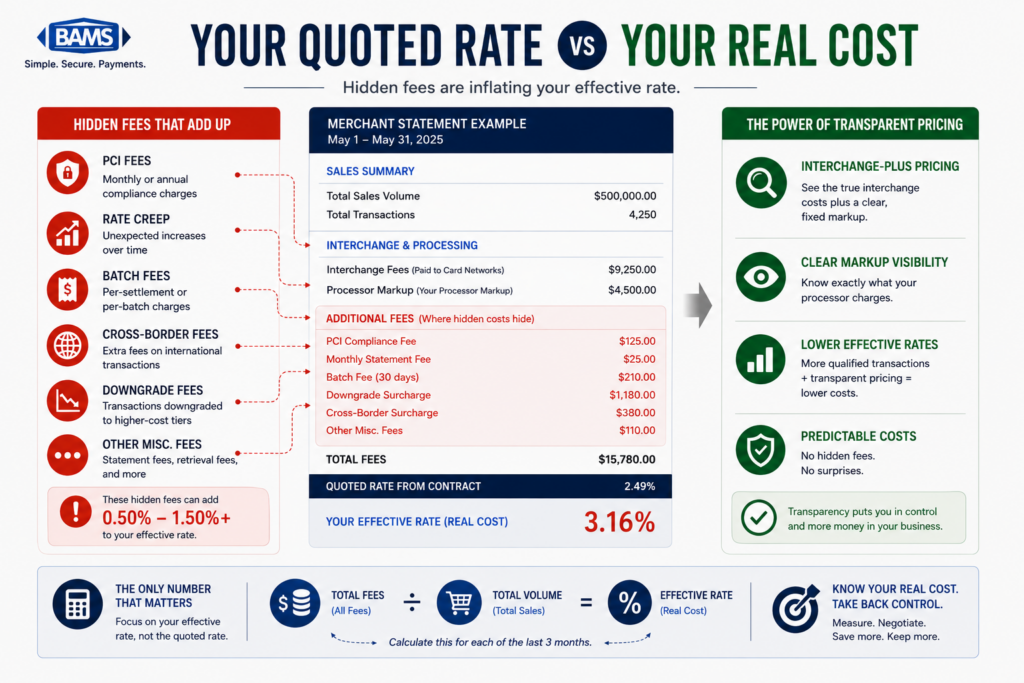
Flat-rate pricing hides the entire problem. If you’re paying 2.9% + $0.30 on every transaction regardless of data quality, you have no visibility into downgrades and no financial incentive to optimize. Switching to interchange-plus pricing is the prerequisite that makes everything else in this guide actionable. If you’re evaluating that switch, comparing ACH and card costs for B2B orders can further clarify where your biggest savings opportunities are.
Finally, treating this as a one-time project instead of an ongoing process is the most expensive long-term mistake. Platform updates break configurations silently, and the cost accumulates for months before anyone notices.
What to Do Next
Start with the audit. Pull your most recent processing statement and identify how many commercial card transactions qualified at Standard or Non-Qualified tiers. That number is your baseline, and it tells you exactly how much money is recoverable.
If you’re on flat-rate pricing, your first step is different: request an interchange-plus quote from your processor so you can see the actual qualification data. Without that visibility, optimization is impossible.
You don’t need to map every field across every platform in one sprint. Start with tax and freight on your highest-volume commercial card transaction type. Verify qualification on one billing cycle. Then expand to line-item detail and additional card types. Incremental progress compounds quickly when you’re recovering basis points on every transaction.
Revisit this guide as a reference when platforms update, when you add new product types, or when your effective rate drifts upward. The field mapping itself is straightforward. The discipline of maintaining it is what separates merchants who save money once from those who save money permanently.
Frequently Asked Questions
What are the best strategies to reduce payment processing fees?
The highest-impact strategy for B2B eCommerce merchants is ensuring your transactions pass Level 2 and Level 3 data (tax, freight, line-item detail) to qualify for lower interchange tiers. Beyond that, switching from flat-rate to interchange-plus pricing gives you visibility into where you’re overpaying. Encouraging lower-cost payment methods like ACH for high-ticket orders and regularly auditing your processing statements for downgrades are also effective. Each of these strategies targets a different layer of your total processing cost.
Why is interchange-plus pricing more beneficial than flat-rate pricing?
Interchange-plus pricing separates the interchange fee (set by the card network) from the processor’s markup, so you can see exactly what you’re paying and why. This transparency is essential for Level 3 optimization because it lets you identify which transactions are downgrading to higher interchange tiers due to missing data. Flat-rate pricing bundles everything into one percentage, hiding downgrades and eliminating your ability to optimize. If you process significant commercial card volume, interchange-plus is the only pricing model that lets you benefit from field mapping work.
How can I audit my payment processing statements for hidden fees?
Look at the interchange category column on your statement. Transactions labeled “Standard,” “Non-Qualified,” or “EIRF” are being downgraded, which means you’re paying more than necessary. Calculate your effective processing rate by dividing total fees by total volume. Compare this rate month over month. If it fluctuates without a change in your card mix, you likely have inconsistent data passthrough. Focus especially on commercial, corporate, and purchasing card transactions, as these have the widest spread between qualified and non-qualified rates.
How does optimizing transaction data affect processing fees?
When your eCommerce platform sends complete transaction data (tax amount, freight amount, ship-to postal code, line-item detail) to the processor, the card network qualifies the transaction at a lower interchange tier. Completing tax, freight, and line-item fields can move a transaction to a lower interchange tier, reducing the largest component of your processing cost. The difference between Level 1 and Level 3 qualification can be 0.3% to 0.9% per transaction, depending on the card type.
Do all credit card transactions benefit from Level 3 data?
No. Level 3 interchange rates apply specifically to commercial, corporate, purchasing, and government cards. Consumer credit and debit cards have their own interchange schedules that don’t include Level 3 tiers. This is why testing with a personal credit card won’t show any rate improvement. The merchants who benefit most are those with significant B2B, wholesale, or government sales where buyers use commercial purchasing cards.
When should I negotiate my processing rates with my payment provider?
Negotiate after you’ve optimized your transaction data, not before. If your transactions are downgrading due to missing Level 3 fields, negotiating a lower markup won’t address the largest portion of your fees (interchange). Fix your data passthrough first, then negotiate the processor’s markup with evidence of your improved qualification rates. You’ll have more leverage because your processor benefits from lower interchange costs too. Revisit negotiations annually or whenever your monthly volume increases significantly.