
Apple Pay Transaction Fees: A Complete Guide for Merchants
Last Updated on October 7, 2026 by Dimitri Akhrin
Unpack the layered fee structure behind every tap-to-pay transaction and stop overpaying your processor
Learn how Apple Pay transaction fees actually work across interchange, processor markup, and hidden charges. This guide helps eCommerce managers pinpoint where costs originate and qualify for faster deposit settlement.
TL;DR
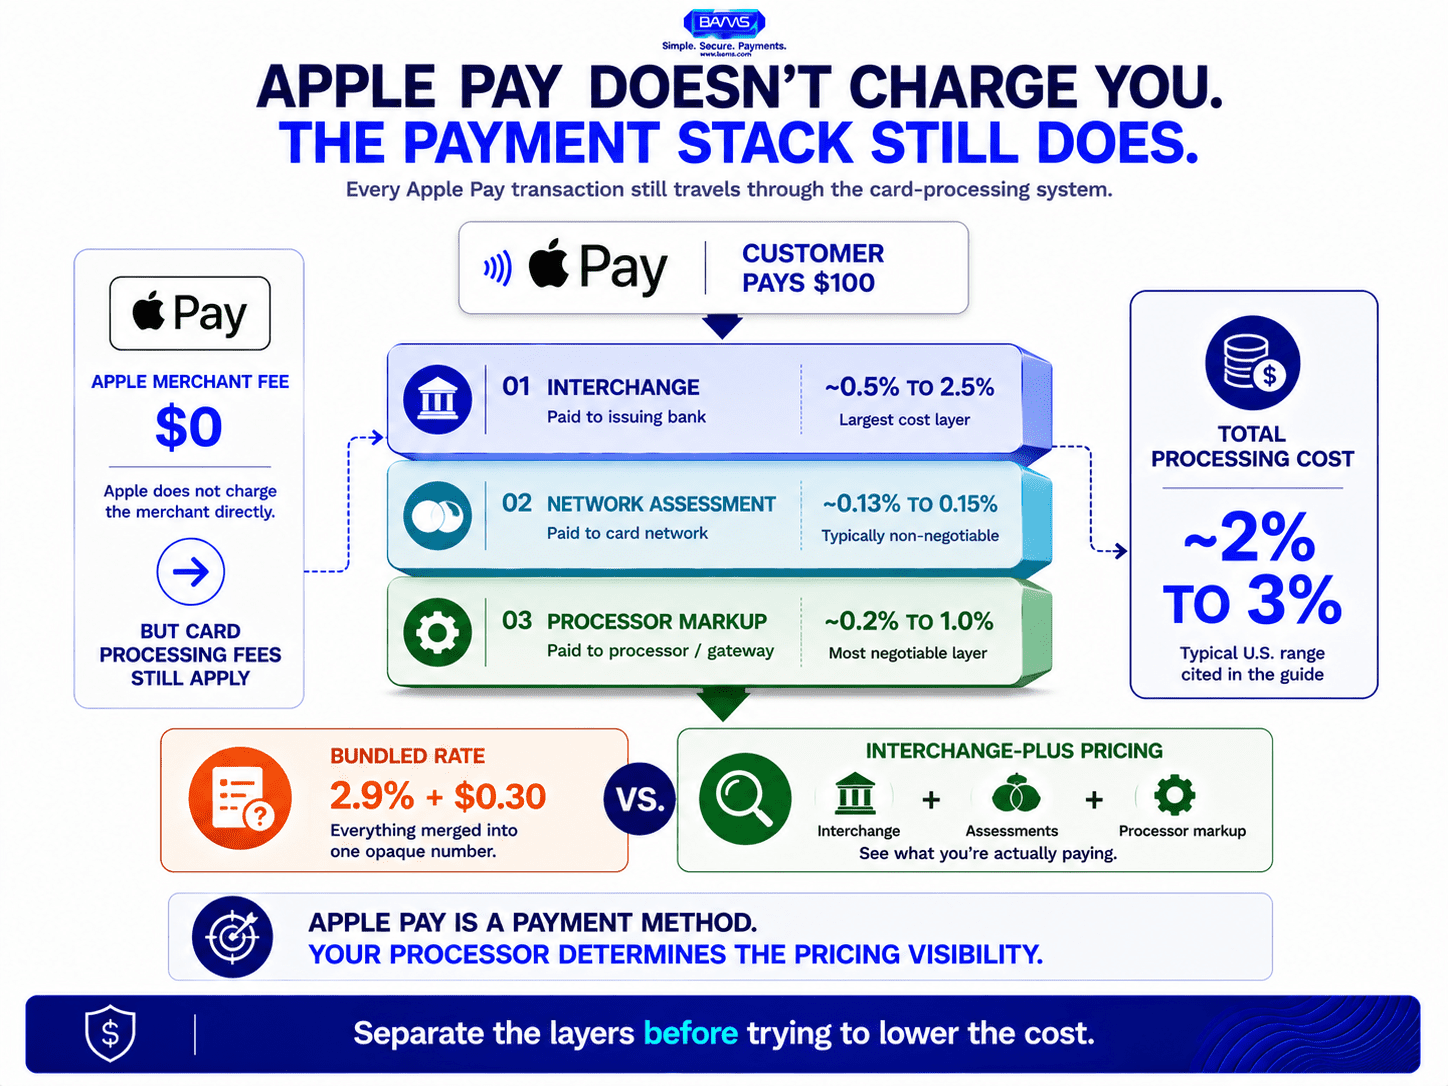
- Apple charges you nothing, but Apple Pay is not free to accept. Your interchange fees, network assessments, and processor markup still apply to every Apple Pay transaction, totaling 2% to 3% of the purchase price in the U.S.
- Bundled pricing hides your real costs. Switch to interchange-plus pricing so you can see interchange, assessments, and processor markup as separate line items and identify where you are overpaying.
- Interchange downgrades silently inflate your fees. Missing transaction data (AVS, tax amounts, timely settlement) pushes transactions into higher-cost interchange tiers. Fix your gateway configuration to prevent this.
- Deposit delays are a cash flow cost, not just an inconvenience. Qualifying for next-day funding by maintaining low chargeback ratios and clean account standing frees up working capital that would otherwise sit in a processing queue for days.
- Payment optimization is ongoing, not one-time. Audit your effective rate, downgrade frequency, and deposit timing monthly. Interchange tables change twice a year, and processor fees drift upward without active management.
Guide Orientation: What This Guide Covers and Who It’s For
This guide breaks down the real cost of Apple Pay transaction fees for eCommerce businesses, then shows you exactly how to eliminate the deposit delays that quietly erode your cash flow. It is written for eCommerce managers at established online businesses (roughly 10 to 50 employees) who already accept or plan to accept Apple Pay for business and want to stop leaving money on the table.
By the end, you’ll understand the layered fee structure behind every mobile wallet transaction, know how to identify where your processing costs actually originate, and have a clear method for qualifying for faster settlement so your revenue lands in your bank account the next business day instead of three to five days later.
This guide does not cover Apple Pay device setup, consumer-side how-tos, or tokenization security deep-dives. Those topics are well-documented elsewhere. Instead, we focus on what happens after the customer taps “Pay”: the fees, the settlement timeline, and the levers you can pull to fix both.
Why Apple Pay Transaction Fees and Deposit Speed Matter Now
Mobile wallet adoption is accelerating. More of your customers expect to check out with Apple Pay, Google Pay, or similar digital wallets, and refusing those payment methods costs you conversions. But accepting them without understanding the underlying cost structure costs you margin.
Here is the core distinction: Apple states that it does not charge merchants, network operators, developers or users a fee for Apple Pay. That statement is technically accurate, and it is also deeply misleading if you stop reading there. Your payment processor, the card networks, and the issuing banks all still collect their standard fees on every Apple Pay transaction. The result is a total cost that can reach 2 to 3% of the purchase price in the U.S., layered across interchange, assessments, and processor markup.
On top of those fees, most processors batch Apple Pay transactions into standard settlement windows of two to three business days. For an eCommerce operation running lean, that delay compounds. Payroll, ad spend, and inventory purchases all depend on predictable cash flow. Every extra day your deposits sit in a processing queue is a day you’re financing your own business with your own revenue, just on someone else’s timeline.
The cost of inaction is not dramatic. It is incremental and persistent. A few basis points of unnecessary interchange here, a two-day funding delay there. Over a year, these small leaks add up to thousands of dollars in lost margin and constrained working capital.
Core Concepts: The Layered Cost Structure Behind Every Apple Pay Transaction
Apple’s Role (and Non-Role) in Merchant Fees
Apple confirmed in a submission to New Zealand’s Commerce Commission that it does not charge fees to merchants, network operators, developers or users for Apple Pay. Apple instead charges participating card issuers based on its agreements with those issuers, and Apple states that those fees are not directly linked to interchange or card network fees.
The Three Fee Layers You Actually Pay

Apple does not charge merchants to accept Apple Pay, but the underlying card transaction still carries interchange, network and processor costs.
Every Apple Pay transaction you process includes three distinct cost layers, and understanding them is the foundation for reducing your total expense:
- Interchange fees: Paid to the cardholder’s financial institution. Visa’s published U.S. interchange schedule shows that rates vary by card product, transaction type, merchant category and qualification criteria.
- Network fees: Card networks may assess additional fees associated with processing transactions. These are separate from your processor’s own markup.
- Processor markup: Paid to your payment processor for its processing, settlement, reporting and other services. The amount depends on your processor agreement and pricing model.
When a processor quotes you a single blended rate, these cost layers are combined. That bundling can make it harder to identify which portion of your processing cost comes from interchange and which portion comes from your processor’s own pricing.
Settlement vs. Funding: A Critical Distinction
Settlement is the process of clearing and reconciling the transaction between all parties in the payments stack. Funding is when the money actually arrives in your bank account. Many processors settle quickly but fund slowly. The gap between those two events is where deposit delays live, and it is where most eCommerce managers lose visibility into their cash position.
Reducing transaction cost and reducing deposit delay are related but separate goals. One improves margin, while the other improves working-capital timing.
The Framework: Four Phases to Faster, Cheaper Apple Pay Processing
Eliminating deposit delays and reducing Apple Pay transaction fees is not a single fix. It is a four-phase process that moves from diagnosis to optimization:
- Phase 1: Unbundle Your Costs. Separate interchange, assessments, and processor markup so you can see each layer independently.
- Phase 2: Fix Data Quality. Ensure your transactions submit the data fields required to qualify for the lowest interchange tiers.
- Phase 3: Accelerate Settlement. Qualify for next-day or same-day funding by meeting processor requirements for account standing, volume, and chargeback ratios.
- Phase 4: Monitor and Maintain. Build a recurring review process that catches rate creep, interchange downgrades, and new fee categories before they compound.
Each phase builds on the previous one. You cannot negotiate processor markup effectively until you can see it in isolation. You cannot qualify for faster funding until your chargeback ratio and data quality meet threshold requirements. The steps below walk you through each phase in detail.
Step-by-Step: How to Eliminate Deposit Delays and Reduce Apple Pay Fees
Step 1: Unbundle Your Processing Statement
Objective: Move from a blended rate to an interchange-plus pricing model so you can see exactly what you pay at each layer.
Most eCommerce businesses start with a flat-rate or tiered pricing model. These are simple to understand, but they obscure the actual cost of each transaction. A flat rate of 2.9% + $0.30 might be competitive for some card types and wildly expensive for others. You will never know unless you unbundle.
Request your current processing statement and look for these line items: interchange fees by card type, network assessment fees, and processor markup. If your statement shows only a single rate per transaction, you are on bundled pricing and you are almost certainly overpaying on a meaningful percentage of your volume.
Contact your processor and ask to switch to interchange-plus pricing. This model passes interchange and assessment fees through at cost, then adds a fixed markup on top. It is the most transparent structure available, and it is the only one that lets you diagnose problems in Steps 2 through 4.
Anti-patterns: Do not accept a “qualified/mid-qualified/non-qualified” tiered model as a substitute for interchange-plus. Tiered pricing gives processors discretion to reclassify transactions into higher-cost buckets. Also avoid comparing processors on markup alone without understanding the interchange rates your transactions actually qualify for.
Success indicators: You can identify the interchange rate, assessment fee, and processor markup for any individual Apple Pay transaction on your statement. You know your effective rate (total fees divided by total volume) and can break it into its component parts.
Step 2: Optimize Transaction Data to Prevent Interchange Downgrades
Objective: Submit complete transaction data so every Apple Pay payment qualifies for the lowest applicable interchange tier.
Interchange rates are not fixed. They vary based on dozens of factors, including card type (rewards vs. standard, consumer vs. commercial), transaction method (card-present vs. card-not-present), and the data fields you submit with each transaction. When required data is missing or incomplete, the transaction gets “downgraded” to a higher interchange tier. You pay more, and you often do not realize it.
For eCommerce Apple Pay transactions, common downgrade triggers include missing Level II data (tax amount, customer code) for commercial cards, failing to settle within the required window (usually 24 hours of authorization), and not passing AVS (Address Verification Service) data.
Interchange rates are not fixed. They vary based on card product, transaction type and qualification requirements. Visa’s published U.S. interchange schedule includes different card-not-present and eCommerce categories as well as incentives tied to qualifying authentication and tokenization criteria. When a transaction fails to meet the applicable requirements, it may qualify differently and cost more to process.
Work with your payment gateway to ensure your integration passes all available data fields. For a deeper walkthrough of interchange optimization specific to Apple Pay, see this interchange fee optimization guide for Apple Pay. Audit your transactions monthly for downgrade frequency and identify the root cause of each one.
Anti-patterns: Do not assume your payment gateway handles data submission automatically. Many default configurations omit optional fields that are required for optimal interchange qualification. Do not ignore commercial or corporate card transactions, as these have the widest spread between qualified and downgraded rates.
Success indicators: Your downgrade rate declines from its established baseline, and you can identify the reason for transactions that fail to reach their expected interchange category.
Step 3: Qualify for Next-Day Funding
Objective: Reduce the gap between transaction settlement and deposit arrival from two to five business days down to one business day.
This is the step most directly tied to eliminating deposit delays, and it is the one that competitor guides almost universally ignore. The technical integration of Apple Pay is well-documented. What happens to your money after the customer pays is not.
Most processors offer next-day funding as an option, but qualification is not automatic. Common requirements include maintaining a chargeback ratio below 1% (and ideally below 0.5%), processing a minimum monthly volume, maintaining a verified and stable bank account relationship, and having a clean account history with no unresolved disputes or holds.
If your current processor does not offer next-day funding, or charges a premium for it, this is a strong signal to evaluate alternatives. BAMS, for example, provides next-day funding as a standard feature for qualifying merchants, removing the cash flow penalty that most processors impose through delayed settlement windows.
To prepare for next-day funding qualification, clean up your chargeback process first. Implement chargeback alerts, use clear billing descriptors so customers recognize your charges, and respond to disputes within 24 hours. A high chargeback ratio is the single most common reason processors deny faster funding or place rolling reserves on merchant accounts.
Anti-patterns: Do not assume next-day funding means same-day access. Funds deposited “next day” typically arrive the following business day, so weekends and holidays still create gaps. Do not ignore the fine print: some processors offer next-day funding but exclude certain transaction types, high-ticket sales, or new merchant accounts from eligibility.
Success indicators: Your deposits consistently arrive the next business day after batch settlement. Your chargeback ratio stays below 0.5%. You have no rolling reserves or funding holds on your account.
Step 4: Negotiate Processor Markup With Data in Hand
Objective: Reduce the processor markup layer of your fees using the cost visibility you built in Steps 1 through 3.
Once you are on interchange-plus pricing and your transactions consistently qualify for optimal interchange tiers, the only remaining variable is your processor’s markup. This is where negotiation creates direct bottom-line impact.
Approach this negotiation with specifics. Know your monthly volume, average ticket size, chargeback ratio, and effective rate. Processors price risk, and a merchant who can demonstrate low chargebacks, consistent volume, and clean data is a lower-risk account that justifies a lower markup.
Request a markup reduction, or solicit competing quotes on an interchange-plus basis so you can compare processor markups directly. When evaluating alternatives, factor in funding speed, support responsiveness, and contract terms (particularly early termination fees and rate escalation clauses). The cheapest markup means nothing if the processor holds your funds for three extra days or takes 48 hours to respond to a critical issue.
Anti-patterns: Do not negotiate based on your blended rate alone. A processor can lower your quoted rate while shifting costs into non-negotiable fees (PCI compliance fees, batch fees, statement fees) that offset the savings. Always negotiate on total cost, including all ancillary fees. Do not sign long-term contracts with auto-renewal and early termination penalties without understanding the exit cost.
Success indicators: Your processor markup is at or below 0.3% + $0.10 per transaction for standard eCommerce volume. Your total effective rate (all fees included) has decreased measurably from your pre-optimization baseline.
Step 5: Build a Recurring Cost and Settlement Audit
Objective: Create a repeatable monthly process that catches fee increases, interchange downgrades, and settlement anomalies before they compound.
Payment processing costs drift upward over time. Card networks update interchange tables twice a year. Processors add or increase ancillary fees. Your transaction mix shifts as your product catalog, customer base, or average order value changes. Without a recurring audit, the savings you captured in Steps 1 through 4 will erode within six to twelve months.
Set a monthly calendar reminder to review three metrics: your effective rate (total fees divided by total processing volume), your downgrade rate, and your average deposit timing. Compare each metric to the previous month and to your post-optimization baseline. Any upward movement in effective rate or deposit timing warrants investigation.
Track interchange table updates from Visa and Mastercard, which typically publish changes in April and October. When new categories appear or existing rates shift, verify that your transactions are mapping to the correct (and lowest applicable) category. Your processor should notify you of these changes, but not all do proactively.
For businesses processing mobile payment solutions across multiple channels (online, in-app, in-store), reconcile each channel’s settlement timeline separately. Deposit delays sometimes affect one channel but not others, and channel-specific issues are easy to miss in aggregate reporting.
Anti-patterns: Do not delegate this audit entirely to your processor. They have limited incentive to flag cost increases that benefit them. Do not treat this as a one-time project. The merchants who maintain the lowest processing costs treat fee management as an ongoing operational function, not a periodic negotiation.
Success indicators: You have a documented monthly review process with clear metrics and thresholds. Your effective rate remains stable or decreases quarter over quarter. You catch and address interchange table changes within 30 days of publication.
Practical Examples: Seeing the Framework in Action
Scenario A: The Hidden Cost of Bundled Pricing
An eCommerce retailer processing $150,000 per month in Apple Pay transactions is on a flat rate of 2.9% + $0.30. Their monthly processing cost is approximately $4,350 plus per-transaction fees. After switching to interchange-plus pricing, they discover that 40% of their transactions are debit cards with interchange rates below 1.0%. Their actual interchange-weighted cost should be closer to 2.1% + processor markup. The flat rate was costing them an extra $1,200 per month, or $14,400 annually.
Scenario B: Deposit Delay Compounding
A mid-size online brand processes $80,000 weekly. Their processor funds on a three-day rolling basis, meaning roughly $34,000 is always in transit. When they qualify for next-day funding, that float drops to approximately $11,000. The freed-up $23,000 in working capital eliminates the need for a short-term credit line they were using to cover weekly ad spend, saving them an additional $2,800 per year in interest.
Scenario C: Interchange Downgrade Discovery
An eCommerce manager audits their statement and finds that 15% of transactions are settling at a “standard” interchange tier instead of the “preferred eCommerce” tier. The root cause: their payment gateway was not passing the customer’s ZIP code for AVS verification on Apple Pay transactions. A single configuration change in their gateway settings drops their effective interchange rate by 0.35%, saving over $6,000 annually on $200,000 in monthly volume.
Common Mistakes and Pitfalls
The most common mistake is treating Apple Pay acceptance as a set-it-and-forget-it integration. The checkout experience may work perfectly while the cost structure quietly deteriorates behind the scenes.
Other frequent errors include:
- Confusing “Apple doesn’t charge fees” with “Apple Pay is free to accept.” The payment stack underneath Apple Pay carries the same (and sometimes higher) costs as traditional card processing.
- Ignoring settlement timing as a cost. Delayed deposits are a real financial cost, even if they do not appear as a line item on your processing statement.
- Negotiating rates without data. Asking for a lower rate without knowing your interchange breakdown, downgrade frequency, and chargeback ratio gives your processor no reason to offer meaningful concessions.
- Overlooking ancillary fees. PCI non-compliance fees, batch fees, and monthly minimums can add hundreds of dollars that offset any rate reduction you negotiate.
These are normal oversights, not signs of negligence. The payments industry is complex by design, and most of these cost layers are intentionally opaque. The goal is not perfection but progressive visibility and control.
What to Do Next
Start with Step 1. Pull your most recent processing statement and determine whether you are on bundled or interchange-plus pricing. If you cannot identify interchange, assessment, and processor markup as separate line items, you are on bundled pricing and that single change will give you the visibility to make every subsequent decision.
If you are already on interchange-plus, skip to Step 2 and audit your downgrade rate. Even a 10% downgrade frequency on moderate volume translates to meaningful annual savings when corrected.
You do not need to execute all five steps in a single week. Treat this guide as a reference you return to as each phase is complete. The merchants who see the best results approach payment optimization as an ongoing discipline, not a one-time overhaul. Each incremental improvement in fee structure or funding speed compounds over time, turning your Apple Pay acceptance from a passive checkout feature into an active cash flow advantage.
Frequently Asked Questions
Does Apple charge merchants a fee for Apple Pay transactions?
No. Apple has confirmed it does not charge merchants, developers, or users any fee for Apple Pay. Apple collects approximately 0.15% from the card-issuing bank, not from you. However, you still pay interchange fees, network assessment fees, and your processor’s markup on every Apple Pay transaction, just as you would with any card payment.
Why are my Apple Pay deposits taking two to five business days?
Deposit timing is controlled by your payment processor, not by Apple. Most processors default to a two- to three-day settlement window. To qualify for next-day funding, you typically need a chargeback ratio below 1%, consistent monthly volume, and a verified bank account. Some processors charge extra for faster funding, while others (like BAMS) include next-day funding as a standard feature for qualifying merchants.
What is an interchange downgrade, and how does it affect my Apple Pay costs?
An interchange downgrade occurs when a transaction fails to meet the data requirements for the lowest applicable interchange rate and is reclassified into a higher-cost tier. Common triggers for eCommerce Apple Pay transactions include missing AVS data, delayed batch settlement, or incomplete Level II data on commercial cards. Each downgrade can add 0.5% to 1.0% to the interchange cost of that transaction.
How much do Apple Pay transaction fees actually cost merchants in the U.S.?
Total merchant costs for Apple Pay transactions in the U.S. typically range from 2% to 3% of the purchase price. This includes interchange (0.5% to 2.5%), network assessments (0.13% to 0.15%), and processor markup (0.2% to 1.0%). The exact cost depends on card type, transaction data quality, and your processor’s pricing model.
Is interchange-plus pricing always better than flat-rate pricing for Apple Pay?
For most established eCommerce businesses processing more than $10,000 per month, interchange-plus pricing is more cost-effective because it passes interchange at cost and adds a transparent markup. Flat-rate pricing can be simpler for very small or low-volume businesses, but it typically overcharges on debit card and low-interchange transactions. The only way to know for certain is to compare your actual interchange costs against your current flat rate.
Which payment processors support Apple Pay integration for eCommerce?
Most major payment processors and gateways support Apple Pay for online transactions, including Stripe, Braintree, Adyen, and many merchant services providers. The more important question is not whether a processor supports Apple Pay, but what pricing model, settlement speed, and support quality they offer. Look for interchange-plus pricing, next-day funding eligibility, and proactive chargeback defense when evaluating processors.
Sources
- https://usa.visa.com/content/dam/VCOM/download/merchants/visa-usa-interchange-reimbursement-fees.pdf
- https://cms.thevalueengineers.nl/uploads/Whitepaper_The_Business_Model_of_Apple_Pay_and_Apple_Card_4280a8c82a.pdf
- https://www.comcom.govt.nz/__data/assets/pdf_file/0029/363764/Apple-Submission-on-Retail-Payment-System-Consultation-on-Costs-to-businesses-and-consumers-of-card-payments-2-September-2024.pdf


