eCommerce Funding Solutions: Defend Your Deposits
Last Updated on August 5, 2026 by Dimitri Akhrin
A step-by-step chargeback defense workflow that lowers rolling reserves and protects next-day funding
Learn a layered chargeback prevention workflow that directly reduces rolling reserve holdbacks and keeps your deposit schedule predictable. Each step connects a specific defense action to a measurable funding outcome.
TL;DR
- Chargebacks directly control your funding terms – Your chargeback ratio determines your rolling reserve percentage (5% to 15% of gross sales withheld for 90 to 180 days) and your eligibility for next-day deposits.
- Prevention beats representment for funding protection – Fixing billing descriptors, deploying pre-dispute alerts, and strengthening delivery tracking prevent chargebacks from ever hitting your ratio, while representment only recovers revenue after the damage is done.
- Follow a specific sequence – Audit your exposure first, categorize root causes, fix descriptors, enroll in alerts, strengthen fulfillment evidence, then negotiate reserve terms with data in hand.
- Quantify the cash flow impact – Model your reserve holdback in dollars. Reducing a 10% reserve to 5% on $300,000 monthly volume frees approximately $90,000 in working capital at steady state.
- Maintain a weekly review cycle – Track your chargeback ratio, reserve balance, and deposit timing every week to catch problems before they escalate into funding disruptions.
What You’ll Achieve: A Defended Funding Baseline
By the end of this tutorial, you’ll have a fully implemented chargeback defense workflow that directly protects your cash flow predictability. Instead of reacting to disputes after they damage your deposit schedule, you’ll build a layered prevention system that keeps your rolling reserve exposure low and your next-day funding eligibility intact.
Your success criteria are concrete: a documented chargeback ratio below your processor’s threshold, a reserve holdback rate you’ve actively negotiated downward, and a deposit schedule you can forecast with confidence. Each step connects a specific defense action to a measurable funding outcome, so you’ll know exactly where you stand.
Prerequisites and Setup
Before you begin, confirm you have access to the following. Missing any of these will create blockers in later steps.
- Processor dashboard access with permissions to view chargeback ratios, reserve terms, and batch settlement reports
- Your current reserve agreement (the exact percentage withheld and the hold period, typically 90 to 180 days)
- Transaction descriptor records showing what customers see on their bank statements
- Refund and return policy documentation as it currently appears on your storefront
- Order fulfillment system access with tracking number export capability
- A spreadsheet or cash flow tool to model reserve holdback projections
Time estimate: 4 to 6 hours for initial setup across all steps. Ongoing maintenance takes 30 to 60 minutes per week. The biggest potential blocker is not having visibility into your current chargeback ratio, so verify that access first.
Why This Sequence Matters for eCommerce Funding Solutions
Most chargeback guides treat dispute management as a customer service problem. That framing misses the real cost. Every chargeback directly affects your rolling reserve percentage, your deposit timing, and your eligibility for next-day funding. When your chargeback ratio rises, your processor withholds more of your revenue for longer periods.
Rolling reserve percentages vary depending on the merchant’s risk profile, processing history, industry, and the payment processor’s underwriting policies., and those funds can be locked for 90 to 180 days. For a business processing $200,000 per month, that’s $10,000 to $30,000 unavailable for inventory, payroll, or supplier payments at any given time. This tutorial treats chargeback prevention as a funding protection workflow, not a dispute checklist, because the sequence you follow determines whether your processor tightens or loosens the financial controls on your account.
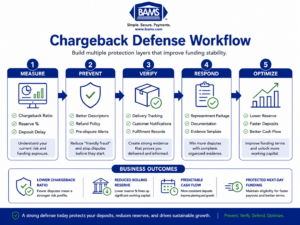
Every prevention layer strengthens your funding profile and protects available working capital.
Step 1: Audit Your Current Chargeback-to-Funding Exposure
Open your processor dashboard and pull three data points: your current chargeback ratio (chargebacks divided by total transactions for the trailing 90 days), your reserve holdback percentage, and your average deposit delay in business days. Write these numbers down. They are your baseline.
What to look for: If your chargeback ratio is above 0.65%, you are likely already flagged for elevated reserve requirements. If it’s above 1.0%, you may be approaching card network monitoring thresholds that trigger additional penalties beyond what your processor imposes.
Expected result: A clear snapshot of how your current dispute volume translates to withheld funds. Calculate the dollar amount held in reserve right now by multiplying your trailing 90-day gross sales by your reserve percentage.
Common failure: Some processors don’t display chargeback ratios in real time. If your dashboard only shows dispute counts, divide total chargebacks by total transactions for the same period manually. Contact your processor’s support team if you can’t access transaction-level data.
Step 2: Map Every Chargeback to Its Root Cause Category
Export your chargeback history for the past six months. For each dispute, categorize it into one of four buckets: product not received, product not as described, unrecognized transaction, or friendly fraud (customer received the product but disputes anyway).
Create a simple spreadsheet with columns for date, order ID, dispute amount, reason code, and your root cause category. Sort by category and calculate the percentage each bucket represents of your total chargebacks. Refer to the latest dispute reason code documentation published by Visa and Mastercard when mapping chargebacks to their root causes.
Expected result: One or two categories will dominate. For most eCommerce businesses, “unrecognized transaction” and “product not received” account for the majority of disputes. This tells you exactly where to focus your prevention efforts for maximum funding impact.
Common failure: Lumping all chargebacks together without categorization. If you skip this step, you’ll invest defense resources in the wrong areas and your ratio won’t move. Reason codes from your processor map directly to these categories. Visa’s reason code 13.1 is “Merchandise/Services Not Received.” Mastercard’s 4853 covers “Goods or Services Not as Described.”
Step 3: Fix Transaction Descriptors to Eliminate “Unrecognized” Disputes
If “unrecognized transaction” is a significant category (and it usually is), your billing descriptor is the first fix. This is the text that appears on your customer’s bank or credit card statement. Pull up a recent customer statement or test transaction to see exactly what appears.
Action: Update your billing descriptor to include your customer-facing business name (not your legal entity name), your website URL or phone number, and optionally the city/state. Your processor’s settings panel typically has a “statement descriptor” or “soft descriptor” field. Change it now.
Example: Bad descriptor: ACME LLC 8005551234. Good descriptor: YOURSTORE.COM 8005551234.
Expected result: Customers recognize the charge and don’t call their bank. This single fix can reduce “unrecognized” chargebacks by a meaningful percentage within 30 to 60 days. Check your processor documentation for character limits on descriptors (typically 22 to 25 characters).
Common failure: Your payment gateway may override your processor-level descriptor. Test a small transaction after making changes and verify the descriptor on the actual bank statement, not just in your dashboard.
Step 4: Deploy Pre-Dispute Alerts and Prevention Notifications
Before a chargeback formally hits your account, there’s a window where you can resolve it. Enroll in chargeback alert services through your processor or a third-party prevention network. These services notify you when a customer initiates a dispute with their bank, giving you a short window (typically 24 to 72 hours) to issue a refund before it becomes a formal chargeback. Review the latest dispute management guidance from Visa and Mastercard to ensure your prevention workflow aligns with current network requirements and timelines.
Action: Contact your processor and ask specifically about Verifi (Visa) and Ethoca (Mastercard) alert enrollment. These networks cover the majority of card-issuing banks. Some processors include these alerts; others charge a per-alert fee (usually $15 to $40 per alert).
Expected result: Disputes resolved through alerts do not count toward your chargeback ratio. This is critical. A refund costs you the transaction amount, but a chargeback costs you the transaction amount plus a fee, plus ratio damage, plus potential reserve increases. Alerts convert chargebacks into refunds, which protects your funding terms.
Common failure: Enrolling in alerts but not setting up a workflow to act on them within the response window. Assign a specific team member to monitor and respond to alerts within 24 hours. If you miss the window, the alert is wasted and the chargeback posts normally.
Step 5: Strengthen Fulfillment Evidence for “Product Not Received” Disputes
For every order, you need a chain of evidence that proves delivery. This evidence is what wins representment cases and, more importantly, prevents disputes from escalating in the first place.
Action: Configure your fulfillment system to automatically send tracking numbers via email and SMS at the moment of shipment. For orders above $100, require signature confirmation. Store tracking data in a format you can export quickly (carrier, tracking number, delivery timestamp, delivery address).
Add a post-purchase email sequence: one at shipment, one when the carrier marks the package as “out for delivery,” and one confirming delivery. Include your customer service contact information in every email with a clear message: “Questions about your order? Contact us at [email/phone] before contacting your bank.”
Expected result: Customers contact you instead of their bank. When they do dispute, you have ready evidence for representment. Clear delivery tracking and proactive customer communication are consistently cited as effective ways to reduce disputes before they become chargebacks.
Common failure: Using economy shipping without tracking to save costs. The savings are eliminated by a single chargeback. Always use tracked shipping, especially for items over $50.
Step 6: Publish and Enforce a Visible Refund Policy
Your refund policy needs to be visible at three points: the product page, the checkout page, and the order confirmation email. Customers who can’t find your return policy will default to calling their bank.
Action: Review your current refund policy for clarity. It should state the return window (e.g., 30 days), the condition requirements, who pays return shipping, and the expected refund timeline. Add a link to this policy in your website footer, on every product page near the “Add to Cart” button, and in your checkout flow as a required acknowledgment checkbox.
In your order confirmation email, include a one-line summary: “Not satisfied? Start a return within 30 days at [link]. We process refunds within 5 business days.”
Expected result: Customers use your return process instead of filing disputes. This reduces both “product not as described” and “friendly fraud” chargebacks. A generous, visible return policy counterintuitively reduces total chargebacks because it gives customers a lower-friction alternative to disputing.
Common failure: Hiding the refund policy in a hard-to-find page or using legalistic language. If a customer has to search for your policy, they’ve already decided to call their bank instead.
Step 7: Build a Representment Evidence Package Template
For chargebacks you can’t prevent, you need to win them through representment. Winning a representment reverses the chargeback’s impact on your ratio and returns the funds to your account.
Action: Create a template document (or folder structure) that you can populate for each dispute. Include these elements:
- Transaction receipt with timestamp, amount, and card details
- AVS (Address Verification Service) and CVV match confirmation
- Shipping confirmation with tracking number and delivery proof
- Customer communication history (emails, chat logs, support tickets)
- Screenshot of your refund policy as displayed at checkout
- IP address and device information from the order (if available from your platform)
Expected result: A complete evidence package submitted within 48 hours of receiving the chargeback notification. Speed matters because representment windows are strict (typically 30 days for Visa, 45 days for Mastercard). Having a template eliminates the scramble to gather evidence under deadline pressure.
Common failure: Submitting partial evidence or missing the representment deadline entirely. Set calendar reminders for every chargeback received and treat the deadline as non-negotiable.
Step 8: Forecast Your Reserve Holdback and Model the Cash Flow Impact
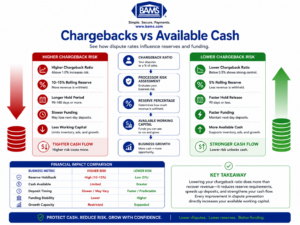
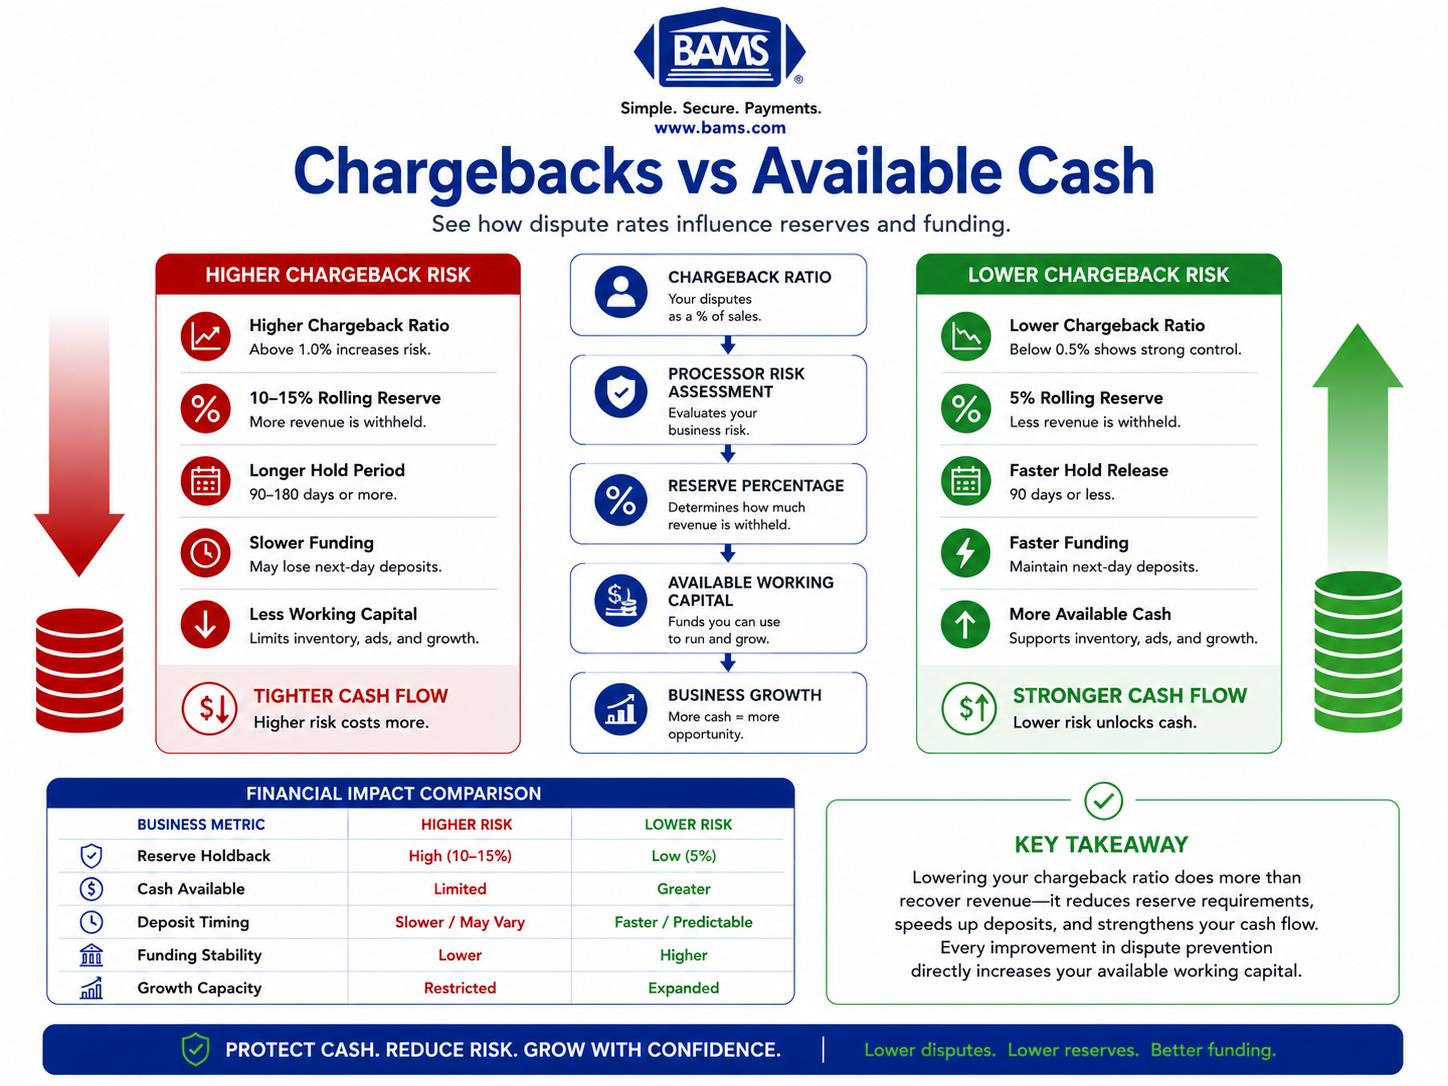
Reducing chargebacks protects more than revenue—it unlocks working capital.
Now that your prevention layers are in place, quantify what your reserve holdback actually costs your business in working capital terms. This step connects your chargeback risk management efforts directly to cash flow planning.
Action: In your spreadsheet, create a rolling 90-day model. For each day, enter your gross sales, multiply by your reserve percentage, and track the cumulative amount held. Then model the release: funds held on Day 1 become available on Day 91 (or Day 181, depending on your terms). This shows you exactly how much cash is locked at any point.
A common reserve structure is 5% to 10% of daily sales held for 90 to 180 days, then released on a rolling basis. If you’re processing $10,000 per day with a 10% reserve and 180-day hold, you have approximately $180,000 locked at steady state. Reducing your reserve from 10% to 5% frees $90,000 in working capital.
Expected result: A concrete dollar figure that represents the financial reward of lowering your chargeback ratio. Use this number to justify the time investment in prevention and to set a target for your processor negotiation in the next step.
Step 9: Negotiate Reserve Terms With Your Processor
With documented evidence of your improved chargeback ratio and prevention infrastructure, contact your processor to request a reserve review. Processors may reduce or remove reserve requirements when a merchant demonstrates a lower-risk profile through lower chargeback ratios, stronger records, and more stable processing history.
Action: Prepare a one-page summary for your processor that includes: your current chargeback ratio versus your ratio 90 days ago, the prevention measures you’ve implemented (alert enrollment, descriptor fixes, tracking improvements), and your specific request (reduce reserve from X% to Y%, or shorten hold period from 180 to 90 days).
If your current processor won’t negotiate, this is the point where evaluating alternatives makes sense. BAMS offers proactive chargeback defense and next-day funding as standard features for eCommerce merchants, which means your prevention work translates directly into better deposit terms rather than requiring a separate negotiation process.
Expected result: A written confirmation of revised reserve terms, or a clear set of benchmarks your processor wants you to hit before they’ll adjust. Either outcome gives you a target to work toward with measurable funding impact.
Common failure: Asking for a reserve reduction without evidence. Processors respond to data, not requests. Lead with your improved ratio and the specific steps you’ve taken.
Step 10: Establish a Weekly Chargeback-to-Funding Review Cycle
Prevention isn’t a one-time project. Set up a weekly 30-minute review that connects your chargeback metrics to your funding outcomes.
Action: Every Monday, check three numbers: your trailing 30-day chargeback ratio, your current reserve holdback balance, and your average deposit delay for the past week. Log these in your tracking spreadsheet. If any number moves in the wrong direction, trace it back to a specific root cause category from Step 2 and address it that week.
Set threshold alerts: if your chargeback ratio exceeds 0.5%, escalate immediately. If your reserve holdback increases by more than 10% month-over-month without a corresponding sales increase, investigate. These early warnings prevent small problems from becoming funding disruptions.
Expected result: A predictable cash flow baseline where you can forecast your available funds with confidence. Over 90 days, you should see your reserve holdback stabilize or decrease, your deposit timing become consistent, and your payment processing speed improve as your risk profile strengthens.
Configuration and Customization
Variables You Should Adjust for Your Business
Alert response window: The default recommendation is 24 hours, but if your team operates on business hours only, set up auto-refund rules for alerts below a certain dollar threshold (e.g., auto-refund any alerted dispute under $50). This ensures you never miss the window on low-value disputes.
Tracking confirmation threshold: The tutorial recommends signature confirmation for orders above $100. Adjust this based on your average order value and margin. If your AOV is $40, signature confirmation on every order adds unnecessary friction. If your AOV is $300, lower the threshold to $75.
Reserve negotiation timing: Wait until you have at least 90 days of improved chargeback data before requesting a reserve review. Some processors require 6 months of clean history. Ask your account manager what their review cycle looks like.
Safe defaults: Keep your chargeback ratio target below 0.5% (well under the 1% threshold most networks enforce). Maintain your evidence template for every transaction regardless of dispute likelihood. These defaults protect you even during seasonal volume spikes.
Verification and Testing
After completing all ten steps, verify your implementation with this checklist:
- Descriptor test: Place a test order and verify the billing descriptor on your bank statement matches your customer-facing brand name
- Alert test: Confirm with your processor that your Verifi/Ethoca enrollment is active and that alerts are routing to the correct email or dashboard
- Tracking test: Place a test order and confirm that shipment, out-for-delivery, and delivery notifications all fire correctly with tracking links
- Refund policy visibility test: Navigate your site as a new customer and confirm the refund policy is visible on product pages, at checkout, and in the confirmation email
- Representment template test: Pick a past chargeback and populate your template. Can you assemble complete evidence in under 30 minutes? If not, identify what data source is slow and fix the access issue
If your systems store, process, or transmit cardholder data, verify that your operational procedures continue to align with guidance from the PCI Security Standards Council.
Success definition: All five tests pass, your weekly review cycle is scheduled, and your reserve holdback forecast is modeled. You now have a defended funding baseline rather than a reactive dispute process.
Common Errors and Fixes for Chargeback Prevention
“My chargeback ratio isn’t dropping despite alert enrollment”
Cause: Alerts only cover banks enrolled in Verifi or Ethoca networks. Some issuing banks aren’t enrolled, so those disputes bypass your alerts entirely.
Fix: Layer alerts with descriptor fixes and proactive communication. Alerts are one defense layer, not a complete solution.
“My processor increased my reserve after I improved my ratio”
Cause: Reserve reviews often happen on a delayed schedule. Your processor may be reacting to data from 3 to 6 months ago.
Fix: Request a manual review with your current data. Provide the one-page summary from Step 9 and ask for the specific date of their next scheduled review.
“I’m winning representments but my ratio isn’t improving”
Cause: Some card networks count the initial chargeback toward your ratio regardless of representment outcome. Visa, for example, counts the chargeback at filing.
Fix: Focus on prevention (Steps 3 through 6) rather than relying on representment to fix your ratio. Representment recovers revenue but doesn’t always repair your risk profile.
“Customers say they never received tracking emails”
Cause: Transactional emails landing in spam folders, or email addresses with typos captured at checkout.
Fix: Add SMS notifications as a backup channel. Use email deliverability tools to monitor inbox placement rates. Add email confirmation at checkout to catch typos.
“My deposit timing is inconsistent even with a low chargeback ratio”
Cause: Batch timing may not be optimized for your processor’s settlement cutoff.
Fix: Confirm your daily batch cutoff time with your processor and ensure your platform submits batches before that cutoff. Review payment option expansion strategies that align settlement timing with your operational schedule.
Next Steps and Extensions
With your chargeback defense workflow operational, you can extend this foundation in several directions. First, use your reserve holdback forecast to time inventory purchases. When you know exactly how much cash releases from reserve each week, you can align supplier orders with those release dates and potentially negotiate early-payment discounts.
Second, explore whether your improved risk profile qualifies you for interchange optimization. Lower chargeback ratios can unlock better processing rates on certain card categories. Third, connect your chargeback data to your marketing channels. If a specific ad campaign or traffic source generates disproportionate disputes, you can adjust spend before the chargebacks hit your ratio.
Each of these extensions builds on the defended funding baseline you’ve created, turning predictable cash flow into a competitive advantage for inventory management, supplier payments, and growth investment.
Frequently Asked Questions
How do rolling reserves affect my daily deposit amounts?
Your processor withholds a percentage of each day’s sales (typically 5% to 15%) and holds those funds for 90 to 180 days before releasing them. This means your daily deposit is reduced by the reserve percentage, and you have a significant amount of working capital locked at any given time. Lowering your chargeback ratio is the most direct way to negotiate a lower reserve percentage and increase your daily available funds.
What is next-day funding and how do chargebacks affect eligibility?
Next-day funding means your processed transactions settle into your bank account the following business day instead of the typical 2 to 3 day window. Processors often restrict next-day funding eligibility for merchants with elevated chargeback ratios or risk flags. Maintaining a low dispute rate and clean processing history keeps you eligible for faster deposit schedules.
Do chargeback alerts count against my chargeback ratio?
No. When you resolve a dispute through a pre-chargeback alert (via Verifi or Ethoca networks), the dispute is settled as a refund rather than a formal chargeback. This means it does not count toward the chargeback ratio that card networks and processors use to evaluate your risk profile. This is why alert enrollment is one of the highest-impact steps for protecting your funding terms.
How long does it take to see funding improvements after reducing chargebacks?
Most processors evaluate chargeback ratios on a trailing 90-day basis. If you implement prevention measures today, expect to see measurable ratio improvement within 60 to 90 days. Reserve term renegotiation typically requires at least 90 days of improved data, and some processors review accounts on a 6-month cycle. Ask your processor for their specific review timeline.
Can I eliminate rolling reserves entirely?
It depends on your processor and your risk profile. Some processors remove reserves entirely for merchants with consistently low chargeback ratios, stable processing volume, and a strong track record. Others reduce the percentage or shorten the hold period instead. The key is demonstrating a sustained low-risk profile through documented prevention measures and clean dispute history.
How can I optimize batch timing for faster deposits?
Your processor has a daily settlement cutoff time. Transactions batched before the cutoff settle in the next cycle; transactions after the cutoff wait an additional day. Confirm your processor’s cutoff time (often between 5 PM and 9 PM ET) and configure your eCommerce platform to auto-batch before that window. This alone can eliminate one day of unnecessary deposit delay.