Payment Gateway Integration: Pass Level 3 Data
Map tax, freight, and product code fields to unlock the lowest interchange tiers on B2B transactions
Learn how to configure Level 3 line-item data fields across your eCommerce platform and payment gateway integration. This step-by-step tutorial covers field mapping, test transactions, and interchange qualification reports so you can lower your effective processing rate by 0.30%–0.50% on qualifying volume.
TL;DR
- Level 3 data unlocks the lowest interchange rates – Passing line-item tax, freight, product codes, and PO numbers can reduce your effective processing rate by 0.30% to 0.50% on qualifying commercial card transactions.
- Your platform collects the data but probably does not send it – WooCommerce, Magento, Shopify Plus, and BigCommerce all store line-item detail, but your gateway plugin must be explicitly configured to forward it.
- Interchange-plus pricing is a prerequisite – Flat-rate processors absorb interchange savings, so L3 optimization only benefits merchants on interchange-plus plans.
- Configuration details matter – A single missing field (even a $0.00 tax indicator) can downgrade an entire transaction. Test with corporate cards and verify every field in your gateway’s transaction detail view.
- Settle within 24 hours and use AVS – Even perfect L3 data will not help if your transactions sit unsettled or fail address verification. Auto-capture and batch settlement are essential companions to L3 mapping.
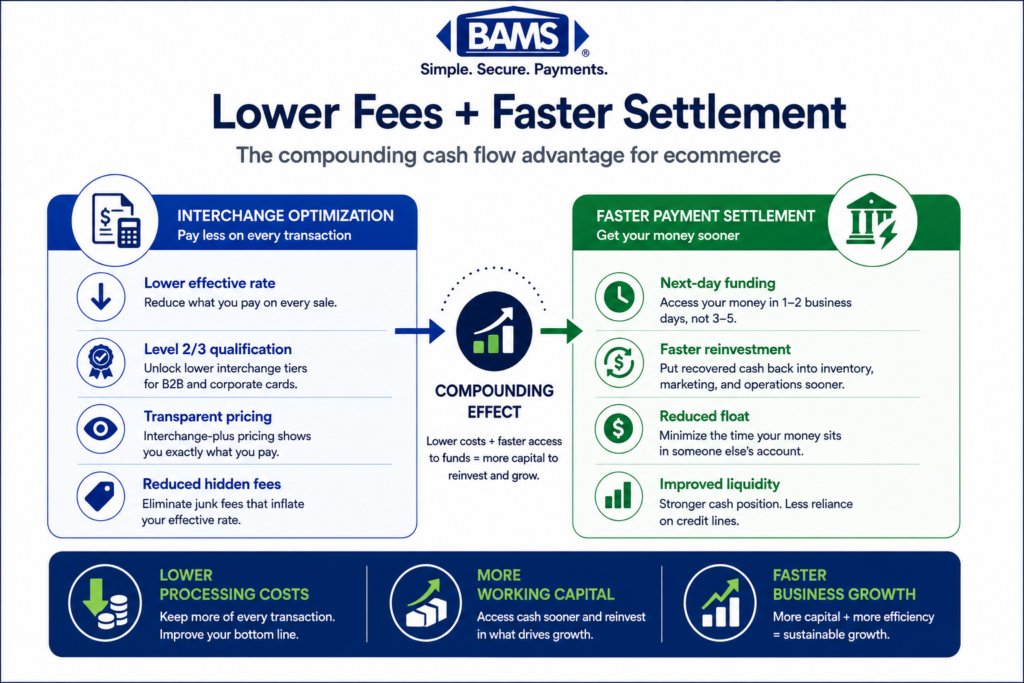
What You Will Achieve: Lower Interchange Rates Through Level 3 Data
This tutorial walks you through mapping tax, freight, and product code fields across your eCommerce platform and payment gateway integration so that every qualifying transaction passes Level 3 (L3) line-item data to the card networks. When you finish, your B2B and corporate card transactions will carry the enriched data Visa and Mastercard require to qualify for the lowest interchange tiers.
Your success criteria are simple: run a batch of test transactions, pull your interchange qualification report, and confirm that previously “downgraded” transactions now land at Level 3 rates. For many eCommerce merchants, this single configuration change can shave 0.30% to 0.50% off the effective processing rate on qualifying volume, translating directly into thousands saved per year.
Prerequisites and Setup Checklist
Before you touch a single field mapping, verify you have the following in place. Missing any one of these will block your progress.
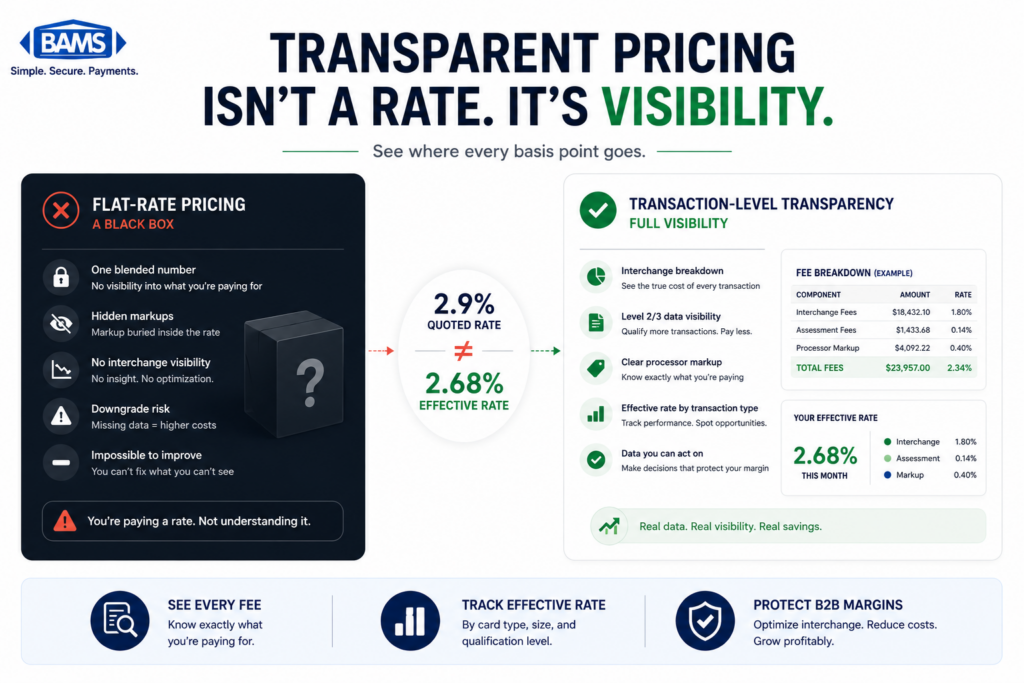
- Interchange-plus pricing on your merchant account. Flat-rate processors bundle interchange, so L3 savings never reach you. If you are unsure, review your merchant account statement fees and look for separate interchange line items.
- A gateway that supports L3 data passthrough. Confirm with your processor or gateway documentation. Common gateways that support L3 fields include Authorize.Net (CIM/AIM), NMI, USAePay, and Payeezy.
- Admin access to your eCommerce platform (Shopify Plus, WooCommerce, Magento/Adobe Commerce, or BigCommerce).
- Tax calculation configured. You need tax amounts computed at the line-item level, not just at the order total.
- Commodity or product codes assigned. You will need UPC, SKU, or commodity codes for each product in your catalog.
- A test card or sandbox environment to validate field mapping before going live.
Time estimate: 2 to 4 hours for initial configuration, plus 1 to 2 business days to verify interchange qualification on live transactions.
Why Level 3 Data Matters for Your Effective Processing Rate
Your checkout already captures most Level 3 data. The real problem is that the gateway never forwards it properly.
Card networks created three data levels. Level 1 is the bare minimum (card number, expiration, amount). Level 2 adds tax amount and customer code. Level 3 adds line-item detail: product codes, quantities, unit costs, freight amounts, and item-level tax. The more data you pass, the lower the risk the networks assign, and the lower the interchange rate you qualify for.
Most eCommerce platforms collect this data during checkout but do not automatically send it to the gateway. That disconnect is why your transactions downgrade to higher-cost tiers even though you technically have every field the card networks want. This tutorial closes that gap with platform-specific steps. Merchant Payments Coalition resources continue to highlight how interchange inefficiencies and transaction qualification issues increase operational costs for merchants processing B2B volume.
Step 1: Audit Your Current Interchange Qualification
Action: Pull your most recent processing statement or log into your gateway’s reporting dashboard. Look for a column or section labeled “Interchange Category” or “Qualification Level.”
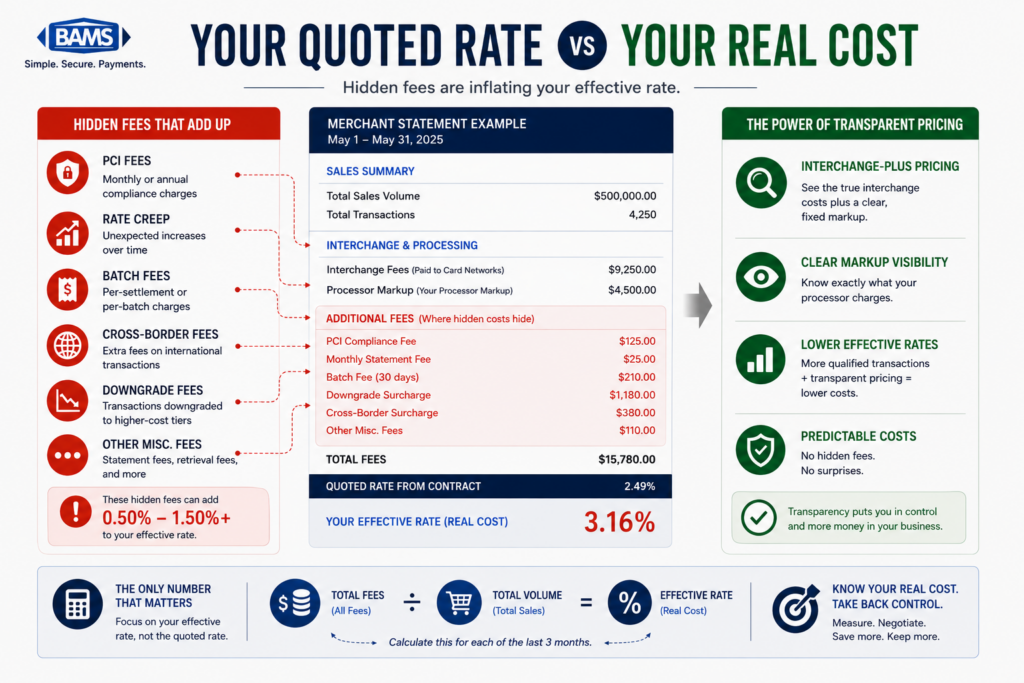
Count how many transactions show as “EIRF” (Electronic Interchange Reimbursement Fee) or “Standard” instead of “Commercial Level 3” or “Purchasing Card Level 3.” These are your downgraded transactions. They represent the gap between what you pay now and what you could pay with proper field mapping.
Checkpoint: You should have a concrete count of downgraded transactions and an estimate of the volume in dollars. If more than 15% of your B2B or corporate card volume is downgrading, this tutorial will deliver measurable savings.
Common failure: Your statement only shows a blended rate with no interchange detail. This means you are likely on flat-rate or tiered pricing. Switch to interchange-plus pricing first, then return to this step.
Step 2: Identify Required L3 Fields for Visa and Mastercard
Action: Reference the field requirements below. Visa and Mastercard have slightly different L3 field sets, but the overlap covers the critical items. Map every field marked “Required” before moving to optional ones.
Core L3 Fields (Required by Both Networks)
- Line-item commodity code (UPC, SKU, or UNSPSC code)
- Product description (alphanumeric, up to 35 characters)
- Quantity (integer)
- Unit of measure (e.g., “each,” “box,” “lb”)
- Unit cost (decimal, pre-tax price per unit)
- Extended amount (quantity × unit cost)
- Line-item tax amount
- Line-item tax rate
- Freight/shipping amount (order level)
- Order-level tax amount
- Customer reference number / PO number
Checkpoint: Print or bookmark this list. You will reference it in every subsequent step as you trace each field from your eCommerce platform through to the gateway API call.

A single missing Level 3 field can downgrade an otherwise qualified commercial transaction.
Step 3: Map Tax Fields at the Line-Item Level
Action: Open your eCommerce platform’s tax configuration. Verify that tax is calculated and stored per line item, not just as a single order-level sum. Here is how to confirm on major platforms:
WooCommerce
Navigate to WooCommerce → Settings → Tax. Ensure “Calculate tax based on” is set to your preferred address type. Under “Display prices in the shop” and “Display prices during cart and checkout,” confirm tax is itemized. WooCommerce stores line_tax per item in the order meta. Your gateway plugin must read this field.
Magento / Adobe Commerce
Go to Stores → Configuration → Sales → Tax → Calculation Settings. Set “Tax Calculation Method Based On” to Row Total. This ensures each line item carries its own tax value in the order object. The payment extension you use must map tax_amount from the order item to the gateway’s L3 tax field.
Shopify Plus
Shopify calculates line-item tax automatically. However, Shopify Payments does not pass L3 data. You need a third-party gateway integration (via Shopify Plus’s checkout customization) to access and forward line-item tax. Use the tax_lines object from the Order API.
BigCommerce
Under Settings → Tax, enable automatic tax calculation. BigCommerce exposes tax_class and per-item tax in the Orders API. Your payment integration must pull these values during authorization.
Common failure: Tax shows as a single lump sum in the gateway transaction log. This means your plugin is summing all line-item taxes into one field. Check your gateway plugin’s settings for a “Send line-item detail” or “Level 3 data” toggle.
Step 4: Map Freight and Shipping Fields
Action: Locate the shipping/freight amount in your platform’s order object and confirm it reaches the gateway as a separate, labeled field.
Most gateways expect freight as an order-level field, not a line item. Your eCommerce platform already stores this separately (e.g., shipping_total in WooCommerce, shipping_cost_inc_tax in BigCommerce). The issue is whether your gateway plugin actually maps it.
For gateway plugins that support L3: Look for a configuration field labeled “Freight Amount” or “Shipping Amount” in the plugin settings. Point it to your platform’s shipping total field. If your plugin does not expose this, you may need a custom code snippet.
Example: WooCommerce to NMI Gateway
// In your NMI gateway plugin’s order processing function
$order = wc_get_order( $order_id );
$freight_amount = $order->get_shipping_total();
// Add to L3 data array sent to NMI
$l3_data[‘shipping_amount’] = number_format( $freight_amount, 2, ‘.’, ” );
Checkpoint: After configuration, place a test order with shipping. In your gateway’s transaction detail view, confirm that the freight/shipping amount appears as a distinct field, separate from the subtotal and tax.
Step 5: Assign Product Codes to Your Catalog
Action: Every line item in an L3 transaction needs a commodity or product code. You have three options, listed from most to least preferred by the card networks:
- UNSPSC codes (United Nations Standard Products and Services Code). These are the gold standard. If your business already categorizes products using NAICS classification resources, align your commodity coding structure closely with those operational product categories to improve consistency across reporting and interchange qualification workflows.
- UPC/EAN codes. If your products already have barcodes, use those.
- Internal SKUs. Accepted by most gateways, but UNSPSC is more likely to satisfy network validation.
In WooCommerce, store the commodity code in a custom field on each product (e.g., _commodity_code). In Magento, use a product attribute. In Shopify Plus, use a metafield. Your gateway plugin must then read this field during checkout and include it in the authorization request.
Common failure: The commodity code field is left blank on some products. The gateway sends an empty string, and the entire transaction fails L3 qualification. Run a catalog export and filter for blank commodity code fields before going live.
Step 6: Pass the Customer Reference or PO Number
Action: B2B buyers often enter a Purchase Order (PO) number at checkout. This field is required for L3 qualification on many commercial card types.
If your checkout does not include a PO number field, add one. In WooCommerce, use the woocommerce_after_order_notes hook to add a custom field. In Magento, add it to the checkout layout XML. In Shopify Plus, use checkout extensibility to add an input field.
// WooCommerce: Add PO Number field to checkout
add_action( ‘woocommerce_after_order_notes’, function( $checkout ) {
woocommerce_form_field( ‘po_number’, array(
‘type’ => ‘text’,
‘class’ => array( ‘form-row-wide’ ),
‘label’ => ‘PO Number’,
‘placeholder’ => ‘Enter your Purchase Order number’,
‘required’ => false,
), $checkout->get_value( ‘po_number’ ) );
});
Checkpoint: Place a test order with a PO number. Verify it appears in the gateway’s transaction detail as “Customer Reference” or “PO Number.”
Step 7: Configure Your Gateway Plugin for L3 Passthrough
Action: This is where all your field mapping comes together. Open your payment gateway plugin or integration settings and enable Level 3 data submission.
Common Gateway Configuration Paths
- Authorize.Net (CIM): Use the
lineItemsarray in thecreateTransactionRequestAPI call. IncludeitemId,name,quantity,unitPrice, andtaxAmountfor each line item. Visa payment rules and merchant guidance continue to emphasize the importance of enriched transaction-level data for qualification and interchange optimization. - NMI: Enable “Level 3 Processing” in your merchant console under Settings → Transaction Settings. The API accepts
shipping,tax,ponumber, and aproduct_prefixed array for line items. - USAePay: Pass L3 fields through the
LineItemobject in the SOAP or REST API. Enable L3 in the merchant console under Settings → Batch/Import.
If your plugin does not natively support L3 fields, you have two paths: find a plugin that does, or extend your current plugin with custom code that hooks into the payment request before it is sent to the gateway.
Common failure: The plugin sends L3 data only on “authorize” but not on “capture.” Some gateways require L3 data at capture time. Check your plugin’s documentation and test both authorize-only and authorize-and-capture flows.
Step 8: Optimize Transaction Routing for Maximum Qualification
Passing L3 data is only valuable if the transaction is routed through the correct interchange program. To optimize transaction routing, verify these additional settings:
- Settle within 24 hours. Transactions that remain in “authorized” status for more than 24 hours (48 for some networks) will downgrade regardless of data quality. Enable auto-capture or batch settlement at end of day.
- Use AVS (Address Verification). A successful AVS match is required for L2/L3 qualification on many card types. Ensure your checkout collects and submits billing address.
- Include the tax indicator. Even if tax is $0.00, the field must be present with a “tax exempt” or “0.00” indicator. An absent tax field triggers a downgrade.
If you are evaluating whether your current processor supports this level of routing control, a guide to selecting the best eCommerce merchant services can help you compare capabilities. Processors like BAMS offer interchange-plus pricing with dedicated account managers who can review your L3 qualification reports and flag configuration issues before they cost you money.
Configuration and Customization Notes
Variables You Should Adjust
- Tax calculation method: If you sell across multiple states or countries, use a tax automation service (Avalara, TaxJar) that returns line-item tax. Manual tax tables often produce rounding errors that fail network validation.
- Commodity code granularity: Start with 4-digit UNSPSC codes. You can increase to 8-digit codes later if your processor recommends it.
- Freight allocation: Some merchants split freight across line items for internal accounting. For L3 purposes, keep freight as a single order-level value. Splitting it can cause validation failures.
Safe Defaults
- Set “Unit of Measure” to
EA(each) unless you sell by weight or volume. - Set “Discount Amount” to
0.00if you are not applying line-item discounts. Do not leave it null. - Set “Tax Indicator” to
Y(taxable) orN(exempt). Never omit this field.
Verification and Testing
Action: Run 3 to 5 test transactions using a corporate or purchasing card (not a personal consumer card, since L3 rates only apply to commercial card types). If you do not have a corporate card, ask your processor for a test card number flagged as a commercial card in their sandbox.
Success definition: In your gateway’s transaction detail, you should see every L3 field populated. After settlement, your interchange qualification report should show these transactions at “Commercial Level 3” or “Purchasing Card Level 3” rates.
Edge cases to verify:
- An order with a $0.00 shipping amount (freight field must still be present).
- An order with a tax-exempt item mixed with taxable items.
- An order with more than 10 line items (some gateways cap line items per transaction).
- A refund or partial refund (L3 data must persist through the void/refund cycle on some gateways).
Common Errors and Fixes
Error: “Transaction downgraded to EIRF” despite L3 data
Symptom: Your interchange report still shows EIRF or Standard rates. Cause: The transaction was not settled within the required window (typically 24 hours). Fix: Enable auto-settlement or move your batch close time to end-of-day.
Error: “Invalid line item data” from gateway
Symptom: The gateway rejects the transaction or strips L3 data. Cause: A required field (often unit cost or commodity code) is null or formatted incorrectly. Fix: Check that unit cost uses two decimal places (e.g., 12.50, not 12.5) and that commodity codes contain no special characters.
Error: Tax amount mismatch
Symptom: The sum of line-item taxes does not equal the order-level tax total. Cause: Rounding differences between your tax calculation engine and the gateway’s validation. Fix: Calculate line-item tax using the “row total” method (tax rate × line total), then adjust the last line item’s tax by the rounding difference so the sum matches exactly.
Error: “Freight amount exceeds transaction total”
Symptom: Gateway rejects the L3 data block. Cause: Freight was accidentally mapped to a field that expects cents instead of dollars, or the shipping discount was not subtracted. Fix: Verify your freight field outputs dollars with two decimal places, and subtract any free-shipping discount before passing the value.
Error: L3 data sent on authorize but missing on capture
Symptom: Transactions qualify as L2 but not L3. Cause: Your integration sends line-item data only during authorization, but your gateway requires it at capture. Fix: Modify your plugin to resend L3 fields during the capture API call, or switch to an authorize-and-capture flow.
Next Steps and Extensions
Once your L3 field mapping is live and verified, consider these follow-on improvements:
- Automate interchange auditing. Set up a monthly review of your qualification report. Flag any transaction that downgrades and trace it back to a missing field.
- Extend L3 to invoiced payments. If you send invoices with a “pay now” link, ensure your invoice payment flow also passes L3 data through the gateway.
- Negotiate rates on qualified volume. With a higher percentage of transactions qualifying at L3, you have leverage to negotiate lower processor markups on top of interchange. Your account manager (if you have one) should be able to review this with you quarterly.
Federal Reserve interchange fee data continues to demonstrate how qualification differences materially affect merchant processing costs over time. As more B2B commerce moves online, Level 3 optimization becomes a competitive advantage rather than a nice-to-have.
Frequently Asked Questions
What are the best strategies to reduce payment processing fees?
The most impactful strategy for B2B eCommerce merchants is passing Level 3 line-item data (tax, freight, product codes) to qualify for the lowest interchange rates. Beyond that, settling transactions within 24 hours, using AVS, and switching to interchange-plus pricing all contribute to a lower effective processing rate. Auditing your monthly statements for downgrades is the fastest way to identify where you are losing money.
Why is interchange-plus pricing more beneficial than flat-rate pricing?
Interchange-plus pricing separates the base interchange fee (set by Visa/Mastercard) from your processor’s markup. This transparency means that when you pass L3 data and qualify for lower interchange categories, the savings go directly to you. Flat-rate processors charge the same percentage regardless of qualification level, so any L3 optimization effort is wasted. You can review common merchant account fees to understand how these pricing models differ on your statement.
How does optimizing transaction data affect processing fees?
Card networks assign lower interchange rates to transactions that include detailed data because the additional information reduces fraud risk and dispute costs. A transaction that qualifies at Level 3 can cost 0.30% to 0.50% less than the same transaction at Level 1. Over a year of B2B volume, this adds up to significant savings without changing your pricing plan or processor.
How can I audit my payment processing statements for hidden fees?
Request an interchange qualification summary from your processor. This report shows which interchange category each transaction landed in. Look for transactions marked “EIRF,” “Standard,” or “Downgrade.” These are costing you more than they should. Cross-reference them with your gateway logs to identify which L3 fields were missing. If your processor does not provide this report, that itself is a red flag.
Which payment methods should I encourage to lower processing costs?
For B2B transactions, corporate purchasing cards with L3 data passthrough offer the best interchange rates. For B2C, debit cards (especially PIN debit) carry lower interchange than credit cards. ACH payments bypass card networks entirely and typically cost a flat fee of $0.25 to $1.00 per transaction. Offering ACH as a checkout option for high-value orders can meaningfully reduce your blended cost.
Do all payment gateways support Level 3 data?
No. Many popular gateways support L3 fields in their API but do not enable them by default. Some gateway plugins for eCommerce platforms strip L3 data entirely. Before choosing a gateway, confirm that it supports L3 passthrough in both its API documentation and in the specific plugin or integration you plan to use. Gateways like NMI, Authorize.Net, and USAePay are known to support L3 when properly configured.