
Payment Optimization: Build a Chargeback Alert System
Last Updated on October 1, 2026 by Dimitri Akhrin
A step-by-step tutorial any eCommerce manager can set up this week—no fraud team or enterprise tools required
Learn how to build a working chargeback early-warning system for your eCommerce store using accessible tools and a clear daily workflow. This tutorial walks you through alert enrollment, dispute tracking, and resolution steps that protect revenue and build customer trust.
TL;DR
- Enroll in Verifi and Ethoca alert networks – These give you 24-72 hours to resolve disputes before they become formal chargebacks, saving you $25-100+ per incident in fees and protecting your chargeback ratio.
- Fix your billing descriptor first – A huge percentage of “unrecognized transaction” chargebacks happen because customers don’t recognize the charge on their statement. Match your descriptor to your store name and add a phone number.
- Build a simple daily workflow, not a complex system – A Google Sheet tracker, a decision tree for alert responses, and two daily check-ins (9 AM and 3 PM) are all you need to run effective chargeback prevention without a fraud team.
- Calibrate fraud filters carefully – Start with ZIP-match AVS and CVV required. Avoid over-filtering, since 30-40% of authenticated transactions get declined, and many of those are legitimate customers you’re turning away.
- Monitor your chargeback ratio weekly – Track it every Monday. Visa flags merchants at 0.65% and penalizes at 0.9%. Catching an upward trend early gives you time to adjust before you face fines or account restrictions.
What You’ll Build: A Chargeback Early-Warning System That Protects Revenue
By the end of this tutorial, you’ll have a working chargeback early-warning system for your eCommerce store. No dedicated fraud team. No enterprise software contracts. Just a clear, repeatable process that catches disputes before they become costly chargebacks, preserving your revenue and improving customer trust across every transaction.
Your success criteria are simple: you’ll be able to identify potential chargebacks within 24 hours of a dispute filing, resolve at least 40% of alerts before they escalate, and track your chargeback ratio in a single dashboard. This is payment optimization at its most practical, turning defense into a genuine growth lever by keeping more of the money you’ve already earned.
Prerequisites and Setup Checklist
Before you start, confirm you have the following in place. Missing any one of these will slow you down, so check them off first.
- Active payment processor account with login access to your merchant dashboard
- Access to your payment gateway (Stripe, Authorize.net, NMI, or similar) with admin-level permissions
- A Visa Merchant Purchase Inquiry (VMPI) or Ethoca alerts enrollment (or willingness to sign up during this tutorial) Visa publishes documentation covering dispute prevention, merchant inquiries, and transaction lifecycle best practices, making it a valuable reference for merchants building long-term chargeback prevention processes. See Visa for additional merchant resources.
- Google Sheets or a spreadsheet tool for tracking alerts and outcomes
- Your customer service email and phone channel set up and staffed (even if that’s just you)
- 30-60 minutes per day for the first week to monitor and respond to alerts
Time estimate: Full setup takes 3-5 hours spread across 2-3 days. Ongoing maintenance drops to about 20 minutes daily once the system is running. The main blocker is enrollment approval for alert networks, which can take 24-72 hours.
Why This Approach Works for Growing eCommerce Teams
Most chargeback content assumes you have a fraud analyst on staff or budget for a $2,000/month platform. That’s not reality for eCommerce teams of 10-50 people. You need a system that works with the tools and people you already have.
This method combines three layers: alert network enrollment (to catch disputes early), transaction descriptor cleanup (to prevent confusion-based chargebacks), and a simple response workflow. Together, they address the root causes of most eCommerce chargebacks without requiring machine learning infrastructure or a dedicated risk team.
The difficulty level is moderate. If you can configure settings in your payment gateway and respond to customer emails, you can do this. Improving payment acceptance, reducing disputes, and streamlining checkout all contribute to stronger payment performance and better customer experiences across the transaction lifecycle.
Step-by-Step: Building Your Chargeback Early-Warning System
Step 1: Audit Your Current Chargeback Situation
Log into your payment processor’s merchant dashboard. Navigate to the disputes or chargebacks section and export the last 90 days of chargeback data. You’re looking for three things: total chargeback count, chargeback ratio (chargebacks divided by total transactions), and the most common reason codes.
Sort your chargebacks by reason code. Most eCommerce merchants find that “product not as described,” “not recognized,” and “credit not processed” account for 60-80% of all disputes. Write down your top three reason codes and their frequency. This tells you exactly where to focus your defense.
Expected result: A clear picture of your chargeback ratio (healthy is under 0.65% for Visa, under 1% for Mastercard) and your top dispute categories. If your ratio is above 1%, treat this tutorial as urgent.
Common failure: Some processors bury chargeback data in separate reports. If you can’t find it, call your processor’s support line and ask for your “dispute activity report” and current chargeback ratio.
Step 2: Clean Up Your Transaction Descriptors
A surprising number of chargebacks happen because customers don’t recognize the charge on their bank statement. Your billing descriptor (the name that appears on their statement) might show a parent company name, an abbreviation, or a payment facilitator’s name instead of your store name.
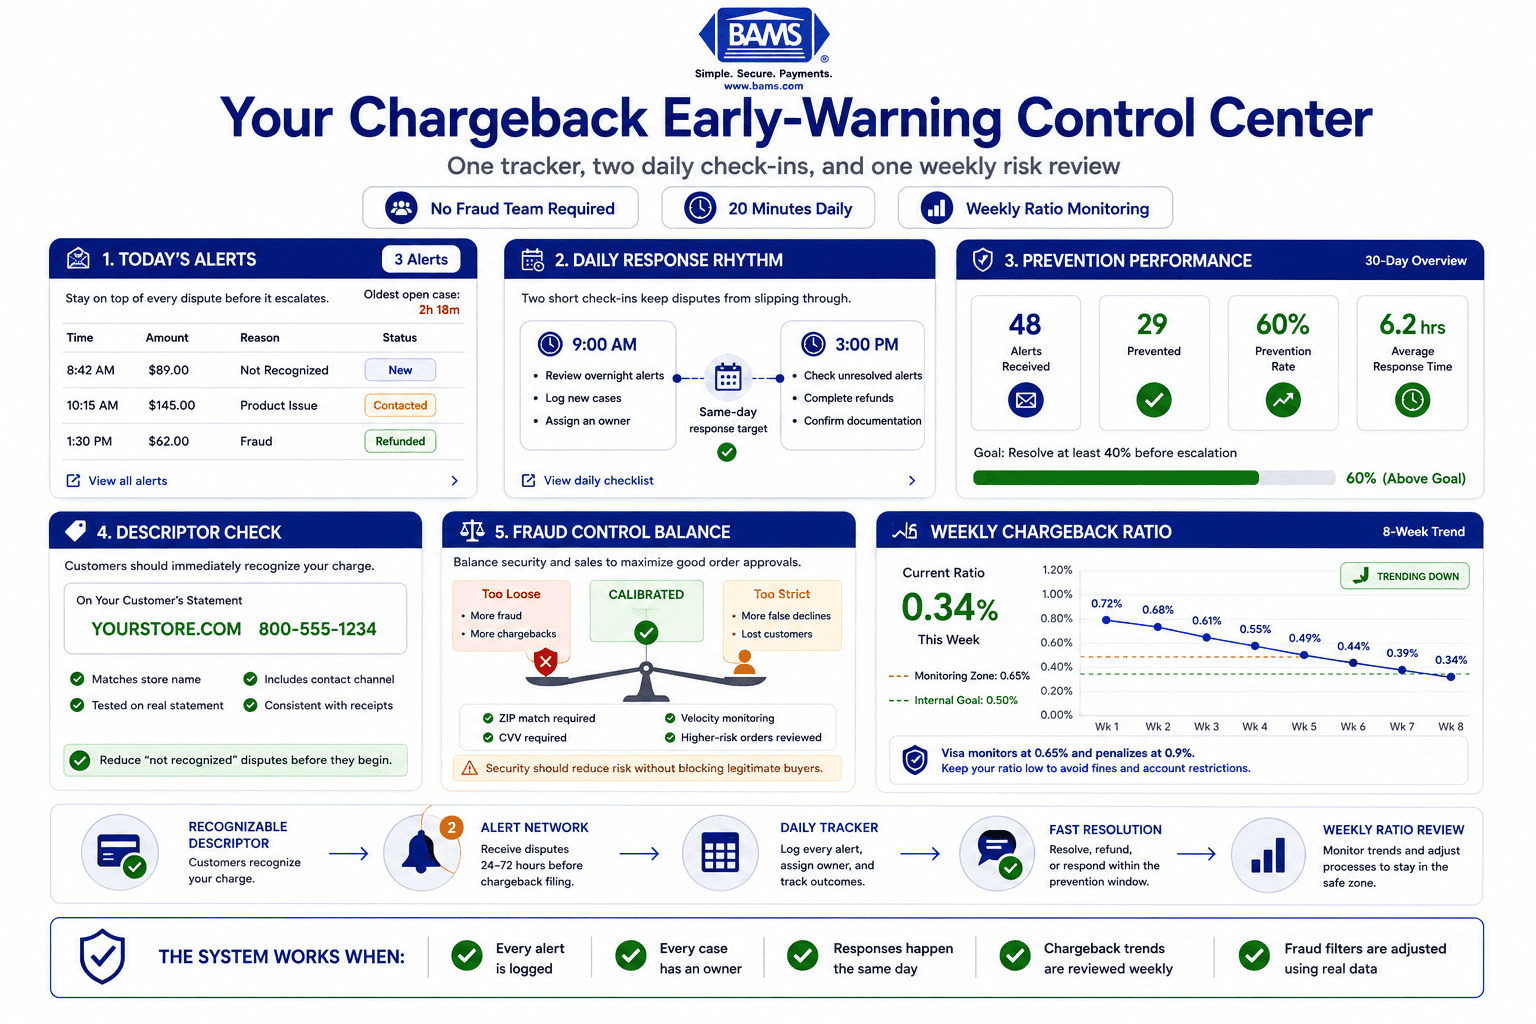
Action: Go to your payment gateway settings and find the “billing descriptor” or “statement descriptor” field. Change it to match your store name exactly as customers know it. Include your customer service phone number or URL if your processor allows a dynamic descriptor. For example: YOURSTORE.COM 800-555-1234.
Expected result: Customers see a recognizable name on their statement and call you instead of their bank. This single change can reduce “not recognized” chargebacks by 15-25%.
Common failure: Some processors limit descriptors to 20-25 characters. If your store name is long, use the most recognizable abbreviation. Test by making a small purchase on your own card and checking how it appears on your statement within 2-3 business days.
Step 3: Enroll in Chargeback Alert Networks
This is the core of your early-warning system. Two major networks, Verifi (Visa’s CDRN/RDR) and Ethoca (Mastercard), send you alerts when a cardholder disputes a transaction before the chargeback is officially filed. You typically get 24-72 hours to issue a refund and prevent the chargeback from hitting your ratio.
Mastercard also provides dispute management guidance and merchant education covering chargeback prevention, collaboration, and post-transaction communication through its payment ecosystem resources.
Action: Contact your payment processor and ask about enrollment in Verifi and Ethoca alert programs. Some processors bundle this; others require you to sign up through a reseller. Expect a per-alert fee of $15-40 (still far cheaper than a $25-100 chargeback fee plus the lost merchandise).
If your current processor doesn’t offer easy access to these networks, this is a strong signal to evaluate alternatives. BAMS, for example, includes proactive chargeback defense with dedicated account management, so you get alert enrollment and human support without cobbling together separate vendor relationships.
Expected result: Within 24-72 hours of enrollment approval, you’ll start receiving dispute alerts via email or your processor dashboard before they become formal chargebacks.
Common failure: Enrollment can be rejected if your MCC (Merchant Category Code) is wrong or your business information doesn’t match across systems. Verify your business details with your processor before applying.
Step 4: Build Your Alert Response Tracker
Create a Google Sheet (or use your preferred spreadsheet) with the following columns:
| Date Received | Alert Source | Transaction ID | Customer Name | Amount | Reason Code | Action Taken | Resolution | Date Resolved |
Every alert that comes in gets logged here. This is your single source of truth. It replaces expensive case management software for now and gives you the data you need to spot patterns later.
Action: Create the spreadsheet and bookmark it. Set a calendar reminder to check for new alerts at 9 AM and 3 PM daily. Share the sheet with anyone on your team who handles customer service.
Expected result: A living document that tracks every alert, your response, and the outcome. After 30 days, you’ll have enough data to calculate your prevention rate and identify repeat offenders.
Common failure: Inconsistent logging. If you skip entries, you lose visibility. Make the spreadsheet part of your daily opening routine, like checking email.
Step 5: Create Your 24-Hour Response Workflow

A clear response workflow helps every chargeback alert reach the right decision before the prevention window closes.
Speed matters. When an alert arrives, you need a decision tree that any team member can follow. Here’s the workflow to implement:
- If the order is unfulfilled: Cancel the order and issue a full refund immediately. Log it as “prevented.”
- If the order was delivered and the dispute reason is “not recognized”: Email the customer with the order details, delivery confirmation, and your store name. Ask them to contact you before disputing with their bank. Refund if no response within 12 hours.
- If the dispute reason is “product not as described” or “defective”: Offer a replacement or refund. Document the customer interaction.
- If the transaction looks like genuine fraud (shipping address mismatch, failed AVS, unusual order pattern): Refund immediately and flag the customer account.
Expected result: Most alerts get resolved within 4-12 hours. Your chargeback ratio drops because refunds issued through alerts don’t count as chargebacks.
Common failure: Hesitating to refund because you want to “fight” the dispute. At the alert stage, a refund costs you the sale. A chargeback costs you the sale plus $25-100 in fees plus damage to your chargeback ratio. Refund fast.
Step 6: Strengthen Your Pre-Purchase Fraud Filters
Alerts catch disputes after the sale. Now add a layer that prevents fraudulent transactions from going through in the first place. Go to your payment gateway and enable or verify these settings:
- AVS (Address Verification System): Decline transactions where the street address and ZIP code don’t match the card’s billing address.
- CVV matching: Require the 3-digit (or 4-digit for Amex) security code on every transaction. Decline mismatches.
- Velocity filters: Flag or decline when the same card or email attempts more than 3 transactions in 10 minutes.
- 3D Secure 2.0: Enable this for transactions over a threshold you set (e.g., $150+). This shifts liability for fraud chargebacks to the card issuer.
This is where checkout process optimization and fraud prevention overlap. Cart abandonment usually happens after the customer enters checkout, so be strategic. Apply strict filters to high-risk signals without adding friction for legitimate buyers.
Merchants handling payment card data should also follow the security guidance published by the PCI Security Standards Council, including PCI DSS best practices for protecting payment information and reducing payment-related risk.
Expected result: A measurable drop in fraud-related chargebacks within 30 days, without a significant increase in false declines.
Common failure: Setting AVS too aggressively (e.g., requiring exact match on both street and ZIP). Start with “ZIP match required” and monitor for legitimate declines before tightening further.
Step 7: Optimize Your Order Confirmation and Delivery Communication
Many “not recognized” and “product not received” chargebacks come from poor post-purchase communication. Customers forget what they ordered, don’t get tracking updates, or can’t find your contact information.
Action: Review your order confirmation email. It should include your store name (matching your billing descriptor), a clear itemized receipt, the expected delivery date, a tracking link, and your customer service email and phone number. Then verify that your shipping confirmation email includes live tracking and an estimated delivery window.
Add a line to both emails: “Questions about your order? Contact us at [email/phone] before contacting your bank, and we’ll make it right.” This simple sentence redirects disputes to you instead of the card network.
Expected result: Fewer “not recognized” disputes and more customer service inquiries (which you can resolve without chargeback fees). For more on reducing friction at this stage, see this guide on improving mobile checkout with customer behavior tracking.
Step 8: Set Up Weekly Chargeback Ratio Monitoring
An effective early-warning system combines alert visibility, fast response, calibrated fraud controls, and consistent ratio monitoring.
Your chargeback ratio is the metric that matters most. Visa’s threshold is 0.9% (with monitoring starting at 0.65%), and Mastercard’s is 1.0%. Exceeding these puts you in monitoring programs with fines, higher fees, or account termination.
Action: Every Monday morning, log into your processor dashboard and record two numbers in your tracking spreadsheet: total transactions for the prior week and total chargebacks for the prior week. Calculate the ratio. Plot it on a simple line chart.
If your ratio trends upward for two consecutive weeks, escalate immediately. Review your alert response times, check for new fraud patterns, and contact your processor’s support team. If you’re using a processor with proactive chargeback defense and dedicated account management, this is exactly when that human support pays for itself.
Expected result: A weekly trend line that shows your ratio declining as your alert system catches more disputes. Within 60 days, most merchants see a 30-50% reduction in chargebacks that reach completion.
Step 9: Document Your Evidence Library
Some chargebacks will get past your alert system. When they do, you need to fight them with compelling evidence. Build a template folder now so you’re not scrambling later.
Action: Create a folder (Google Drive, Dropbox, or your internal system) with subfolders for each evidence type:
- Delivery proof: Carrier tracking screenshots, delivery confirmation with timestamps
- Customer communication: Email threads, chat logs, phone call notes
- Transaction data: AVS match results, CVV verification, IP address and device fingerprint logs
- Product documentation: Product page screenshots at time of purchase, terms of service, refund policy
When a chargeback arrives, you’ll pull from these folders to build your representment case. Include your refund policy URL and proof that the customer agreed to your terms at checkout.
Expected result: Representment response time drops from hours to minutes. Win rates on fought chargebacks improve to 40-60% with organized evidence.
Configuration and Customization
Your early-warning system needs tuning based on your business model. Here are the key variables to adjust:
- Alert refund threshold: Set a dollar amount below which you auto-refund on any alert (e.g., orders under $50). Above that threshold, investigate before refunding. Start at $50 and adjust based on your average order value.
- 3D Secure threshold: Trigger 3D Secure authentication for orders above a set amount. Start at 2x your average order value. This balances fraud protection with checkout friction.
- Velocity filter limits: The default of 3 attempts per 10 minutes works for most stores. If you sell subscription boxes or bulk orders, increase to 5.
- Descriptor format: If you operate multiple storefronts, use dynamic descriptors that match each brand. Most gateways support this through API configuration.
Must-change settings: Your billing descriptor and CVV requirement are non-negotiable. Everything else can start at safe defaults and be refined as you gather data from your tracking spreadsheet.
Verification and Testing
After completing the setup, run these checks to confirm everything works:
- Descriptor test: Make a small purchase on your own card. Verify the billing descriptor matches your store name on your bank statement within 48 hours.
- Alert test: Ask your alert provider or processor if they offer a test alert. If not, your first real alert (typically within 1-2 weeks) serves as confirmation.
- Filter test: Attempt a transaction with an intentionally wrong CVV. Confirm it’s declined. Try a transaction with a mismatched ZIP code. Confirm it’s flagged or declined per your settings.
- Workflow test: Have a team member simulate receiving an alert. Time how long it takes them to log it, make a decision, and issue a refund. Target: under 15 minutes.
Your system is working when alerts arrive promptly, your team responds within the same business day, and your tracking spreadsheet captures every case. Check your chargeback ratio weekly to measure the impact.
Common Errors and Fixes
“I’m enrolled but not receiving any alerts”
Cause: Your Merchant ID (MID) or card acceptor ID may not be correctly mapped in the alert network. Fix: Contact your alert provider and verify that your MID matches exactly. Some merchants have multiple MIDs (one per gateway or currency), and each needs separate enrollment.
“My chargeback ratio went up after implementing alerts”
Cause: You’re likely seeing alerts for the first time and mistaking the visibility for an increase. Or, your alert-to-refund turnaround is too slow. Fix: Check your response times in the tracker. If alerts sit unresolved for more than 24 hours, they convert to chargebacks anyway. Tighten your response window.
“Legitimate customers are being declined by fraud filters”
Cause: AVS or velocity filters are set too aggressively. About 30-40% of authenticated eCommerce transactions are declined, and a significant portion of those are false declines. Fix: Loosen AVS to “ZIP match only” instead of full address match. Add a manual review queue for flagged transactions instead of auto-declining. Review declined transactions weekly to calibrate.
“I can’t find my chargeback ratio in my processor dashboard”
Cause: Not all processors surface this metric clearly. Fix: Request a monthly chargeback report from your processor. If they can’t provide one, calculate it manually: (number of chargebacks in a month) ÷ (number of transactions in the same month) × 100. If your processor makes basic reporting difficult, consider whether they’re the right partner for your growth stage.
“Customers ignore my outreach after an alert”
Cause: Your email may land in spam, or the customer has already decided to dispute. Fix: Use a subject line like “Important update about your [Store Name] order #12345.” If no response within 12 hours, issue the refund. Waiting longer rarely changes the outcome and risks the alert window closing.
Next Steps: Turning Defense into Growth
With your early-warning system running, you’ve stopped the bleeding. Now turn that momentum into measurable growth. Start by reviewing your payment deposit speed and next-day funding options. Every chargeback you prevent is revenue that hits your account faster.
Next, use 30 days of data from your tracking spreadsheet to identify your top chargeback triggers. If “product not as described” dominates, invest in better product photography and descriptions. If “not recognized” persists, test adding your logo to digital receipts via services your gateway may offer.
Finally, explore whether transparent pricing at checkout can further reduce disputes by setting clearer customer expectations before the sale. Each of these extensions builds on the system you just created, compounding your savings over time.
Frequently Asked Questions
What are the common payment challenges faced by eCommerce merchants?
The most frequent challenges include chargebacks from unrecognized transactions, delayed deposit timelines that strain cash flow, high false decline rates that block legitimate customers, and processing fees that eat into margins. For growing eCommerce teams, the added burden of managing disputes without a dedicated fraud team makes chargeback prevention especially critical.
How does a chargeback early-warning system actually work?
Alert networks like Verifi (Visa) and Ethoca (Mastercard) notify you when a cardholder contacts their bank about a transaction. You receive the alert 24-72 hours before a formal chargeback is filed. During that window, you can issue a refund to resolve the dispute. The refund costs you the sale amount, but you avoid chargeback fees ($25-100 per incident) and protect your chargeback ratio from damage.
When should merchants conduct a payment processing audit?
Audit your payment processing setup at least quarterly. Run an immediate audit if your chargeback ratio exceeds 0.5%, if you notice a spike in customer complaints about unrecognized charges, or if your authorization rate drops below 90%. Seasonal businesses should also audit before peak sales periods to ensure fraud filters and alert systems are properly calibrated.
How do false declines impact customer relationships?
False declines happen when legitimate transactions are blocked by overly aggressive fraud filters. Research indicates that 30-40% of authenticated eCommerce transactions are declined, and 20-40% of those customers never retry the purchase. Beyond the lost sale, false declines damage customer trust and brand perception. Calibrating your fraud filters (starting with ZIP-only AVS matching) helps balance security with conversion.
Which factors affect the speed of payment deposits for eCommerce businesses?
Deposit speed depends on your processor’s funding schedule (next-day vs. 2-3 day batches), your batch submission timing, your chargeback ratio (high ratios can trigger reserve holds), and the payment methods you accept. Optimizing these factors can move your deposits from a 3-day cycle to next-business-day funding, significantly improving cash flow predictability.
Do I need a fraud team to manage chargebacks effectively?
No. The system outlined in this tutorial is designed for eCommerce managers who don’t have dedicated fraud staff. By combining alert network enrollment, a simple response workflow, and basic gateway fraud filters, a single person can manage chargeback prevention for a store processing hundreds of transactions daily. The key is consistency: checking alerts twice daily and responding within the alert window.


