How to Build a Customer Payment Recovery System
Step-by-step tutorial to recover failed transactions, prevent chargebacks, and reduce cart abandonment
Learn to build a payment recovery system that boosts recovery rates from 40% to 85%. This tutorial covers automated retry logic, strategic recovery emails, and chargeback prevention tactics.
TL;DR
- Audit your failures first – Export 90 days of decline data and identify your top 3 failure reasons before building any recovery system
- Match retry timing to decline type – Insufficient funds needs days between retries while temporary holds can retry in hours; optimized strategies recover 45-70% of failed payments
- Layer automated and human recovery – Use automated dunning for standard cases and route high-value or complex failures to your team for personal outreach
- Prevent chargebacks at the source – Clear billing descriptors, chargeback alerts, and quick refunds for small disputes protect your merchant account health
- Measure everything – Track recovery rate by channel, time to recovery, and revenue recovered; best-in-class businesses achieve 70-85% recovery rates through continuous optimization
What You Will Achieve: A Complete Payment Recovery System
By the end of this tutorial, you will have a fully operational payment gateway system that catches failed transactions before they become lost revenue. Your eCommerce store will automatically retry declined payments, send strategic recovery emails, and flag potential chargebacks before they happen.
Most businesses see a significant increase in recovered revenue once a structured recovery system is implemented and optimized over time. You will see fewer abandoned carts, faster deposits hitting your account, and a clear dashboard showing exactly which recovery tactics work for your customers.
The verification is simple: compare your failed payment recovery rate before and after implementation. Most businesses see measurable improvement within 14 days.
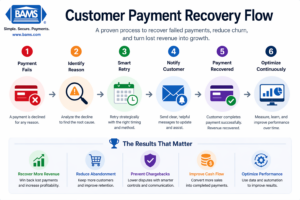
A simple recovery flow helps turn failed payments into completed transactions and recovered revenue.
Prerequisites and Setup Checklist
Before starting, confirm you have access to these essentials. Missing any item will stall your progress at specific steps noted below.
- Admin access to your payment processor dashboard (needed for Steps 3-5)
- Email marketing platform with automation capabilities (Klaviyo, Mailchimp, or similar)
- eCommerce platform admin access (Shopify, BigCommerce, WooCommerce, or equivalent)
- Current chargeback and failed payment data from the last 90 days
- Customer service team briefing time (30 minutes for Step 8)
Time estimate: 3-4 hours for initial setup, plus 1 hour weekly for optimization during the first month. The main blocker most teams face is waiting for payment processor API credentials, so request those first.
Why This Approach Works for eCommerce Recovery
This tutorial combines automated retry logic with human-triggered recovery sequences. A large portion of lost revenue comes from failed transactions rather than actual customer intent to stop buying. Pure automation misses context; pure manual recovery does not scale.
According to Visa, modern payment systems are designed to improve transaction success rates while maintaining speed and security.
Alternative approaches like aggressive dunning emails or immediate account suspension often damage customer relationships. The method here prioritizes recovery while protecting your brand reputation and reducing friction that causes cart abandonment.
Expect moderate technical difficulty. If you can set up email automation sequences and navigate your payment dashboard, you have the skills needed. The hardest part is patience: optimal retry timing requires testing over 2-3 weeks.
Step 1: Audit Your Current Payment Failure Landscape
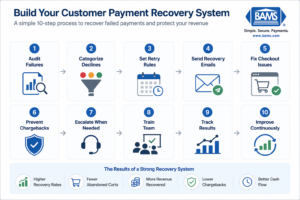
A structured system helps recover failed payments and improve revenue over time.
Action: Export your failed transaction report from your payment processor for the last 90 days. Filter by decline reason codes.
Navigate to your payment dashboard, find the “Transactions” or “Payments” section, and filter for status “Declined” or “Failed.” Export this data as a CSV file. You need columns for: transaction date, amount, decline code, and customer email.
Expected result: A spreadsheet showing patterns in your failures. Common decline codes include insufficient funds (code 51), expired card (code 54), and do not honor (code 05).
Checkpoint: You should identify your top 3 decline reasons. For most eCommerce businesses, insufficient funds and expired cards account for 60-70% of failures.
Common failure: If your export shows no decline codes, your processor may require enabling detailed reporting. Contact their support to activate “enhanced decline reason” reporting.
Step 2: Configure Smart Retry Logic Based on Decline Type
Action: Set up conditional retry rules in your payment processor that match retry timing to decline reason.
In your processor settings, locate “Retry Settings” or “Automatic Retry Configuration.” Create these rules:
- Insufficient funds (code 51): Retry in 3 days, then 7 days, then 14 days
- Expired card (code 54): Do not retry; trigger card update request immediately
- Temporary hold (code 43): Retry in 2 hours, then 24 hours
- Do not honor (code 05): Retry once after 5 days with different amount (split payment if possible)
Expected result: Your system now treats different failures differently. Targeted retry strategies consistently outperform generic retry schedules and recover a meaningful portion of failed payments.
Checkpoint: Test with a small transaction using a test card that triggers each decline type. Verify the correct retry schedule appears in your pending transactions.
Common failure: “Retry settings not available” error means your plan may not include this feature. Contact your processor about upgrading, or use a third-party dunning tool that integrates via API.
Step 3: Build Your Pre-Dunning Notification Sequence
Action: Create an automated email sequence that contacts customers before aggressive collection begins.
In your email platform, build a new automation triggered by “payment failed” webhook or segment. Create three emails:
Email 1 (sent immediately): Subject line: “Quick update needed for your order.” Body: Friendly notification that payment did not process, with one-click link to update payment method. No guilt, no urgency language.
Email 2 (sent 3 days later if unresolved): Subject line: “Your [product name] is waiting.” Body: Reminder with specific order details and alternative payment options including digital wallets.
Email 3 (sent 7 days later if unresolved): Subject line: “Last step to complete your purchase.” Body: Final friendly reminder with customer service contact for assistance.
Expected result: Well-timed recovery messaging helps bring customers back and complete transactions that would otherwise be lost.
Checkpoint: Send test emails to yourself. Verify all links work, payment update pages load correctly, and mobile formatting displays properly.
Common failure: Links lead to expired sessions or login walls. Ensure your payment update links include authentication tokens that keep customers logged in for at least 48 hours.
Step 4: Implement Chargeback Prevention Strategies at the Source
Action: Configure transaction descriptors and implement pre-transaction verification to stop chargebacks before they start.
Access your merchant account settings and update your billing descriptor to clearly show your business name and contact method. Instead of “PYMNT*12345,” use “YOURSTORE.COM 800-555-1234.”
Next, enable Address Verification Service (AVS) and CVV matching. Set your processor to flag (not auto-decline) transactions where:
- Billing address does not match card address
- CVV is missing or incorrect
- Transaction amount exceeds customer’s historical average by 300%+
Expected result: Customers recognize charges on their statements and call you instead of their bank. Flagged transactions get human review before processing, catching fraud without blocking legitimate sales.
For detailed implementation of fraud verification techniques, see this guide on preventing fraud-related chargebacks in eCommerce.
Checkpoint: Process a test transaction and verify the descriptor appears correctly on your test card statement within 24-48 hours.
Common failure: Descriptor changes may take 1-2 billing cycles to propagate. If customers report old descriptors, confirm the change with your processor and provide a timeline.
Step 5: Create Your Reduce Cart Abandonment Recovery Flow
Action: Build a parallel recovery system specifically for abandoned carts that failed at the payment step.
This differs from general cart abandonment. You are targeting customers who entered payment information but the transaction failed. In your eCommerce platform, create a segment for “checkout started + payment attempted + order not completed.”
Set up this automation sequence:
- 15 minutes after abandonment: SMS or email with message: “Your payment did not go through. Want to try a different card?” Include link directly to payment step with cart preserved.
- 2 hours after: Offer alternative payment methods. “Complete your order with PayPal, Apple Pay, or Shop Pay.”
- 24 hours after: Customer service outreach for high-value carts (over $200). Personal email from a real team member offering phone assistance.
For more tactics on reducing cart abandonment through payment options, including guest checkout and digital wallet integration, review this implementation guide.
Expected result: Recovery of 15-25% of payment-failed abandoned carts within 48 hours.
Checkpoint: Abandon a test cart at the payment step. Verify you receive all three messages at correct intervals with working links.
Common failure: Cart contents expire before customer returns. Extend cart preservation to 7 days minimum in your platform settings.
Step 6: Set Up Real-Time Chargeback Alerts
Action: Connect to chargeback alert networks that notify you before disputes finalize.
Contact your payment processor about enabling Visa’s Verifi CDRN (Cardholder Dispute Resolution Network) and Mastercard’s Ethoca alerts. These services notify you when a customer initiates a dispute, giving you 24-72 hours to issue a refund before it becomes a formal chargeback.
Configure alerts to route to a dedicated email address monitored during business hours. Create a response protocol:
- Under $50 disputes: Auto-refund immediately (the cost of fighting exceeds the transaction value)
- $50-$200 disputes: Review order details, contact customer within 4 hours, refund if legitimate
- Over $200 disputes: Full investigation with shipping confirmation, customer communication logs, and fraud analysis
Expected result: 40-60% of potential chargebacks converted to simple refunds, preserving your chargeback ratio.
For comprehensive chargeback prevention strategies and defense tactics, including reason code analysis and response templates, see this detailed resource.
Checkpoint: Confirm alert enrollment by requesting a test notification from your processor. Verify it arrives at your designated email within the promised timeframe.
Common failure: Alerts arrive but no one responds in time. Assign specific team members to monitor the alert inbox and set up mobile notifications for after-hours disputes. The PCI Security Standards Council emphasizes that strong fraud prevention and compliance practices are essential to reduce disputes and protect transactions.
Step 7: Implement Account Updater Services
Action: Enable automatic card-on-file updates through your processor’s Account Updater service.
When customers’ cards expire or get reissued, Account Updater automatically retrieves the new card details from the card networks. This prevents the “expired card” decline that causes significant involuntary churn.
In your processor dashboard, locate “Account Updater” or “Card Account Updater” settings. Enable the service and configure it to:
- Run updates 7 days before stored cards expire
- Automatically update card details without customer action
- Log all updates for compliance records
Expected result: 70-80% of expired card declines eliminated. Payment failures can quietly reduce overall revenue if left unaddressed, especially in subscription or repeat purchase models.
Checkpoint: Review your Account Updater logs after the first update cycle (usually monthly). Verify cards are being updated and the success rate meets processor benchmarks (typically 60-70% match rate).
According to the Federal Reserve, transaction processing structures directly influence payment efficiency and overall costs.
Common failure: “Account Updater not available for your merchant category” error. Some high-risk categories are excluded. If this applies, implement manual card update request emails 30 days before expiration instead.
Step 8: Train Your Team on Recovery Protocols
Action: Brief your customer service team on the new recovery system and their role in high-touch recovery.
Schedule a 30-minute training session covering:
- When automated recovery hands off to humans: High-value carts, repeat failures, customer replies to dunning emails
- Approved recovery offers: What discounts or incentives can they offer to recover a sale? (Recommend 10% maximum for first recovery attempt)
- Escalation paths: When to involve management for chargeback disputes or fraud suspicion
- Documentation requirements: What to log in the CRM for each recovery attempt
Expected result: Consistent customer experience across all recovery touchpoints. Team members can handle recovery calls confidently without manager approval for standard situations.
Checkpoint: Role-play three scenarios: expired card recovery call, “I didn’t make this purchase” dispute, and “my bank declined but I want to buy” assistance. Team members should complete each scenario correctly.
Common failure: Team offers inconsistent discounts or makes promises the system cannot fulfill. Create a one-page reference card with approved offers and system limitations.
Step 9: Configure Your Recovery Dashboard
Action: Build a monitoring dashboard that tracks recovery performance across all channels.
In your analytics platform (Google Analytics, your eCommerce platform’s native analytics, or a dedicated BI tool), create a dashboard with these metrics:
- Daily failed transactions: Count and total value
- Recovery rate by channel: Automated retry vs. email vs. SMS vs. phone
- Time to recovery: Average days from failure to successful payment
- Chargeback ratio: Monthly chargebacks divided by total transactions (keep under 1%)
- Revenue recovered: Dollar value of payments recovered that would have been lost
Expected result: Single view of your payment health that updates daily. You can spot problems (sudden spike in a specific decline code) before they become crises.
Checkpoint: Verify all data sources connect correctly by comparing dashboard numbers to raw reports from each platform. Discrepancies over 5% indicate a data connection issue.
Common failure: Dashboard shows stale data. Confirm refresh schedules and set up alerts for data connection failures.
Configuration Variables You May Need to Adjust
These settings work for most eCommerce businesses but may need tuning based on your customer behavior and product type.
Retry timing: The 3-7-14 day schedule for insufficient funds assumes customers receive paychecks biweekly. If your customer base skews toward monthly pay cycles, adjust to 5-15-30 days.
Email frequency: Three emails over 7 days works for most products. High-ticket items (over $500) may benefit from extending to 14 days with 4-5 touchpoints. Low-ticket items (under $50) should compress to 3-4 days with 2 emails maximum.
Auto-refund threshold: The $50 auto-refund threshold assumes average order values of $75-150. Adjust proportionally to your AOV. A good rule: auto-refund disputes under 30% of your AOV.
Must-change settings: Your billing descriptor, alert email address, and team training content are specific to your business. Do not use the examples as-is.
Verification and Testing Your Recovery System
Run this complete test sequence before considering your system live:
Test 1: Simulated decline recovery. Use your processor’s test card numbers to trigger each major decline type. Verify the correct retry schedule activates and the appropriate email sends.
Test 2: End-to-end cart recovery. Abandon a cart at payment with a real email address you control. Confirm you receive all recovery messages with working links and preserved cart contents.
Test 3: Chargeback alert response. Request a test alert from your processor (most offer this). Verify it routes correctly and your team responds within the target timeframe.
Test 4: Dashboard accuracy. Manually count transactions from yesterday’s raw data. Compare to dashboard figures. Variance should be under 2%.
Success definition: All four tests pass without manual intervention or workarounds. If any test requires you to fix something manually, the system is not ready for production.
Edge cases to verify: International transactions (currency conversion affects retry logic), subscription renewals (different from one-time purchases), and guest checkout recovery (no account to update).
Common Errors and How to Fix Them
Error: “Webhook delivery failed” in email platform.
Cause: Your eCommerce platform cannot reach your email service’s webhook endpoint. Usually a firewall or authentication issue.
Fix: Whitelist your email platform’s IP addresses in your firewall. Regenerate webhook credentials and update both platforms.
Error: Recovery emails marked as spam.
Cause: Email authentication (SPF, DKIM, DMARC) not configured correctly for your sending domain.
Fix: Verify DNS records match your email platform’s requirements. Use mail-tester.com to check authentication before sending to customers.
Error: “Card update not permitted” from Account Updater.
Cause: The card issuer does not participate in the Account Updater network, or the card is prepaid/gift card.
Fix: For non-participating issuers, fall back to manual update request emails. Exclude prepaid cards from Account Updater processing.
Error: Retry attempts charging customer multiple times successfully.
Cause: Race condition between retry logic and customer’s manual payment attempt.
Fix: Implement idempotency keys on all payment attempts. Add 15-minute cooldown after any successful charge before next retry can process.
Error: Chargeback alerts arriving after dispute deadline.
Cause: Alert service delays or incorrect routing.
Fix: Confirm alert service SLA with processor. Set up redundant notification (email plus SMS) for all alerts. Escalate delivery delays to processor support.
Error: Dashboard showing 0% recovery rate despite successful recoveries.
Cause: Attribution tracking not connecting failed transaction to recovered transaction.
Fix: Ensure customer ID or email persists across the failure and recovery events. Check that your analytics tracks the full customer journey, not just session-based conversions.
Next Steps: Extending Your Recovery System
Once your basic recovery system runs smoothly for 30 days, consider these enhancements:
Predictive decline prevention: Use your historical data to identify customers likely to have payment failures (card expiring soon, previous soft declines) and proactively request payment updates before the scheduled charge.
Dynamic retry optimization: Implement machine learning tools that adjust retry timing based on individual customer patterns. Advanced tools can further improve recovery performance by adapting retry timing and customer communication based on behavior.
Multi-processor redundancy: Route transactions to a backup processor when your primary declines. Some declines are processor-specific, and a second attempt through a different network succeeds 10-15% of the time.
For businesses using BigCommerce, expanding payment options with Apple Pay integration can reduce checkout friction and improve authorization rates on mobile transactions.
Your payment recovery system is now a competitive advantage. While competitors lose revenue to preventable payment failures, your business captures those sales and builds customer loyalty through smooth recovery experiences.
Frequently Asked Questions
What are faster deposit strategies in merchant services?
Faster deposit strategies include next-day funding agreements with your processor, same-day ACH enrollment, and batch processing optimization. The most impactful change is often switching from standard 2-3 day funding to next-day funding, which improves cash flow without changing your checkout process. Some processors offer same-day funding for transactions settled before noon.
How can I improve my payment authorization rates?
Authorization rates improve through three main tactics: implementing Account Updater to keep stored cards current, using network tokenization to reduce fraud flags, and optimizing your merchant category code (MCC) to match your actual business. Clean billing descriptors also help because transactions that look legitimate to card issuers get approved more often.
Which payment processing fees can I reduce to optimize costs?
Focus on interchange optimization first since it represents 70-80% of processing costs. Qualify for lower interchange by submitting Level 2 and Level 3 data for B2B transactions, batching settlements within 24 hours, and using address verification. Assessment fees are non-negotiable, but processor markup is always negotiable, especially with transaction volume leverage.
What role does fraud protection play in payment optimization?
Fraud protection directly impacts authorization rates and chargebacks. Overly aggressive fraud filters decline legitimate transactions (false positives), while weak filters allow fraud that becomes chargebacks. The goal is balanced protection that catches actual fraud without blocking good customers. Modern AI-based fraud tools achieve this balance better than rule-based systems.
When should I consider expanding my payment options?
Expand payment options when you see cart abandonment at the payment step exceeding 20%, when mobile traffic represents over 40% of checkouts, or when you are expanding internationally. Digital wallets like Apple Pay and Google Pay reduce mobile checkout friction significantly. Buy-now-pay-later options can increase average order value by 20-30% for higher-priced items.
How long does it take to see results from payment recovery improvements?
Initial results appear within 7-14 days as your first retry cycles complete. Meaningful data for optimization requires 30 days minimum to capture a full billing cycle. Most businesses see their recovery rate stabilize at the improved level within 60-90 days, after which gains come from incremental optimization rather than system changes.