Transaction Data Optimization: A Guide to Lower Fees
Last Updated on July 29, 2026 by Dimitri Akhrin
How Level 2 and Level 3 data fields unlock interchange savings most eCommerce merchants miss
Learn how to map tax, freight, and line-item fields across your eCommerce stack so every qualifying transaction earns a lower interchange rate. This guide covers exactly which data fields matter and how to verify your gateway is passing them.
TL;DR
- Your fees are high because of missing data, not bad rates – Card networks assign interchange tiers based on the data fields included with each transaction. Missing tax, freight, or line-item fields trigger automatic downgrades to more expensive tiers.
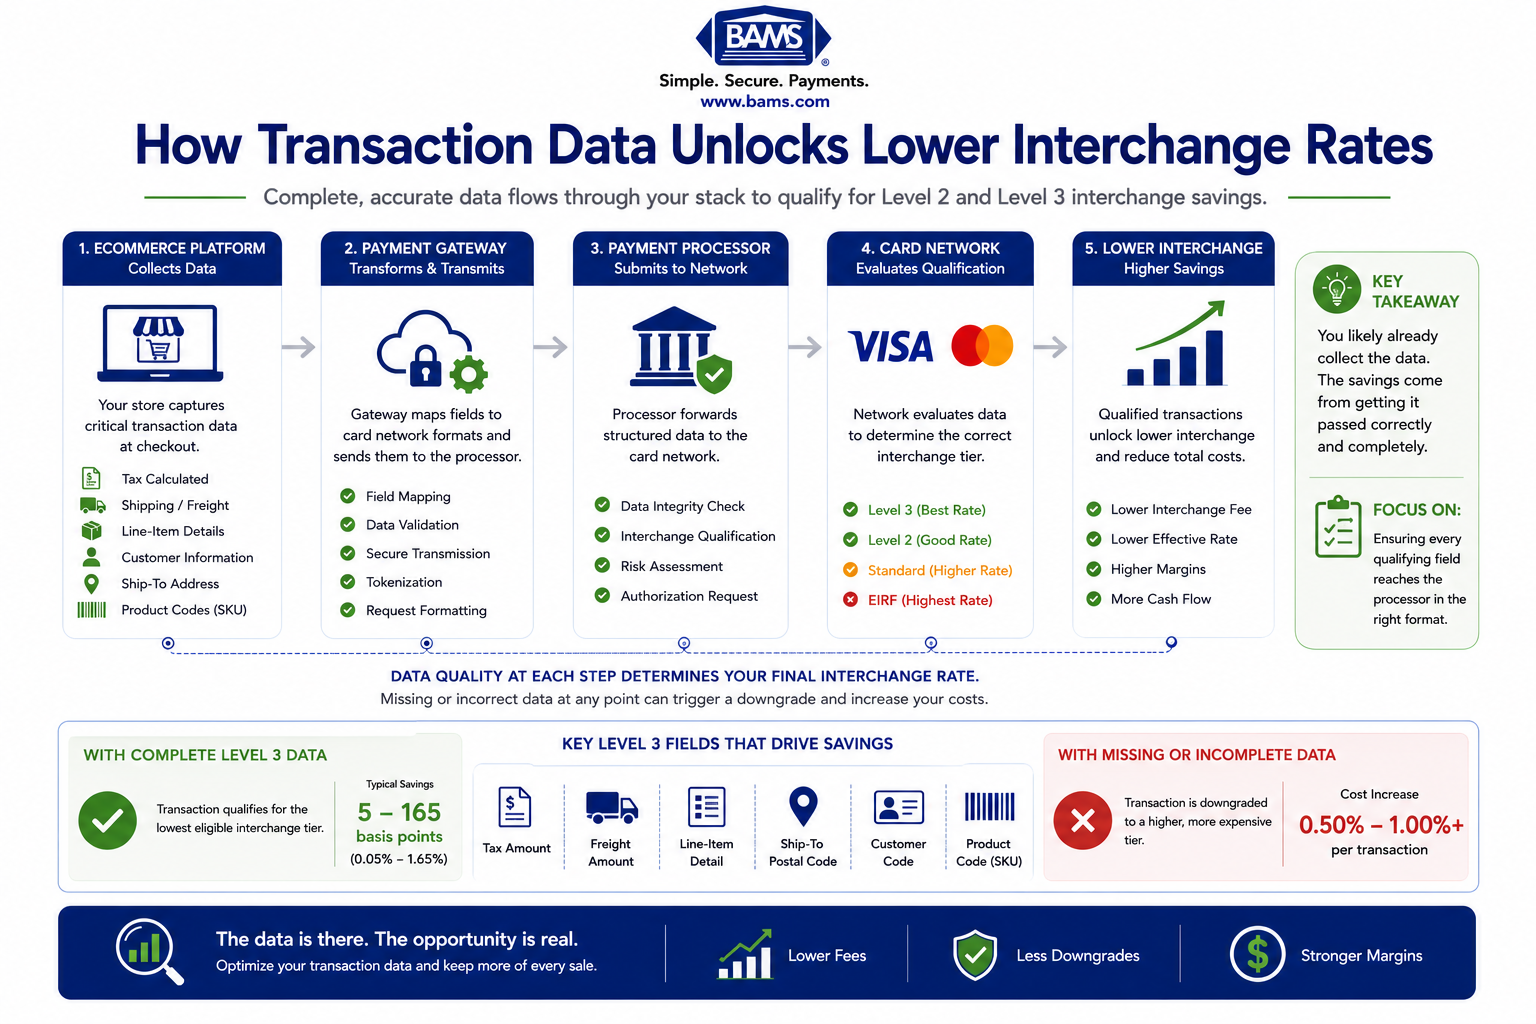
- Level 3 data fields unlock the lowest interchange rates – Passing tax amount, freight amount, line-item detail, ship-to postal code, and customer code on commercial card transactions can reduce interchange by 5 to 165 basis points.
- Your platform collects the data but probably doesn’t pass it – Most eCommerce carts calculate tax and shipping internally, but the gateway integration often fails to forward those values to the processor as structured Level 3 fields.
- Audit your processing statement first – Look for downgraded commercial card transactions classified as “Standard” or “EIRF.” These are the transactions where field mapping improvements will produce immediate, measurable savings.
- Treat this as ongoing operations, not a one-time fix – Platform updates, plugin changes, and catalog additions can silently break field mappings. Monthly monitoring of interchange qualification rates catches regressions before they erode your savings.
Guide Orientation: What This Covers and Who It’s For
This guide teaches eCommerce managers how to map tax, freight, and line-item fields across their platforms so that every qualifying transaction sends the enriched data needed to unlock lower interchange rates. The focus is transaction data optimization, specifically the Level 2 and Level 3 fields that card networks use to determine which interchange tier your transactions land in.
You’re the right reader if you manage payments for an established online business, process a meaningful volume of commercial or purchasing cards, and suspect your payment processing fees are higher than they should be. By the end, you’ll understand exactly which data fields matter, where they live in your eCommerce stack, and how to verify that your gateway is actually passing them to the processor.
This guide does not cover rate negotiation tactics, processor switching, or PCI compliance. It focuses entirely on the data layer between your cart and your processor, the layer most merchants never examine.
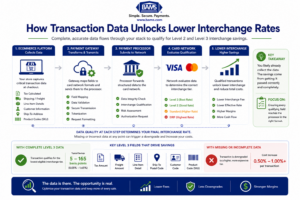
Most eCommerce platforms already collect tax, freight, and line-item data. The real savings come from ensuring that information reaches the payment processor correctly for Level 2 and Level 3 interchange qualification.
Why Transaction Data Optimization Matters More Than Rate Negotiation
Most eCommerce managers assume that reducing processing costs means negotiating a better rate or switching providers. That instinct is understandable but incomplete. The largest variable in what you actually pay per transaction isn’t your processor’s markup. It’s the interchange rate set by Visa, Mastercard, or the relevant card network, and that rate is determined in real time by the data your gateway sends with each authorization.
When your system fails to pass tax amounts, freight charges, product codes, or ship-to postal codes, the card network can’t verify the transaction as a legitimate commercial purchase. The result is an automatic downgrade to a more expensive interchange tier. You pay a higher rate not because you negotiated poorly, but because your data was incomplete. According to the Federal Reserve’s 2025 Small Business Credit Survey, controlling operating expenses remains a priority for many businesses. Reducing avoidable payment acceptance costs can improve margins without increasing sales.
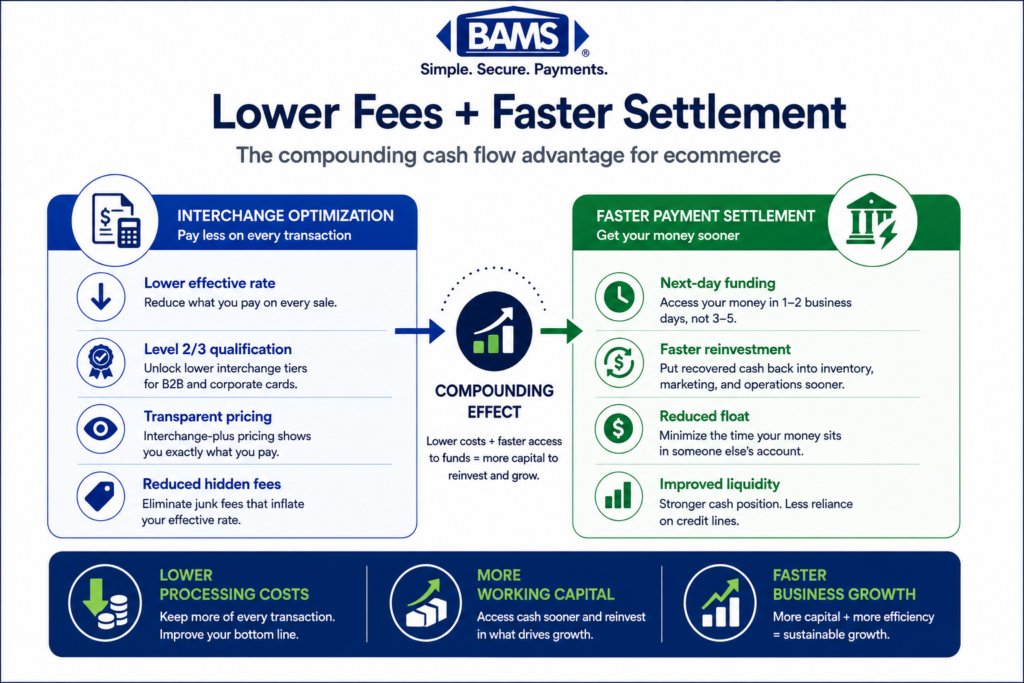
The cost of this gap is not trivial. One eCommerce brand reduced its effective rate from 2.3% to 2.0% simply by switching to a gateway that supported Level 3 data, saving over $9,000 annually. For merchants on interchange-plus pricing, where the interchange component passes through transparently, every basis point you recover goes directly to your bottom line.
The opportunity is structural. It doesn’t require changing processors, renegotiating contracts, or altering your checkout flow. It requires understanding what data your platforms already collect and making sure that data reaches the processor in the format card networks expect.
Core Concepts: Interchange Tiers, Level 3 Data, and Field Mapping
Interchange Tiers Are Not Fixed
Interchange is the fee your processor pays the card-issuing bank on every transaction. Card networks publish hundreds of interchange categories, each with different rates. Where your transaction lands depends on several factors: card type (consumer, corporate, purchasing), merchant category code, and critically, the data fields included in the authorization and settlement messages.
Visa’s payment processing guidance explains that interchange qualification depends on transaction characteristics, card type, and the information submitted during authorization and settlement.
When required fields are missing, the transaction “downgrades” to a higher-cost tier. This isn’t a penalty in the punitive sense. It’s the network’s default behavior when it can’t classify a transaction with confidence.
Level 1, Level 2, and Level 3 Data
Card networks define three tiers of transaction data richness:
- Level 1: Basic authorization data (card number, expiration, transaction amount). Every transaction includes this.
- Level 2: Adds tax amount, customer code, and merchant postal code. Required for most commercial card interchange qualification.
- Level 3: Adds line-item detail (product descriptions, commodity codes, quantities, unit costs), freight amount, ship-to postal code, and other fields. Required for the lowest interchange tiers on purchasing and corporate cards.
The savings from Level 3 qualification are significant. Missing Level 3 fields can inflate your effective rate by 5 to 165 basis points on commercial card transactions.
The Visa Commercial Enhanced Data Program (CEDP) describes how enhanced transaction data helps eligible commercial card transactions qualify for more favorable interchange categories.
What “Field Mapping” Actually Means
Field mapping is the process of identifying where each required data element lives in your eCommerce platform (cart, ERP, shipping module, tax engine) and ensuring it flows through your payment gateway to your processor in the correct format. Your platform almost certainly collects tax and freight amounts. The question is whether those values reach your processor as structured Level 3 fields or get lost somewhere in the integration layer.
The Framework: Four Phases of Field Mapping
Mapping tax and freight fields across platforms follows a four-phase process. Each phase builds on the previous one, and skipping ahead typically creates problems that are harder to diagnose later.
- Phase 1: Audit — Identify what data your platforms already collect and what your processor actually receives.
- Phase 2: Map — Match each required Level 3 field to its source system and trace the path it takes to settlement.
- Phase 3: Configure — Adjust gateway settings, middleware, or integration code to pass the mapped fields correctly.
- Phase 4: Verify — Confirm that transactions are qualifying at the expected interchange tiers and monitor for regressions.
These phases apply regardless of your specific platform stack. The tools and configuration screens differ between Shopify, WooCommerce, Magento, BigCommerce, and custom builds, but the logic is the same: find the data, trace the path, fix the gaps, and prove it works.
Step-by-Step Breakdown: Mapping Tax and Freight Fields for Lower Interchange
Step 1: Audit Your Current Data Flow
Objective: Establish a clear picture of what transaction data your processor currently receives, not what your platform collects internally.
Start by pulling your most recent processing statement. Look at the interchange qualification breakdown. If you see categories labeled “Standard” or “Data Rate II” on transactions that should be qualifying at commercial or purchasing card tiers, your data isn’t making it through. These downgrade signals on your processing statement are the clearest evidence of missing fields.
Next, run a test transaction on your live site using a commercial or purchasing card. Contact your processor or gateway provider and ask them to show you the raw data fields that were included in both the authorization request and the settlement batch. Compare what was sent against the Level 3 field requirements published by Visa and Mastercard. Pay particular attention to whether tax amount, freight amount, and line-item arrays are present and populated.
Anti-patterns: Don’t assume your gateway handles Level 3 automatically. Many popular eCommerce gateways pass Level 1 data only, regardless of what your cart collects. Don’t rely on your platform’s “tax calculated” confirmation as evidence that the tax amount reached the processor.
Success indicators: You have a documented list of which Level 3 fields are currently being passed and which are missing. You can identify the exact point in your data flow where each missing field drops off.
Step 2: Identify Field Sources Across Your Platform Stack
Objective: Map every required Level 3 field to the specific system, database table, or API endpoint where it originates.
The key fields you need to locate are:
- Tax amount: Usually calculated by your cart’s native tax engine or a third-party tax service (Avalara, TaxJar, etc.). The value typically lives in the order object.
- Freight/shipping amount: Generated by your shipping module or rate calculator. Stored in the order’s shipping line or fulfillment object.
- Line-item detail: Product name, SKU, quantity, unit price, commodity code. These live in your product catalog and order line items.
- Ship-to postal code: Captured at checkout in the shipping address fields.
- Customer code / PO number: Often entered by B2B buyers at checkout. May require a custom field if your platform doesn’t include one natively.
For each field, document the system of record, the field name or API property, and whether it’s available at authorization time or only after order completion. Some gateways require Level 3 data at authorization; others accept it at settlement. This distinction matters for your configuration in Step 3.
Anti-patterns: Don’t treat all platforms as equivalent. Shopify’s native checkout, for example, does not expose Level 3 fields to most payment gateways without middleware or a custom integration. WooCommerce with a compatible gateway plugin may pass some fields natively but miss others. Assuming your platform “handles it” without verifying field-by-field is the most common source of persistent downgrades.
Success indicators: You have a field mapping table that lists every required Level 3 field, its source system, the exact property or field name, and its availability window (auth vs. settlement).
Step 3: Trace and Fix the Data Path to Your Processor
Objective: Ensure each mapped field travels from its source system through your gateway to your processor without being dropped, truncated, or reformatted.
This is where most implementations break down. The data exists in your platform, but the integration between your cart, your gateway, and your processor doesn’t carry it through. Common failure points include:
- Gateway limitations: Your gateway’s API may not support Level 3 fields at all, or it may support them only on specific card types. Check your gateway’s API documentation for Level 3 or “enhanced data” endpoints.
- Plugin gaps: If you use a payment plugin (e.g., WooCommerce Payments, Shopify Payments), the plugin may not populate Level 3 fields even when the underlying gateway supports them. You may need a specialized plugin, middleware, or direct API integration.
- Field format mismatches: Tax and freight amounts must be passed as separate numeric fields, not embedded in a description string. Commodity codes must follow the correct standard (UNSPSC for Visa, SIC for some Mastercard programs). A field that exists but is formatted incorrectly will not qualify.
If your current gateway cannot pass Level 3 data, you have two options: integrate a Level 3-capable gateway alongside your existing checkout, or work with a processor that provides middleware to enrich your transaction data before it reaches the network. BAMS, for instance, works with eCommerce merchants to identify these data gaps and configure the integration layer so that tax, freight, and line-item fields pass correctly on qualifying transactions, without requiring a full platform migration.
Anti-patterns: Don’t build custom integrations without first confirming that your processor can accept and forward Level 3 data to the card networks. Some processors strip enhanced data fields regardless of what you send. Also avoid passing placeholder or zero values for tax and freight. A tax amount of $0.00 on a taxable transaction will not qualify and may trigger additional scrutiny.
Success indicators: A test transaction with a commercial card shows all required Level 3 fields populated in the processor’s transaction detail report. Your gateway logs confirm the fields were included in the settlement message.
Step 4: Validate Address Verification (AVS) Data
Objective: Confirm that your card-not-present transactions include full AVS data to avoid a separate, common downgrade trigger.
Level 3 data gets the most attention, but incomplete address verification data is another frequent cause of interchange downgrades on eCommerce transactions. Including both the zip code and numeric street address in your AVS submission improves your chance of qualifying for lower Visa and Discover interchange rates.
Most eCommerce platforms collect full billing addresses at checkout. The issue is whether your gateway sends both the numeric portion of the street address and the zip code, or only the zip. Check your gateway’s AVS configuration. Some default to zip-only matching, which is sufficient for fraud screening but insufficient for optimal interchange qualification.
Anti-patterns: Don’t confuse AVS fraud screening results with interchange qualification. Your gateway may return an AVS “match” based on zip code alone, but the interchange system evaluates whether the full AVS data was submitted, not just whether it matched.
Success indicators: Your gateway’s transaction logs show both AVS street number and zip code submitted for every card-not-present transaction. Your processor confirms full AVS data is included in authorization requests.
Step 5: Enforce Timely Settlement
Objective: Eliminate settlement-timing downgrades by batching transactions within 24 hours of authorization.
Even with perfect Level 3 data, settlement delays cause transactions to downgrade to more expensive interchange tiers. Visa and Mastercard expect card-not-present transactions to settle within one to two days of authorization. If your batch process runs less frequently, or if orders sit in a “pending” state waiting for manual review or fulfillment confirmation, you’re paying more than necessary.
Review your gateway’s batch settlement schedule. Most gateways support automatic daily batching, but some require manual batch submission or are configured to batch only when triggered by your platform’s order status changes. If you use a fulfillment-triggered settlement model (where you capture payment only when an order ships), consider whether the delay between authorization and capture is pushing transactions past the settlement window.
Anti-patterns: Don’t hold authorizations open for extended periods to accommodate backorders or pre-orders. If fulfillment will take more than 24 to 48 hours, consider authorizing and settling immediately, then issuing refunds if needed, rather than letting the authorization age and downgrade.
Success indicators: Your average time from authorization to settlement is under 24 hours. Your processing statement shows zero or near-zero transactions in “Standard” or “EIRF” downgrade categories due to late settlement.
Step 6: Monitor Qualification Rates and Measure Savings
Objective: Build an ongoing monitoring process that catches regressions and quantifies the financial impact of your field mapping work.
After configuring your data flow, pull your next full-month processing statement and compare interchange qualification rates against your pre-optimization baseline. Focus on commercial and purchasing card transactions specifically. Calculate your effective rate on that segment before and after the changes.
The math is straightforward. One merchant reduced their commercial card effective rate from 2.65% to 2.05% after mapping Level 3 fields for tax, shipping, and line items, saving roughly $2,880 annually on that card segment alone. Your savings will depend on your commercial card volume and the severity of your previous downgrades, but the pattern is consistent: merchants who pass complete Level 3 data pay measurably less per transaction.
Set a monthly review cadence. Platform updates, gateway version changes, and new product catalog entries can all break field mappings silently. A field that passed correctly last month may stop passing after a plugin update. Monitoring your interchange qualification distribution each month catches these regressions before they accumulate.
Anti-patterns: Don’t treat this as a one-time project. The most common failure mode is implementing Level 3 data correctly, seeing savings for a few months, and then losing those savings after a platform update breaks the integration without anyone noticing.
Success indicators: Your monthly effective rate on commercial cards is stable at the post-optimization level. You have a documented process for reviewing interchange qualification after any platform, gateway, or plugin update.
Practical Examples: Platform-Specific Scenarios
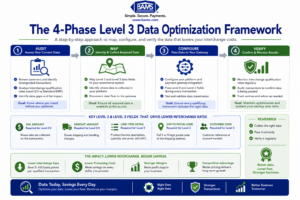
A structured framework helps merchants identify where transaction data is collected, how it moves through their eCommerce stack, and how to verify that every qualifying field reaches the processor.
Scenario 1: WooCommerce with a Third-Party Gateway
A mid-size B2B merchant running WooCommerce uses a popular gateway plugin that supports Level 2 data (tax amount and customer code) but does not pass Level 3 line-item detail. Their commercial card transactions qualify at Level 2 rates but miss the lower Level 3 tiers. By adding a Level 3-capable middleware layer between WooCommerce and their processor, they begin passing product descriptions, quantities, unit costs, commodity codes, and freight amounts. Their effective rate on purchasing card transactions drops by approximately 60 basis points.
Scenario 2: Shopify with Native Payments
An eCommerce brand on Shopify Plus discovers that Shopify Payments does not pass Level 3 data to the processor. Their payment processing costs on corporate cards are consistently higher than expected. They integrate an external gateway that accepts Level 3 fields via API, using Shopify’s checkout extensibility to pass tax, freight, and line-item data directly. The result mirrors the case study cited earlier: a reduction in effective rate from 2.3% to 2.0%, translating to over $9,000 in annual savings.
Scenario 3: The B2B Merchant with High Commercial Card Volume
A wholesale distributor processing $2 million annually in commercial card transactions has never passed Level 3 data. Their transactions consistently downgrade to Standard interchange. After implementing full Level 3 field mapping (tax, freight, line items, ship-to zip, customer code), their qualifying transactions move to the lowest available commercial interchange tiers. At a conservative 80 basis point improvement on 60% of their volume, the annual savings exceed $9,600. For context, one high-volume client saved $5 to $6 million per year through enhanced data capture on commercial cards, demonstrating how this scales with volume.
Common Mistakes and Pitfalls
The most predictable failure is assuming your platform and gateway handle Level 3 data by default. They almost certainly don’t. Many merchants discover this only after auditing their processing statements and finding widespread downgrades on commercial card transactions.
Another common mistake is passing incomplete or incorrectly formatted data. A tax field populated with “included” instead of a numeric value, a freight amount embedded in a text description rather than a dedicated field, or a commodity code in the wrong standard will all fail to qualify. The card network’s systems are not flexible about formatting.
Merchants also frequently overlook settlement timing as a separate downgrade trigger. You can pass perfect Level 3 data and still pay elevated rates if your batch settles more than 24 hours after authorization.
Finally, treating field mapping as a one-time project rather than an ongoing operational concern leads to silent regressions. Cutting payment processing costs requires sustained attention to your data flow, especially after platform updates.
What to Do Next
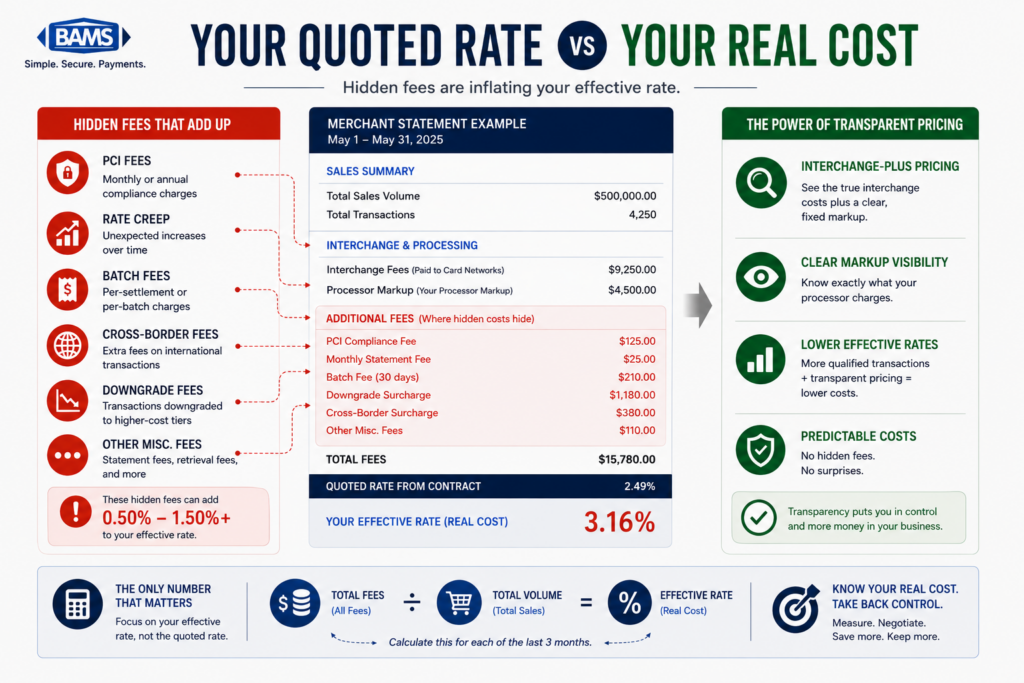
Start with the audit. Pull your most recent processing statement and look at the interchange qualification breakdown for commercial and purchasing card transactions. If you see downgrades, you have a quantifiable opportunity. If your statement doesn’t break out interchange categories, that itself is a signal: you may not be on interchange-plus pricing, which means you can’t see (or benefit from) the savings that better data would unlock.
Build your field mapping table for the five core Level 3 fields: tax amount, freight amount, line-item detail, ship-to postal code, and customer code. Identify where each one lives in your platform and whether it reaches your processor. You don’t need to fix everything at once. Even adding tax and freight fields alone can move transactions from Standard to Level 2 qualification, which is a meaningful improvement.
Revisit this guide after your first month of post-optimization statements. Compare your effective rates, document the savings, and use that data to justify further investment in your data integration layer. Small, verified improvements compound over time into significant margin recovery.
Frequently Asked Questions
What are the best strategies to reduce payment processing fees?
The most effective strategy most eCommerce merchants overlook is ensuring their gateway passes complete Level 2 and Level 3 transaction data (tax amounts, freight charges, line-item details) to their processor. This qualifies transactions for lower interchange tiers set by card networks. Beyond data optimization, settling transactions within 24 hours, submitting full AVS data, and using interchange-plus pricing so you can see and benefit from qualification improvements all contribute to measurable fee reduction.
Why is interchange-plus pricing more beneficial than flat-rate pricing?
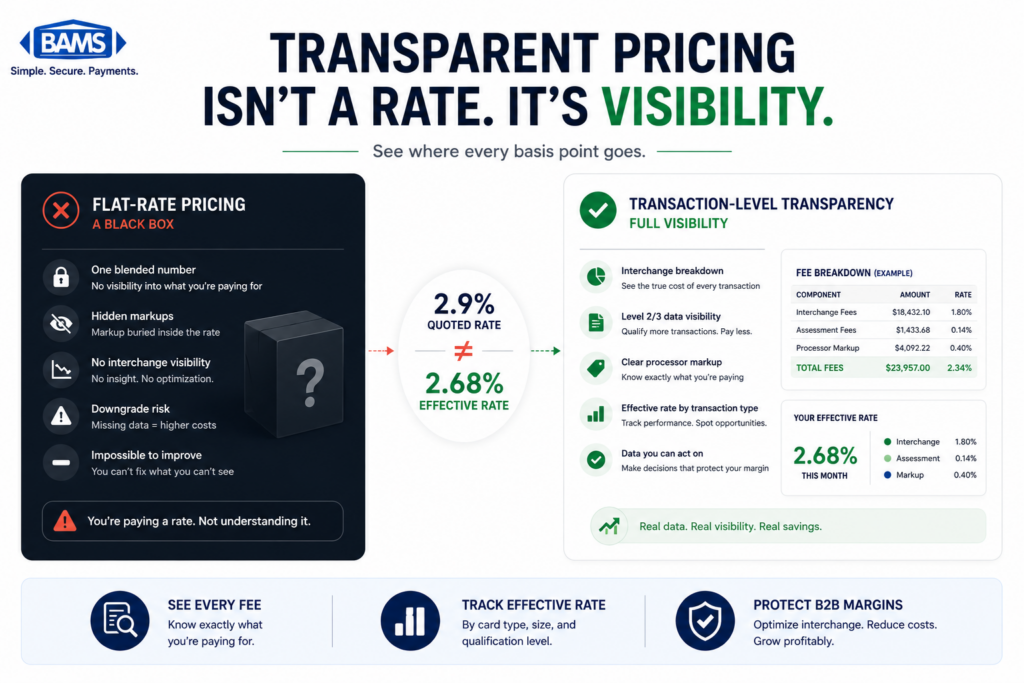
Interchange-plus pricing separates the interchange fee (set by the card network) from your processor’s markup. This transparency means that when you improve your data quality and qualify for lower interchange tiers, you keep the savings. With flat-rate pricing, you pay the same percentage regardless of how well your transactions qualify, so the processor captures the benefit of any data improvements, not you.
How does optimizing transaction data affect processing fees?
Card networks like Visa and Mastercard assign interchange rates based partly on the data included with each transaction. Transactions that include tax amounts, freight charges, and line-item detail qualify for lower rates on commercial and purchasing cards. Leveraging Level 2 and Level 3 data on commercial cards can reduce interchange rates by 5 to 165 basis points (0.05% to 1.65%), depending on the card type and data completeness.
How can I tell if my transactions are being downgraded?
Check your processing statement for interchange category breakdowns. If you see commercial or purchasing card transactions classified as “Standard,” “EIRF,” or “Data Rate II” instead of “Commercial Level 3” or “Purchasing Card Level 3,” those transactions are being downgraded. If your statement doesn’t show interchange categories at all, ask your processor for a detailed breakdown or consider whether your current pricing model gives you visibility into these costs.
Do all payment gateways support Level 3 data?
No. Many popular eCommerce gateways, including some native platform payment solutions, pass only Level 1 data by default. Even gateways that technically support Level 3 fields may require specific API calls, plugins, or middleware to populate them. Always verify your gateway’s Level 3 capabilities by checking its API documentation and testing with a live commercial card transaction rather than relying on marketing claims.
How much can I realistically save by mapping Level 3 fields?
Savings depend on your commercial card volume and the severity of your current downgrades. Documented examples show merchants saving $2,880 to over $9,000 annually on specific card segments after implementing Level 3 field mapping. High-volume merchants processing millions in commercial card transactions have seen savings in the millions. Even modest improvements of 30 to 60 basis points on qualifying transactions add up quickly at scale.