Online Payment Gateway Setup for Faster Deposits
Reconfigure batch cutoffs, verification sequences, and risk thresholds to get funds in one business day
Learn how to reconfigure your payment processor setup step by step, ordered by what actually impacts deposit timing. Cut your funding window to one business day and eliminate hidden default fees.
TL;DR
- Audit your fees first – Compare your merchant agreement to your actual statement. Most businesses find 2 to 4 hidden default fees (PCI non-compliance, batch fees, account maintenance) they never explicitly agreed to.
- Batch cutoff time controls your deposit speed – Set it to the latest time that qualifies for next-day funding. This single change can shave a full business day off your cash flow cycle.
- Verify your bank account completely before optimizing anything else – Incomplete bank verification overrides every other speed setting. Use instant verification (Plaid) over micro-deposits when possible.
- Calibrate risk thresholds, don’t just accept defaults – Default fraud thresholds are set to protect the processor, not your revenue. Adjust maximum transaction amounts and velocity limits to match your actual sales patterns.
- Test and monitor with real transactions – After reconfiguring, run a controlled test transaction and track it from authorization to deposit. Set up automated alerts so you catch delays in hours, not days.
What You’ll Achieve: Faster Deposits by Reconfiguring Your Processor Setup
Most eCommerce businesses complete their online payment gateway setup by clicking through a provider’s onboarding wizard and accepting every default. The result? Funds that take 2 to 5 business days to land in your bank account, plus hidden fees you never agreed to explicitly. This tutorial walks you through each configuration step in the order it actually impacts your funding speed, not the order your processor’s UI presents it.
By the end, you’ll have reconfigured your processor setup to eliminate unnecessary deposit delays, removed default fee settings that inflate your costs, and established a verification routine that confirms funds arrive on your timeline. Your success criteria: deposits arriving within one business day and a clear, documented record of every fee your processor charges.
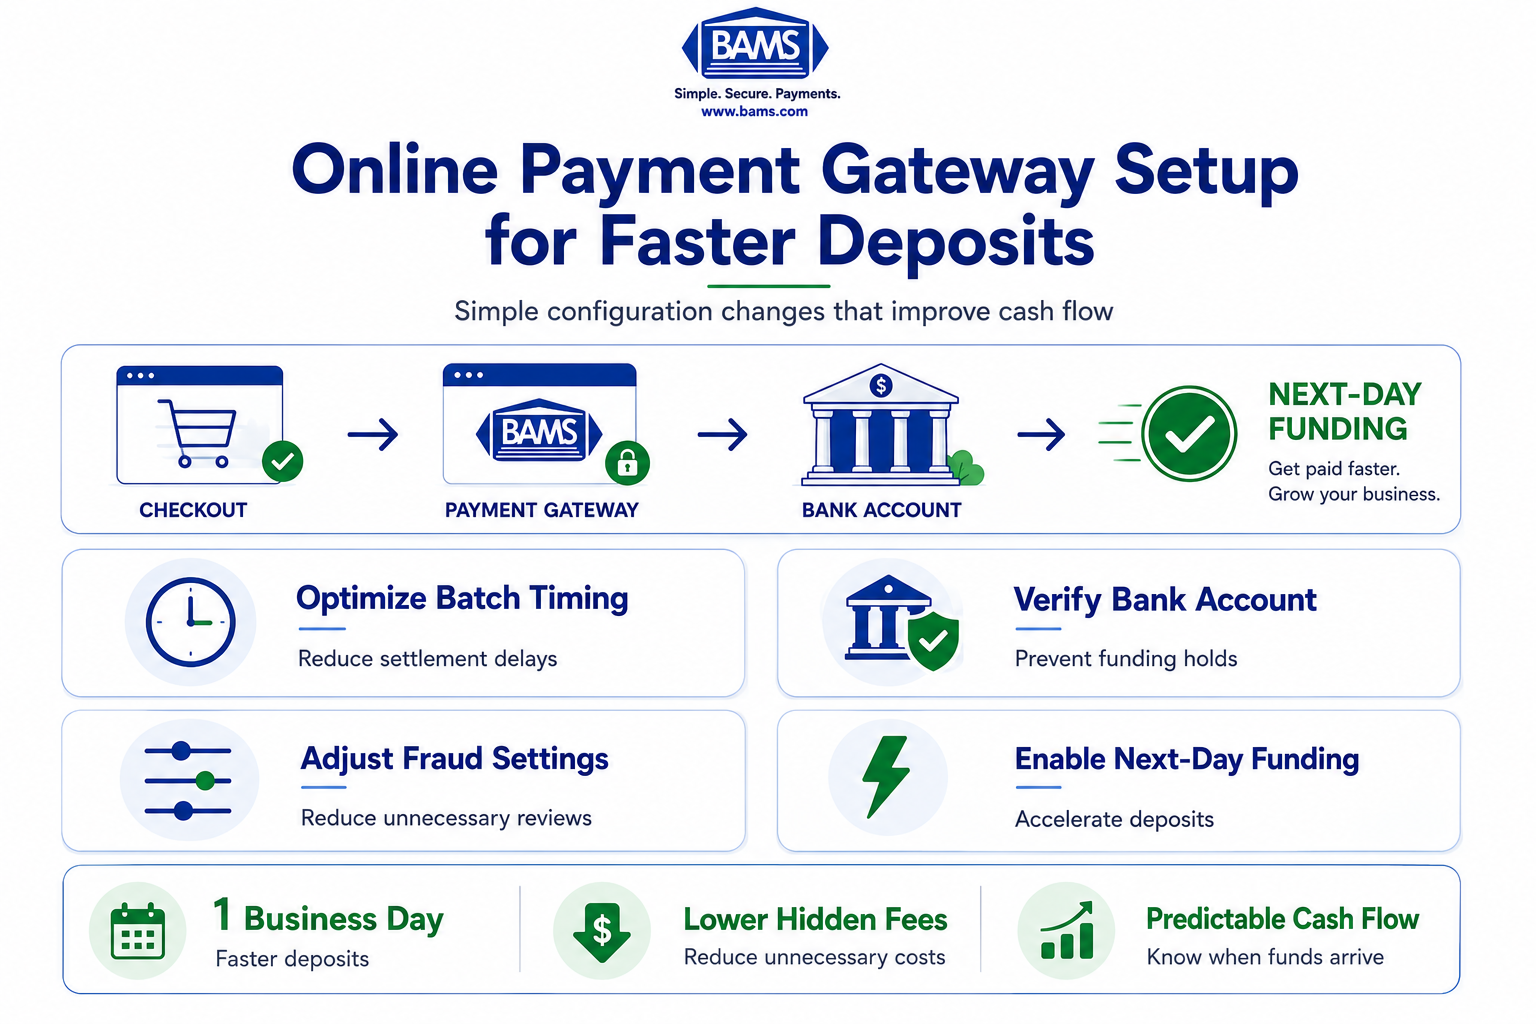
A visual workflow for reducing payment deposit delays through better gateway configuration and funding optimization.
Prerequisites and Setup Checklist
Before you touch a single setting, gather these items. Missing even one can stall the process or lock you out of key configuration panels.
- Admin-level access to your payment gateway dashboard (not just reporting access)
- Your current merchant agreement (PDF or paper), specifically the fee schedule addendum
- Bank account details for the account receiving deposits, including routing and account numbers verified with your bank
- A recent processing statement (last 30 days) showing per-transaction fees, batch fees, and any monthly minimums
- Your gateway’s API documentation or settings reference (usually found in a developer or admin section)
- 30 to 60 minutes of uninterrupted time during business hours (you may need to call your processor’s support line)
Potential blocker: Some processors restrict batch timing or funding speed changes to accounts that have completed enhanced verification. If your account is still in a “limited” or “provisional” state, resolve that first by submitting any outstanding KYC documents.
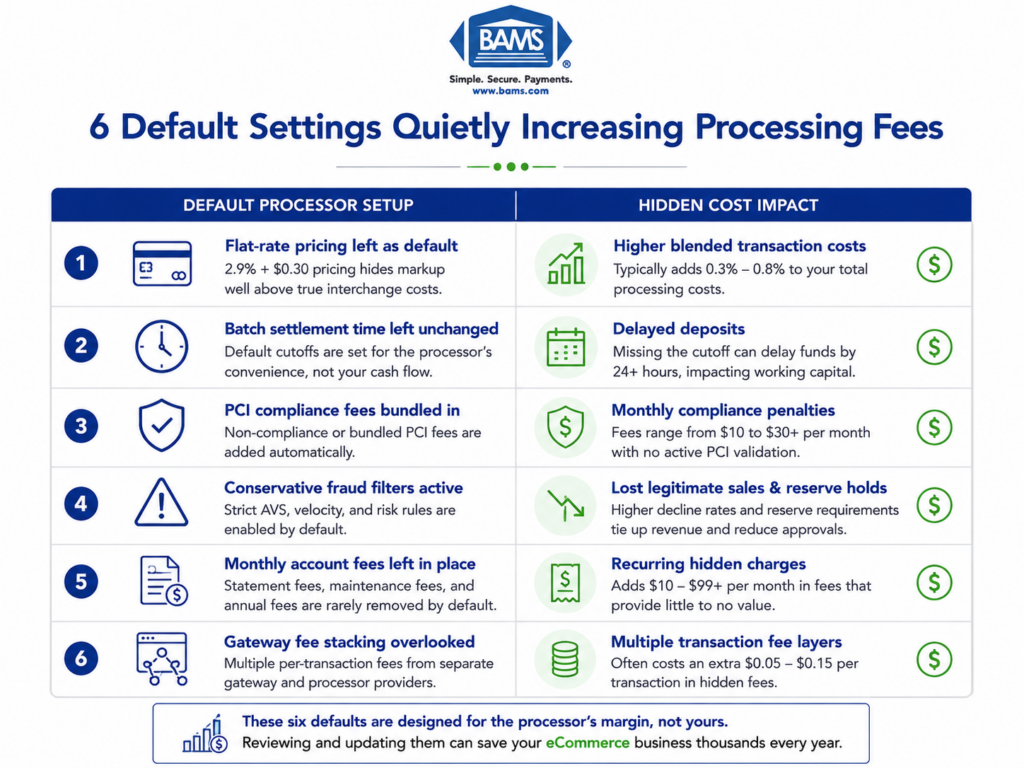
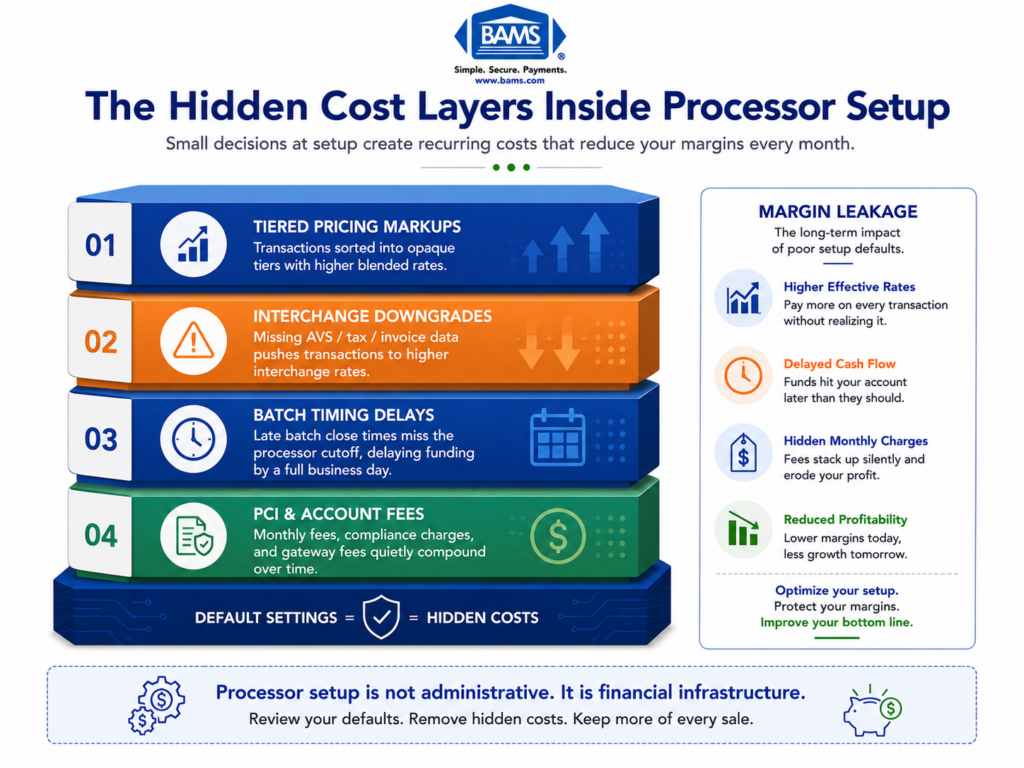
Why Default Settings Cost You Money and Time
Processor onboarding interfaces are designed for speed and liability reduction, not for your cash flow. Default risk thresholds, batch cutoff times, and bank verification sequences are set conservatively. This protects the processor, not you.
According to NACHA’s ACH Network resources, ACH processing and settlement timing remain a critical factor in how quickly businesses receive deposits. Yet many eCommerce businesses still rely on default processor configurations that delay funding unnecessarily. The same research notes that unoptimized setups with default risk thresholds contribute to funding delays and even security vulnerabilities.
Meanwhile, Plaid’s payment infrastructure resources highlight how instant bank verification and optimized payment flows are becoming increasingly important for eCommerce businesses focused on faster settlement timelines.
This tutorial treats your processor setup as a sequence of funding-speed decisions. Each step targets a specific delay or hidden cost, in the order it matters most.
Step 1: Audit Your Current Fee Schedule Against Actual Charges
Action: Open your most recent processing statement side by side with your merchant agreement’s fee schedule. Compare every line item.
Look for these common hidden defaults that processors enable without explicit opt-in:
- Batch processing fees (often $0.10 to $0.30 per batch, charged daily even if you expected it monthly)
- PCI non-compliance fees ($19.95 to $99.95/month if you haven’t completed your annual PCI SAQ)
- Account maintenance or “regulatory” fees (sometimes labeled as “service” or “access” fees)
- Enhanced data or Level II/III surcharges applied by default even when your transactions don’t require them
Expected result: A marked-up document showing discrepancies between your agreement and your actual charges. Most businesses find 2 to 4 fees they didn’t knowingly accept.
Common failure: You can’t find your original agreement. Contact your processor and request the full executed contract, including all addenda. You’re legally entitled to this document. If you discover signs of hidden or unexplained fees, document them for the negotiation steps ahead.
Step 2: Reconfigure Your Batch Cutoff Time
Action: Navigate to your gateway’s settlement or batch settings. Find the field labeled “Auto-close batch” or “Batch cutoff time” and note the current value.
Most processors default the batch cutoff to a time that aligns with their internal processing schedule (often 10:00 PM or 11:00 PM Eastern). This means if your last sale of the day comes in at 10:01 PM, it rolls into the next day’s batch, adding a full business day to your deposit timeline.
Adjust it to: The latest time your processor’s acquiring bank accepts same-day settlement files. Call your processor to ask: “What is the latest batch cutoff time that still qualifies for next-business-day funding?” This is typically between 9:00 PM and 11:00 PM Eastern, but it varies.
Expected result: Your batch closes at the optimal time, capturing the maximum number of daily transactions in a single settlement cycle.
Checkpoint: After saving, run a test transaction and verify it appears in the current day’s open batch, not the next day’s.
Common failure: The batch cutoff field is grayed out. This means your account tier doesn’t allow custom batch timing. You’ll need to request an upgrade or contact support to change it manually.
Step 3: Verify and Optimize Bank Verification Sequencing
Action: Check your account’s bank verification status in the “Deposits” or “Funding” section of your gateway dashboard. Look for a status like “Verified,” “Pending,” or “Micro-deposit pending.”
This is a critical step for funding speed verification. Many processors require two rounds of verification: first confirming your bank account (via micro-deposits or instant verification), then confirming your identity and business documents. The order matters. If your bank isn’t fully verified, every other optimization in this tutorial is irrelevant because your funds will be held.
Exact steps:
- If status shows “Micro-deposit pending,” log into your bank account, confirm the two small deposits (usually $0.01 to $0.99), and enter the amounts in your gateway dashboard
- If instant bank verification is available (via Plaid or similar), use it. It shaves 1 to 3 days off the process compared to micro-deposits
- Confirm that your business EIN, legal name, and DBA all match between your processor account and your bank account exactly
Expected result: Bank status shows “Verified” with no pending actions.
Common failure: Name mismatch between your processor account and bank account. Even a small difference (“LLC” vs. “L.L.C.”) can trigger a manual review that delays funding by days. Fix the mismatch at the source (usually your processor account) and resubmit.
Step 4: Adjust Risk and Fraud Thresholds
Action: Open your gateway’s fraud or risk management settings. Look for fields like “Transaction velocity limits,” “AVS mismatch action,” “CVV mismatch action,” and “Maximum transaction amount.”
Default risk thresholds are set aggressively to protect the processor. A common default: any transaction over $500 triggers a manual review, which holds the entire batch until cleared. If your average order value is $200 but you regularly process orders of $800 or more, this default creates unnecessary delays.
Adjust these settings:
- Maximum single transaction amount: Set to 150% to 200% of your highest typical order value. If your largest regular orders are $1,200, set the threshold to $1,800 to $2,400
- AVS mismatch action: Change from “Decline” to “Flag for review” if your business serves customers who ship to addresses different from their billing address (gift purchases, B2B)
- Velocity limits: If you run flash sales or promotions, temporarily increase the “max transactions per hour” limit before the event
Expected result: Legitimate transactions clear automatically without triggering manual holds that delay your entire batch settlement.
Warning: Don’t disable fraud protections entirely. The goal is calibration, not removal.
Common failure: You lower thresholds and see a spike in chargebacks within 30 days. If this happens, tighten the velocity limits first (they catch the most fraud with the least impact on legitimate sales) before reverting other changes.
Step 5: Enable or Confirm Next-Day Funding
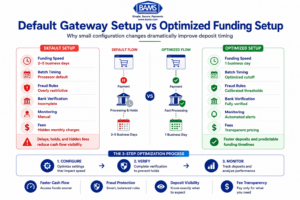
How proper gateway configuration improves deposit speed, fraud handling, and cash flow visibility.
Action: Search your gateway dashboard for a setting labeled “Funding speed,” “Deposit schedule,” or “Settlement timing.” Some processors bury this under “Account preferences” or “Financial settings.”
Many processors offer next-day or even same-day funding but don’t enable it by default. Instead, they default to a 2-day or 3-day rolling reserve schedule. In some cases, faster funding is available at no extra cost but requires you to opt in. In other cases, there’s a small per-transaction fee (typically $0.05 to $0.25).
Exact steps:
- If a “Next-day funding” toggle exists, enable it
- If you see a fee associated with faster funding, calculate the cost: multiply the per-transaction fee by your monthly transaction count. Compare this to the value of having cash 1 to 3 days sooner
- If no option exists in the dashboard, call your processor and ask: “Is next-day funding available for my account, and what are the requirements?”
Providers like BAMS include next-day funding as a standard feature rather than a paid add-on, which eliminates this hidden cost entirely. If your current processor charges extra for faster deposits, it’s worth comparing that ongoing fee against what a transparent provider offers at baseline.
Expected result: Your dashboard confirms a 1-business-day deposit schedule.
Common failure: Your processor says next-day funding requires a “reserve” (a percentage of each transaction held back for 30 to 180 days). Ask for the exact reserve percentage and release schedule in writing. A 5% to 10% reserve on a $100,000/month business means $5,000 to $10,000 of your money is inaccessible at any given time.
Step 6: Eliminate or Renegotiate Default Monthly Fees
Action: Return to the fee discrepancies you identified in Step 1. For each hidden or unexpected fee, take one of three actions.
- PCI non-compliance fee: Complete your PCI DSS self-assessment questionnaire (SAQ). Most eCommerce businesses using a hosted gateway qualify for SAQ A, which takes 15 to 30 minutes. Once filed, the non-compliance fee disappears
- Monthly minimum fee: This fee triggers when your processing volume falls below a set threshold. If you consistently exceed the minimum, call and request its removal. If you don’t, negotiate a lower minimum
- Statement fee, account fee, or “regulatory” fee: These are often negotiable. Call your processor, reference the specific line item, and ask: “Can this fee be waived or reduced?” If they refuse, document it as a reason to evaluate alternatives when your contract term ends
When opening a new merchant account, always request a complete fee schedule before signing, and confirm which fees are defaults you can disable versus mandatory costs.
Expected result: A reduced monthly fee total and a clear understanding of which fees are fixed, which are negotiable, and which are removable.
Common failure: Your processor says fees are “standard” and non-negotiable. This is rarely true for accounts processing over $10,000/month. Escalate to a retention or account management team.
Step 7: Configure Gateway-Level Deposit Notifications
Action: Set up automated alerts for deposit confirmations. Navigate to your gateway’s notification or webhook settings.
Enable these alerts:
- Batch settlement confirmation: Triggers when your daily batch closes and is submitted for processing
- Deposit initiated: Triggers when the ACH transfer to your bank begins
- Deposit completed: Triggers when funds arrive (if your gateway supports bank-side confirmation)
- Batch rejection or hold: Triggers if a batch is flagged, rejected, or delayed for any reason
Set these to go to both email and a Slack channel (or equivalent) so your finance team sees them in real time.
Expected result: You receive a daily confirmation that your batch settled and funds were initiated. Any delay triggers an immediate alert instead of being discovered days later.
Common failure: Your gateway only supports email notifications, not webhooks. In this case, create an email filter that flags deposit-related messages as high priority and routes them to a shared inbox your finance team monitors daily.
Step 8: Run a Controlled Funding Speed Verification Test
Action: Process a small test transaction (use a real card, not a test card number) and track it through every stage from authorization to deposit.
Exact steps:
- Process a transaction for $1.00 at least 2 hours before your batch cutoff time
- Note the exact timestamp of the authorization
- After your batch cutoff time, confirm the transaction appears in the closed batch
- The next business morning, check your bank account for the deposit
- Record the total elapsed time from authorization to deposit arrival
Success definition: The deposit arrives within 1 business day of the batch closing. If your batch closes Monday at 10:00 PM, the deposit should appear in your bank account by end of day Tuesday.
Edge cases to verify:
- Process a test transaction on Friday evening. Does the deposit arrive Monday or Tuesday?
- Process a transaction just before and just after your batch cutoff. Do they land in the correct batches?
- Process a transaction that exceeds your old (default) risk threshold but falls within your new one. Does it clear without a manual hold?
Configuration and Customization Reference
Here are the key variables you adjusted throughout this tutorial, along with safe defaults and the values you should customize for your business.
- Batch cutoff time: Safe default is your processor’s standard (often 10 PM ET). Customize to the latest time that qualifies for next-day funding
- Maximum transaction amount: Safe default varies ($500 to $1,000). Set to 150% to 200% of your highest regular order
- AVS mismatch action: Safe default is “Decline.” Consider “Flag for review” if you have a high gift-purchase or B2B mix
- Velocity limits: Safe default is processor-defined. Increase before known high-traffic events, then reset
- Funding speed: Default is 2 to 3 day ACH. Change to next-day if available
- PCI compliance status: Must-change. Complete your SAQ to eliminate non-compliance fees
Document every change you make, including the previous value, new value, date changed, and the reason. Store this in a shared document your team can reference during audits or if you evaluate a new eCommerce merchant services provider.
Common Errors and Fixes
“Deposit not received” after enabling next-day funding
Symptom: You enabled next-day funding but deposits still take 2 to 3 days. Cause: Your bank account verification is incomplete, or your processor requires a waiting period (often 5 to 10 business days) after the setting change before it takes effect. Fix: Confirm bank verification status is “Verified” (Step 3). Call your processor to ask when the new funding speed activates.
“Batch failed to close” notification
Symptom: You receive an alert that your batch didn’t close at the scheduled time. Cause: A flagged transaction in the batch triggered a manual review hold, preventing the entire batch from settling. Fix: Log into your gateway, identify the flagged transaction, resolve the review (approve or void it), and manually close the batch.
“Transaction declined: exceeds velocity limit”
Symptom: Legitimate customers are declined during a sale or promotion. Cause: Your velocity limit (max transactions per hour or per day) is set too low for peak traffic. Fix: Increase the velocity limit before promotions. Set a calendar reminder to reset it afterward.
PCI non-compliance fee reappears after filing SAQ
Symptom: You completed your PCI SAQ but the fee still shows on your next statement. Cause: Your processor’s billing system hasn’t synced with your compliance status, or you filed with the wrong SAQ type. Fix: Contact your processor with your SAQ completion confirmation. Confirm you filed the correct SAQ type (most hosted-gateway eCommerce businesses need SAQ A).
Reserve hold applied without notice
Symptom: Your deposits are smaller than expected. Cause: Your processor applied a rolling reserve (typically 5% to 10%) when you changed your funding speed, but didn’t clearly communicate it. Fix: Request the reserve terms in writing. Negotiate the percentage and the release timeline. If the reserve makes next-day funding more expensive than the deposit delay, consider reverting and exploring providers that offer next-day funding without reserves.
Next Steps and Extensions
Now that your processor is configured for speed and transparency, consider these follow-on actions to build on your progress.
- Automate reconciliation: Connect your gateway’s deposit reports to your accounting software via API or CSV export. This catches discrepancies within hours, not weeks
- Set up chargeback alerts: Configure your gateway to notify you of disputes within minutes of filing, giving you the maximum response window. Proactive gateway configuration can reduce chargeback losses significantly
- Schedule quarterly configuration reviews: Your business changes. Review your risk thresholds, batch timing, and fee schedule every 90 days to ensure they still match your transaction patterns
Each of these extensions builds on the foundation you’ve set today: a processor configured around your cash flow needs, not your provider’s defaults.
Frequently Asked Questions
What documents do I need before switching merchant service providers?
Gather your current merchant agreement (including all fee addenda), your most recent 3 months of processing statements, your business EIN or tax ID, a voided check or bank letter for the deposit account, and your current gateway login credentials. Having these ready prevents delays during onboarding with a new provider and gives you leverage to compare fees line by line.
Why should I keep my old merchant account open during a transition?
Chargebacks and refund requests can arrive up to 120 days (sometimes longer) after a transaction. If your old account is closed, you lose the ability to respond to disputes on those transactions, which can result in automatic losses. Keep the old account active until you’ve passed the chargeback window for your last batch of transactions.
How do batch cutoff times actually affect when I get paid?
Your batch cutoff time determines when your processor packages the day’s transactions and submits them to the acquiring bank for settlement. If your cutoff is 10:00 PM and a sale comes in at 10:01 PM, that transaction joins the next day’s batch, adding a full business day before the funds reach your account. Optimizing this single setting can accelerate deposits by 24 hours.
Which pricing model gives me the most transparency on processing fees?
Interchange-plus pricing separates the card network’s base cost (interchange) from your processor’s markup, so you can see exactly what you’re paying and why. Tiered or bundled pricing obscures this breakdown, making it easier for hidden fees to go unnoticed. If your processor uses tiered pricing, request a switch to interchange-plus or compare providers that offer it by default.
How can I tell if my risk thresholds are causing deposit delays?
Check your gateway’s “flagged transactions” or “held for review” report. If legitimate transactions are regularly flagged (especially during sales events or for higher-value orders), your risk thresholds are too tight. Compare the flagged transaction amounts against your actual fraud rate. If flags outnumber real fraud by 10:1 or more, your thresholds need recalibration.
What’s the difference between next-day funding and same-day funding?
Next-day funding means your batch settles and funds arrive in your bank account by the end of the next business day. Same-day funding means funds arrive the same day the batch closes, which typically requires a batch cutoff early in the business day (often before 8:00 AM or 10:00 AM). Same-day is rarer and sometimes carries a higher per-transaction fee. For most eCommerce businesses, next-day funding delivers the cash flow improvement without the added cost.