
Processor Setup: A Guide to Cutting Hidden Costs
How default settings at signup quietly drain your margins—and the configuration choices that stop it
Learn which processor setup defaults silently inflate your merchant processing fees every month. This guide covers pricing models, batch timing, and PCI fee structures so you can audit your configuration for maximum cost control.
TL;DR
- Setup is the highest-leverage moment for cost control — The pricing model, batch timing, and fee structure you accept during processor setup compound into thousands of dollars in hidden costs annually. Optimizing after launch is harder and less effective.
- Interchange-plus pricing beats tiered pricing for transparency — Tiered pricing lets your processor classify transactions into opaque, expensive buckets. Interchange-plus shows you the actual card network rate plus a fixed markup, making every cost auditable.
- Gateway configuration directly affects your interchange rates — Missing data fields (AVS, tax amount, invoice numbers) cause interchange downgrades that silently inflate your per-transaction cost. Configure your gateway to pass all required fields before going live.
- Batch timing controls your funding speed — A batch close time set after your processor’s settlement cutoff delays funding by a full business day. Align your batch close 30 to 60 minutes before the cutoff to accelerate cash flow.
- PCI compliance and fraud thresholds prevent account freezes — Complete your PCI SAQ during setup (not after), calibrate fraud filters to your actual transaction patterns, and monitor your chargeback ratio well below the 1% network threshold to avoid holds and disruptions.
Guide Orientation: What This Covers and Who It’s For
This guide walks you through the specific processor setup decisions that silently inflate your merchant processing fees every month. We’re not talking about renegotiating rates after the fact. We’re focused on the configuration choices you make (or accept by default) during merchant account setup, the moment with the highest leverage over your long-term costs.
It’s built for eCommerce managers at established online businesses who process enough volume that a fraction of a percent matters. If you manage 10 to 50 employees and your processing costs feel stubbornly high despite decent volume, this is for you.
By the end, you’ll be able to identify which default settings are costing you money, understand exactly which configuration choices affect funding speed, and know how to audit your setup before (or after) going live. This guide does not cover POS hardware selection or in-store terminal configuration.
Why Merchant Processing Fees Start at Setup, Not After Launch
Most eCommerce managers treat processor setup as an administrative step: fill out the application, accept the defaults, start processing. The real cost optimization happens later, right? That assumption is expensive.
The pricing model selected during onboarding, the batch timing left at its factory default, the PCI compliance fee structure accepted without question: these choices compound into thousands of dollars in unnecessary costs every year. And because they’re baked into your configuration, they don’t show up as a single alarming line item. They show up as a persistent margin drain that feels normal.
The scale of the problem is significant. Card payment costs include interchange fees, network assessments, and processor markups, which together determine the total effective processing cost merchants ultimately pay as outlined by the Federal Reserve. For eCommerce businesses operating on tight margins, the difference between a well-configured processor and a default one can mean the difference between healthy cash flow and a slow bleed.
The Merchants Payments Coalition notes that swipe fees are most merchants’ highest operating cost after labor. Yet the setup moment, where you lock in the structure of those fees, gets less scrutiny than choosing a shipping carrier. That’s the gap this guide closes.
The cost of inaction isn’t dramatic. It’s incremental. A poorly chosen pricing model adds a few basis points per transaction. A missed batch window delays your funding by a day. A default PCI fee adds $30 to $100 per month. None of these trigger an alarm. All of them erode margin quietly, month after month.
Core Concepts: The Defaults That Define Your Costs
Before diving into the step-by-step process, you need to understand three categories of setup defaults that drive hidden costs. These aren’t obscure technical settings. They’re the decisions your processor either makes for you or presents in a way that encourages you to accept the path of least resistance.
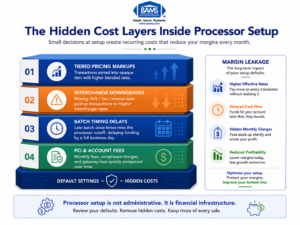
Small setup decisions during onboarding can create long-term payment processing costs.
Pricing Model Defaults
Processors typically offer three pricing structures: tiered (bundled), flat-rate, and interchange-plus. Tiered pricing groups transactions into “qualified,” “mid-qualified,” and “non-qualified” buckets at different rates. The problem is that the processor decides which bucket each transaction falls into, and the criteria are often opaque. Interchange-plus pricing passes the actual card network interchange rate to you with a fixed markup, giving you visibility into exactly what you’re paying and why.
Many processors default new accounts to tiered pricing because it’s simpler to explain and more profitable for them. This single default can cost an eCommerce business processing $500,000 annually several thousand dollars per year in unnecessary fees.
Batch Timing and Settlement Defaults
Your batch close time determines when your day’s transactions are submitted for settlement, which directly affects when funds hit your bank account. Most processors set a default batch time (often late evening or even midnight). If your business processes heavily in the afternoon and evening, a poorly timed batch close can delay your funding by a full business day.
Fee Structure Defaults
PCI compliance fees, statement fees, batch fees, and gateway fees are often set at standard rates during onboarding. These aren’t interchange costs you can’t control. They’re processor-side charges that vary significantly between providers and are frequently negotiable, but only if you identify them before accepting the agreement. The distinction matters: interchange is set by card networks; processor fees are set by your provider.
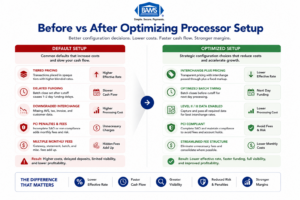
The Framework: Setup as a Five-Stage Cost Control System
Think of processor setup not as a single event but as a five-stage system where each stage either locks in savings or locks in waste. The stages are sequential, and skipping one undermines the ones that follow.
- Stage 1: Pricing Model Selection — Choose the structure that gives you visibility and aligns with your transaction patterns.
- Stage 2: Fee Inventory and Negotiation — Identify every non-interchange fee in your agreement and challenge the defaults.
- Stage 3: Gateway and Integration Configuration — Set up your payment gateway to minimize downgrades and maximize authorization rates.
- Stage 4: Batch Timing and Funding Optimization — Configure settlement windows to accelerate cash flow.
- Stage 5: Compliance and Risk Configuration — Set PCI scope, fraud thresholds, and chargeback protocols to avoid holds and freezes.
Each stage builds on the previous one. Choosing the right pricing model matters less if your gateway configuration triggers interchange downgrades. Fast funding means nothing if a compliance misconfiguration freezes your account. The system works as a whole.
Step-by-Step: Configuring Your Processor to Eliminate Hidden Fees
Step 1: Select the Right Pricing Model for Your Transaction Profile
Objective: Lock in a pricing structure that gives you cost transparency and aligns with your actual card mix.
Start by analyzing your transaction data. What percentage of your volume comes from rewards cards, corporate cards, international cards, and debit cards? Each of these carries a different interchange rate set by Visa, Mastercard, or the issuing bank. Your pricing model determines how those rates flow through to your statement.
For most eCommerce businesses processing more than $10,000 per month, interchange-plus pricing is the clear winner. You see the actual interchange rate for each transaction category plus a fixed markup (typically expressed as basis points plus a per-transaction fee). This transparency makes it possible to identify exactly where your costs are coming from and whether they’re reasonable.
Tiered pricing, by contrast, obscures this. A transaction that costs the processor 1.65% in interchange might be classified as “mid-qualified” at 2.25%, with the difference going straight to the processor’s margin. You’d never know unless you compared it against the actual interchange tables published by the card networks.
Anti-patterns to avoid: Don’t accept a pricing model without asking for a side-by-side comparison using your actual transaction history. Don’t assume flat-rate pricing (like 2.9% + $0.30) is competitive at scale. It’s convenient for low-volume businesses but expensive once you’re processing significant volume. And don’t let a processor tell you tiered pricing is “simpler” without acknowledging it’s simpler because it hides the details.
Success indicator: You can look at any line on your processing statement and trace the cost back to a published interchange rate plus your agreed-upon markup. If you can’t do that, your pricing model is hiding fees.
Step 2: Inventory and Negotiate Every Non-Interchange Fee
Objective: Identify every fee in your merchant agreement that isn’t set by the card networks, then negotiate or eliminate the ones that don’t deliver value.
Pull your merchant agreement and create a spreadsheet of every fee listed. Common ones include: monthly statement fees ($5 to $15), PCI compliance fees ($79 to $120 annually, sometimes monthly), batch settlement fees ($0.10 to $0.30 per batch), gateway access fees ($10 to $25 monthly), and annual account fees ($50 to $300). Some agreements also include “regulatory compliance” fees or “network access” fees that are processor-invented charges with no direct card network equivalent.
For each fee, ask three questions. First, is this fee tied to a service I actually use? Second, is the amount consistent with industry norms? Third, is it negotiable? Many processors will waive or reduce statement fees, PCI fees, and annual fees if you ask during setup, before you’ve signed. After you’ve signed, your leverage drops significantly.
Pay special attention to PCI non-compliance fees. Some processors charge $19.95 to $99 per month if you haven’t completed your PCI Self-Assessment Questionnaire (SAQ). This fee is entirely avoidable by completing the SAQ during setup rather than deferring it. Yet many eCommerce managers skip it during onboarding and pay the penalty for months before noticing.
Anti-patterns to avoid: Don’t focus exclusively on the per-transaction rate while ignoring monthly fixed fees. A processor offering 10 basis points less on interchange-plus but charging $150 more in monthly fees may cost you more overall. Don’t accept fees labeled with vague names like “technology fee” or “service fee” without a clear explanation of what they cover.
Success indicator: Every fee on your agreement has a clear purpose, a competitive rate, and you’ve confirmed whether it’s negotiable. No fee surprises on your first statement.
Step 3: Configure Your Gateway to Prevent Interchange Downgrades
Objective: Set up your payment gateway so transactions qualify at the lowest possible interchange rate, avoiding costly “downgrades” caused by missing data fields.
Interchange downgrades happen when a transaction doesn’t meet the card network’s criteria for the best available rate. For eCommerce transactions (card-not-present), the most common causes are missing Level II or Level III data fields, not passing AVS (Address Verification Service) data, or failing to settle within the required timeframe.
During gateway setup, make sure your integration passes the following data with every transaction: billing address and ZIP code (for AVS), invoice or order number, sales tax amount (if applicable), and customer email. For B2B eCommerce, passing Level II data (tax amount, customer code) and Level III data (line-item detail) can reduce interchange rates by 0.30% to 0.60% per transaction. That’s substantial at volume.
Also verify that your gateway is configured to use the correct Merchant Category Code (MCC). An incorrect MCC can route your transactions into higher interchange tiers. This is set during merchant account setup and rarely reviewed afterward, but it directly impacts your base cost on every transaction.
If you sell to both consumers and businesses, consider whether your gateway supports automatic Level II/III data enrichment. Some gateways detect B2B card types and append the additional data automatically, which can meaningfully reduce your effective rate on those transactions.
Anti-patterns to avoid: Don’t assume your developer or platform’s default integration passes all required data fields. Test it explicitly. Don’t ignore AVS mismatches; they not only increase interchange costs but also increase chargeback risk. Don’t skip the MCC review because it seems like a minor detail.
Success indicator: Run a test batch of transactions across different card types and verify on your statement that none are flagged as downgraded. Your effective rate should be within a few basis points of the published interchange rate for each card category.
Step 4: Optimize Batch Timing for Faster Funding
Objective: Configure your batch close time to minimize the gap between transaction capture and funds arriving in your bank account.
This is where most eCommerce managers leave money (or at least cash flow) on the table. Your batch close time tells your processor “send today’s transactions for settlement now.” If your batch closes at midnight but your processor’s settlement cutoff is 10 PM, your transactions won’t be submitted until the next business day, adding 24 hours to your funding timeline.
Ask your processor for their exact settlement cutoff time, then set your batch close 30 to 60 minutes before that cutoff. For businesses that process transactions around the clock, this might mean a batch close at 9:00 or 9:30 PM rather than the default midnight. The goal is to ensure every day’s transactions are included in that day’s settlement file. Settlement timing depends on how transactions move between gateways, processors, card networks, and issuing banks, with batch schedules directly affecting deposit speed as outlined by Visa.
Funding speed also depends on your processor’s capabilities. Some processors offer next-day funding as a standard feature, while others charge a premium for it or don’t offer it at all. This is a configuration and provider choice, not something you can fix after the fact. If cash flow velocity matters to your business (and for eCommerce managers managing inventory and ad spend, it almost always does), verify the funding timeline during setup, not after your first delayed deposit. Providers like BAMS offer next-day funding as a core feature rather than a premium add-on, which eliminates the need to optimize around slow settlement cycles.
Anti-patterns to avoid: Don’t leave batch timing at the factory default without confirming it aligns with your processor’s cutoff. Don’t assume “next-day funding” means the same thing across providers; some define it as “next business day after batch close” while others mean “next business day after settlement.” Get the specific timeline in writing. Don’t forget that weekends and holidays create gaps; understand how your processor handles Friday batches.
Success indicator: Run transactions on a Monday, verify funds arrive Tuesday (or Wednesday at latest). Track this for two weeks after setup to confirm consistency. If deposits are arriving later than promised, escalate immediately.
Step 5: Set Compliance and Risk Thresholds to Prevent Account Freezes
Objective: Configure PCI compliance, fraud screening, and chargeback thresholds so your account doesn’t get held, frozen, or flagged during normal business operations.
This is the step most eCommerce managers treat as a checkbox exercise, and it’s the one most likely to cause a catastrophic disruption. A frozen merchant account doesn’t just delay funding. It stops your ability to accept payments entirely.
Start with PCI compliance. Complete your SAQ during setup, not after. For most eCommerce businesses using a hosted payment page or tokenized gateway, SAQ A or SAQ A-EP applies. The questionnaire takes 30 to 60 minutes and prevents PCI non-compliance fees from appearing on your first statement. More importantly, it establishes your compliance status so your processor doesn’t flag your account.
Next, configure your fraud screening thresholds. Most gateways include basic fraud tools (velocity filters, AVS matching, CVV verification) that are either turned off by default or set to overly permissive levels. Set them during setup based on your typical order size, geographic distribution, and customer behavior. An order velocity filter that triggers at 10 orders per minute from a single IP might be appropriate for a consumer goods site but would block legitimate traffic for a flash sale.
Finally, understand your processor’s chargeback ratio threshold. Card networks typically flag merchants at a 1% chargeback ratio (chargebacks divided by total transactions). Your processor may have a lower internal threshold. Ask what it is, and set up monitoring during setup rather than discovering it when you receive a warning letter. Proactive chargeback management is far cheaper than reactive remediation.
Anti-patterns to avoid: Don’t defer PCI compliance to “next month.” Don’t set fraud filters so aggressively that you decline legitimate customers (false positives cost revenue and customer trust). Don’t ignore the chargeback ratio threshold until your processor sends a warning.
Success indicator: PCI SAQ completed and filed before your first live transaction. Fraud filters calibrated and tested with sample transactions. Chargeback monitoring dashboard configured with alerts at 0.5% (well below the 1% network threshold).
Practical Examples: What This Looks Like in Real eCommerce Operations
Optimizing gateway setup can reduce hidden fees, improve funding speed, and increase margin visibility.
Scenario: Mid-Size Apparel Brand Processing $75,000/Month
An online apparel brand accepts the default tiered pricing model at signup. Their average transaction is $85, and 40% of their volume comes from rewards credit cards. Under tiered pricing, those rewards card transactions are classified as “mid-qualified” at 2.45%. Under interchange-plus, the same transactions would cost approximately 1.85% + 0.15% markup = 2.00%. On $30,000 in monthly rewards card volume, that’s a difference of $135 per month, or $1,620 per year, from a single configuration choice.
The same brand leaves batch timing at the midnight default. Their processor’s settlement cutoff is 10 PM Eastern. Every day’s transactions miss the cutoff, pushing funding back by one business day. Over a month, that’s an extra $75,000 sitting in limbo for an additional 24 hours, every cycle. For a business managing inventory purchases and ad spend, that delay has real cash flow consequences.
Scenario: B2B Ecommerce Supplier Missing Level II Data
A wholesale supplier sells to other businesses online. Their gateway integration doesn’t pass tax amount or customer purchase order numbers. As a result, every B2B credit card transaction is downgraded from the commercial card interchange rate to the standard ecommerce rate, a difference of roughly 0.40% to 0.60% per transaction. On $200,000 in monthly B2B card volume, that’s $800 to $1,200 per month in avoidable interchange costs. The fix is a gateway configuration change that takes a developer a few hours.
Scenario: Accepting American Express at Default Rates
Many ecommerce businesses avoid accepting American Express because of historically higher fees. But the American Express OptBlue program allows merchants processing under $1 million in annual Amex volume to accept Amex through their existing processor at rates competitive with Visa and Mastercard. If your processor set up your Amex acceptance at the standard direct rate rather than OptBlue, you’re paying more than necessary on every Amex transaction. This is a setup configuration, not a negotiation issue.
Common Mistakes and Pitfalls in Merchant Account Setup
The most predictable failure is treating setup as a speed exercise. eCommerce managers under pressure to launch or switch processors rush through the configuration, accept every default, and plan to “optimize later.” Later rarely comes, and by the time it does, months of unnecessary fees have already accumulated.
Another common mistake is comparing processors solely on their advertised per-transaction rate while ignoring the total cost structure. The lowest advertised rate often comes with the highest monthly fees, the most aggressive PCI charges, or the most restrictive funding terms. Total cost of processing, not headline rate, is the metric that matters.
A third pitfall is failing to test before going fully live. Run a small batch of real transactions across different card types, verify the rates on your first statement, confirm funding timing, and check that your fraud filters aren’t declining legitimate orders. This testing window is your last chance to catch configuration errors before they become recurring costs.
Finally, don’t keep your old merchant account open during a transition without a clear timeline for closing it. Overlapping accounts mean overlapping monthly fees. Set a firm cutover date and close the old account within 30 days of confirming the new one is performing correctly.
What to Do Next
If you’re currently processing, pull your last three monthly statements and run them against the five stages outlined above. Start with the pricing model. Can you trace every line item back to a published interchange rate plus a known markup? If not, that’s your first conversation with your processor.
If you’re about to set up a new processor or switch providers, use this guide as a configuration checklist. Print the success indicators for each step and verify them during your first 30 days of processing. The setup window is short, but the cost impact of getting it right (or wrong) compounds for the entire life of the account.
Revisit your configuration quarterly. Interchange rates change twice a year (April and October for Visa and Mastercard). Your transaction mix evolves as your business grows. A setup that was optimal six months ago may have gaps today. Treat processor configuration as a living system, not a one-time event.
Frequently Asked Questions
Which pricing model is best for my business when setting up merchant services?
For most eCommerce businesses processing over $10,000 per month, interchange-plus pricing offers the best combination of transparency and cost efficiency. You see the actual interchange rate for each card type plus a fixed markup, which makes it possible to audit your costs and identify overcharges. Tiered pricing bundles transactions into opaque categories that typically benefit the processor, not you. Flat-rate pricing (like 2.9% + $0.30) is convenient for very low volume but becomes expensive at scale.
What documents do I need to gather before switching merchant service providers?
Prepare your last three to six months of processing statements (to benchmark current costs), your business tax ID (EIN), a voided check or bank letter for the deposit account, your business license, and your current gateway or platform integration details. Having recent statements is critical because it allows a new provider to give you an accurate cost comparison rather than a generic quote. Also document your current batch timing, gateway credentials, and any contractual obligations (including early termination fees) with your existing provider.
Why is it important to keep my old merchant account open during the transition?
Chargebacks and refunds can arrive weeks or months after the original transaction. If your old account is closed, you may not be able to process refunds for previous orders, and chargebacks could default against you without the ability to respond. Keep the old account open for 30 to 90 days after your cutover date, depending on your refund policy window and typical chargeback timeline. Just be aware that you’ll pay monthly fees on both accounts during the overlap, so set a firm closure date.
How can I verify that my new processor’s funding speed matches what was promised?
Run a small batch of real transactions on your first day of processing and note the exact time your batch closes. Then track when funds appear in your bank account. Do this for at least five consecutive business days to establish a pattern. If your agreement specifies next-day funding and deposits consistently arrive two days later, contact your processor immediately. Common causes of delayed funding include batch times set after the settlement cutoff, incomplete underwriting verification, or risk holds triggered by transaction patterns that don’t match your application profile.
What are interchange downgrades and how do I prevent them?
Interchange downgrades occur when a transaction doesn’t meet the card network’s data requirements for the best available rate, causing it to be processed at a higher, more expensive tier. For eCommerce transactions, the most common causes are missing AVS data (billing address and ZIP), missing invoice or order numbers, and settling transactions more than 24 hours after authorization. Prevent them by configuring your gateway to pass all required data fields and setting your batch close time to ensure same-day settlement.
How often do interchange rates change, and should I revisit my setup?
Visa and Mastercard update their interchange rate schedules twice a year, typically in April and October. These changes can affect your effective processing cost even if your processor’s markup stays the same. Review your statements after each rate update to check for unexpected increases. More broadly, revisit your full processor configuration quarterly. As your transaction volume, average ticket size, and card mix evolve, the optimal settings for batch timing, fraud filters, and even pricing structure may shift.
Sources


