Processor Setup: Configure Settings That Prevent Deposit Holds
How batch timing, risk thresholds, and transaction pattern disclosure control whether you get paid in hours or days
Learn which processor setup defaults to change, how to calibrate risk thresholds to your actual transaction patterns, and what to disclose so acquirers don’t flag your account. Walk away with a configuration that settles your first batch without holds or hidden fees.
TL;DR
- Audit every default fee before signing – Processor agreements contain 4 to 8 hidden fees (batch fees, PCI fees, monthly minimums) not mentioned during the sales conversation. Find them in the agreement and negotiate before activation.
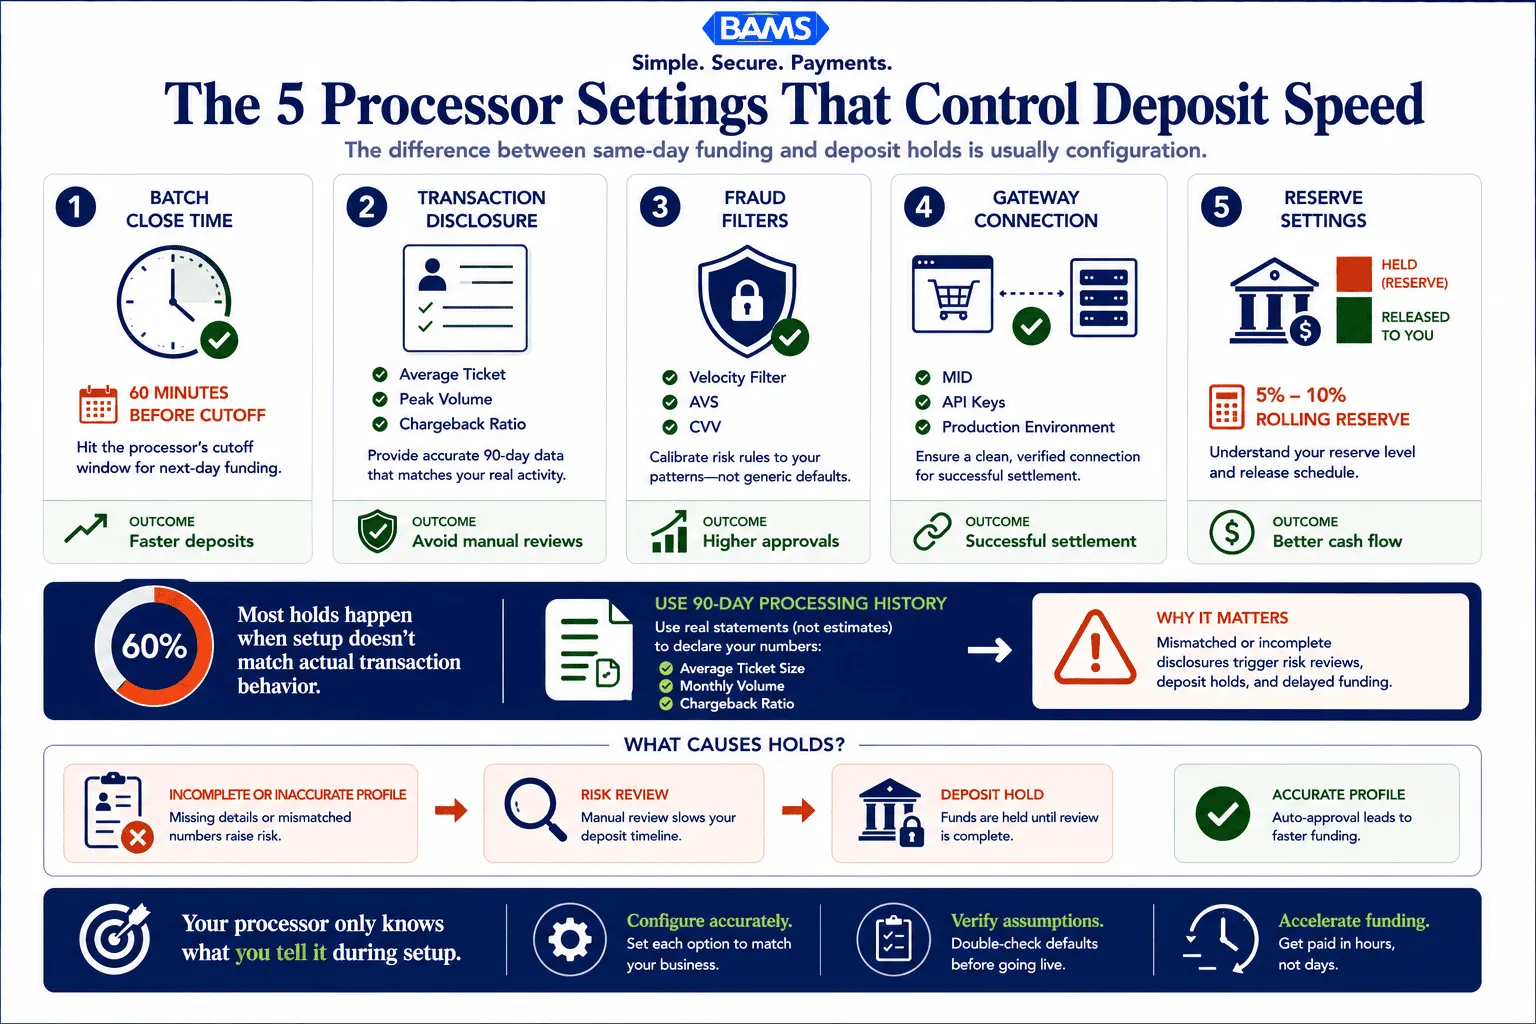
- Disclose your real transaction patterns using actual data – Use your 90-day processing statements (not estimates) to declare your average ticket, peak volume, and chargeback ratio. Mismatches between declared and observed activity trigger holds on your deposits.
- Set batch close time 60 minutes before your processor’s funding cutoff – The default batch time often misses the next-day funding window. This single setting change can accelerate every deposit by a full business day.
- Calibrate fraud filters to your business, not the processor’s generic defaults – Default velocity and amount thresholds decline legitimate high-ticket and repeat-purchase transactions. Adjust filters using your actual peak-hour data to improve approval rates without increasing fraud risk.
- Verify your first live deposit line by line – Compare your eCommerce platform total, your processor’s batch report, and your bank deposit. The difference should equal exactly the fees in your agreement. If it doesn’t, you’ve found a hidden fee or misconfiguration.
What You’ll Achieve: A Processor Setup That Pays You on Schedule
By the end of this tutorial, you will have configured your payment processor so that your first deposit arrives in hours, not days. You’ll know exactly which processor setup defaults to change, which risk thresholds to calibrate to your actual transaction patterns, and how to disclose your business activity so acquirers don’t flag your account for manual review.
Your success criteria are simple: your first batch settles without a hold, your funding timeline matches what your contract promises, and you aren’t leaking money to hidden fees baked into default configurations. This tutorial replaces the generic onboarding checklist with configuration-level decisions that directly control your cash flow.

Most deposit delays originate from setup decisions made during onboarding, not processor performance.
Prerequisites and Setup Checklist
Before you touch a single processor setting, gather these items. Missing even one can trigger the documentation requests that 60% of merchants encounter before they can accept their first card payment. Federal Reserve Small Business Survey data continues to show that operational readiness and cash flow visibility remain major priorities for growing businesses.
- Business documentation: EIN letter, articles of incorporation, voided check or bank letter for the settlement account, and a valid government-issued ID for the primary signer
- 90-day processing history: Statements from your current processor showing average ticket size, monthly volume, chargeback ratio, and refund percentage
- Gateway credentials: API keys or login access for your eCommerce platform’s payment integration (Shopify, WooCommerce, Magento, or custom)
- Transaction pattern documentation: A one-page summary of your typical order value range, peak sales periods, recurring billing cycles, and highest single-transaction amount
- PCI compliance certificate: Your most recent SAQ (Self-Assessment Questionnaire) completion or attestation of compliance
Time estimate: 2 to 4 hours for the full configuration. Potential blocker: If your bank letter is older than 90 days, request a new one before starting.
Why Default Settings Cost You Money
Processors ship with conservative defaults designed for the broadest possible merchant profile. That means batch windows timed for retail stores (not eCommerce), fraud filters calibrated for average-risk businesses, and risk thresholds that trigger holds on transactions your business processes every day. These defaults are not neutral. They cost you in delayed funding, unnecessary declines, and fees you never agreed to.
Incomplete merchant profiles and unclear processing descriptions increase manual review because acquirers must reconcile declared business activity with observed authorization patterns. Your goal is to eliminate that gap at setup, not after your first deposit gets held.
This approach is more detailed than a standard onboarding guide. Expect to spend time reading your processor’s configuration documentation and cross-referencing settings against your actual sales data.
Step-by-Step: Configure Your Processor to Match Your Business
Step 1: Audit the Default Fee Schedule Before You Sign
Open your processor’s merchant agreement and locate every fee line item. You are looking for charges that don’t appear in the quoted rate: batch fees, statement fees, PCI non-compliance fees, early termination fees, and “miscellaneous” or “regulatory” fees. These are the hidden costs buried in processor setup defaults.
Action: Create a spreadsheet with three columns: Fee Name, Default Amount, and Negotiable (Yes/No). Populate it from your agreement. Cross-reference with your interchange plus pricing breakdown to identify markups above interchange.
Expected result: You’ll typically find 4 to 8 fees not mentioned during the sales conversation. Common culprits include a $25 monthly minimum fee, a $0.25 per-batch fee, and a $99 annual PCI fee.
Common failure: Merchants skip this step because the agreement is long. If you skip it, you accept every default fee. Read every page.
Step 2: Disclose Your Transaction Patterns with Precision
Your processor’s underwriting team uses your declared transaction profile to set risk parameters. Vague or generic descriptions trigger conservative holds. 43% of payment fraud cases involve account takeover, which is why processors weight first-batch behavior heavily. If your actual transactions don’t match your declared profile, expect flags.
Action: In your merchant application or onboarding portal, fill in these fields with data from your 90-day processing history (not estimates):
- Average ticket size (use the median, not the mean)
- Highest single transaction in the past 90 days
- Monthly processing volume (use your peak month, not your average)
- Percentage of card-not-present transactions (for eCommerce, this is typically 95% or higher)
- Refund rate as a percentage of total volume
- Chargeback ratio (aim to report the exact number, such as 0.4%, not “low”)
Expected result: Your underwriting review completes without additional documentation requests. Checkpoint: You receive approval without a “pending review” status.
Common failure: Reporting your average month instead of your peak month. When a holiday spike exceeds your declared volume, the processor flags the overage and holds funds.
Step 3: Set Your Batch Timing to Match Your Funding Window
Batch timing is the single most overlooked setting that determines when you get paid. Most processors default to a batch close time of 10:00 PM or 11:00 PM Eastern. If your processor’s cutoff for next-day funding is 9:00 PM Eastern, you miss the window every single day.
Action: Log into your gateway or virtual terminal. Navigate to the batch settings (often under Settings > Processing > Batch or Settlement). Change your auto-batch time to at least 60 minutes before your processor’s funding cutoff. If you don’t know the cutoff, call your processor and ask: “What is the latest batch close time that qualifies for next-business-day funding?”
Expected result: Your batch closes before the cutoff, and your deposit arrives the next business day instead of two days later. FedNow Service resources continue to demonstrate how faster payment infrastructure and settlement capabilities are reshaping merchant expectations around funding speed and liquidity access.
Common failure: Leaving auto-batch disabled and manually closing batches. If you forget one evening, that day’s sales sit unsettled until you remember. Always enable auto-batch.
Step 4: Calibrate Fraud Filters to Your Actual Risk Profile
Default fraud filters reject transactions that are perfectly normal for your business. If you sell high-ticket items, the default velocity filter (which flags multiple large orders in a short window) will decline legitimate customers during sales events. Visa’s acceptance guidance confirms that merchants with strong, well-calibrated authentication controls see better approval performance than those relying on generic settings.
Action: In your gateway’s fraud management section, review and adjust these filters:
- Velocity filter: Set the maximum transaction count per card per hour to match your actual customer behavior. If repeat purchases within an hour are common (e.g., B2B reorders), raise this threshold.
- Amount filter: Set the maximum single-transaction amount to 120% of your highest reported transaction, not the processor’s default (often $500 or $1,000).
- AVS (Address Verification) settings: Decide whether a partial AVS match (zip code matches, street does not) should decline or flag for review. For eCommerce, flagging is usually better than declining.
- CVV mismatch: Keep this as a hard decline. CVV mismatches correlate strongly with fraud.
Expected result: Your approval rate increases without increasing your fraud exposure. Checkpoint: Run a test batch (Step 7) and confirm no legitimate test transactions are declined.
Common failure: Setting filters too loose to “maximize sales.” Around 80% of organizations experienced payment fraud attacks recently. Loose filters invite chargebacks, which trigger holds on future deposits.
Step 5: Configure Your Gateway-to-Processor Connection
Your eCommerce platform connects to your processor through a gateway. Misconfigured gateway credentials or incorrect API endpoints cause silent failures: transactions appear to process on your storefront but never reach the processor for settlement.
Action: In your eCommerce platform’s payment settings, enter the API credentials your processor provided. Verify these details:
- Merchant ID (MID) matches your approval letter exactly
- API key and shared secret are copied without trailing spaces
- The endpoint URL points to the production environment, not the sandbox (a common mistake after testing)
- Transaction type is set to “Authorize and Capture” (not “Authorize Only”) unless you specifically need delayed capture for pre-orders
Expected result: A test transaction processes end-to-end and appears in both your eCommerce dashboard and your processor’s reporting portal.
Common failure: Using sandbox credentials in production. Transactions appear successful on your site but never settle. Always verify the environment URL.
Step 6: Set Your Reserve and Hold Parameters
Many processors apply a rolling reserve (holding 5% to 10% of each batch for 6 months) as a default for new eCommerce merchants. This is negotiable if your processing history demonstrates low risk. If you have clean chargeback ratios and consistent volume, you can often reduce or eliminate the reserve at setup.
Action: Review your merchant agreement for any reserve clause. If one exists, contact your processor’s underwriting team with your 90-day statements showing a chargeback ratio below 1% and consistent monthly volume. Request a reduced reserve or a shorter hold period. If you’re working with a provider like BAMS, their dedicated account managers can negotiate reserve terms during onboarding rather than forcing you to discover them after your first deposit is short.
Expected result: Your reserve percentage is reduced or your hold period is shortened, improving your immediate cash flow.
Common failure: Not reading the reserve clause at all. Merchants discover the reserve only when their deposit is 10% less than expected.
Step 7: Run a Controlled Test Batch Before Going Live
Never go live without testing. Process at least 5 test transactions that mirror your real transaction patterns: one at your average ticket size, one at your maximum, one with a partial AVS match, one international card (if applicable), and one refund.
Action: Process each test transaction and verify it appears in your processor’s reporting portal. Close the batch manually and confirm the settlement amount matches the expected total minus fees. Time how long the deposit takes to reach your bank account.
Expected result: All 5 transactions settle correctly. The deposit arrives within your contracted funding timeline. No transactions are flagged or held.
Common failure: Testing only with small-dollar amounts. Your fraud filters won’t trigger on a $1 test. Test at your actual transaction sizes to verify filter calibration.
Step 8: Verify Your First Live Deposit
Your first live deposit reveals whether your processor setup is working exactly as promised.
After your first real day of processing, verify that the deposit amount matches your batch total minus disclosed fees. This is your final confirmation that no hidden fees are active and your batch timing is correct.
Action: Compare three numbers: (1) your eCommerce platform’s daily sales total, (2) your processor’s batch report total, and (3) the deposit in your bank account. The difference between the batch total and the deposit should equal exactly the fees listed in your agreement.
Expected result: The math adds up. If it doesn’t, you’ve found a hidden fee or a configuration error. For a detailed breakdown of how to audit the gap, see this guide to faster payment settlement and lower fees.
Common failure: Not checking the first deposit at all. If you don’t catch discrepancies on day one, they compound silently for months.
Configuration and Customization: Key Variables to Adjust
Every eCommerce business has different needs. Here are the settings you should customize versus the ones that are safe to leave at default.
- Batch close time (must change): Set to 60 minutes before your processor’s funding cutoff. This is never optional if you want next-day funding.
- Fraud velocity threshold (must change): Match to your actual peak-hour transaction count. The default is almost always too low for eCommerce.
- Maximum transaction amount (must change): Set to 120% of your highest historical transaction. Too low and you decline big orders. Too high and you increase fraud exposure.
- AVS partial-match behavior (customize): For eCommerce, “flag for review” is usually better than “auto-decline.” For high-risk verticals, auto-decline may be appropriate.
- Auto-batch (safe default): Enable it. There is almost no scenario where manual-only batching benefits an eCommerce business.
- CVV required (safe default): Leave this on. Turning it off increases fraud and can disqualify you from lower interchange rates.
If you sell internationally, also configure your currency conversion settings. Default dynamic currency conversion (DCC) often adds a 2% to 3% markup that your customers see at checkout, increasing cart abandonment.
Verification and Testing: Confirm Everything Works
Your test procedure has two phases. Phase 1 (pre-launch): Run the 5-transaction test batch from Step 7 and verify settlement. Phase 2 (post-launch): Monitor your first 5 business days of live processing.
During Phase 2, check daily that: (1) deposits arrive within the contracted timeline, (2) no transactions are unexpectedly declined, and (3) the fee deductions match your agreement. If any of these fail, escalate immediately. A problem on day 2 that you ignore becomes a cash flow crisis by day 30.
Edge cases to verify: a transaction at exactly your maximum amount filter, a transaction from a customer whose billing and shipping addresses differ, and a refund processed the same day as the original sale. These three scenarios trigger the most common false flags in default configurations.
Common Errors and Fixes for Processor Setup
Error: “Batch settlement failed” or deposit doesn’t arrive
Symptom: Your batch report shows transactions, but no deposit appears in your bank account. Cause: The bank account on file doesn’t match the account verified during underwriting, or the batch closed after the funding cutoff. Fix: Confirm your settlement account details in the processor portal. Adjust your batch close time earlier.
Error: Legitimate transactions auto-declined
Symptom: Customers report failed payments, but their cards work elsewhere. Cause: Your fraud velocity or amount filters are set too low. Fix: Review your gateway’s declined transaction log. Identify which filter triggered the decline and adjust the threshold upward based on your actual data. Consult this merchant service provider coordination guide for a detailed walkthrough of reconfiguring default fraud filters.
Error: Deposit amount doesn’t match batch total
Symptom: Your deposit is consistently lower than expected. Cause: Hidden fees (batch fee, statement fee, PCI non-compliance fee) or an undisclosed rolling reserve. Fix: Request a line-item fee breakdown from your processor for the specific batch. Compare against your agreement. Dispute any fee not in your signed contract.
Error: Account flagged for “unusual activity” after first batch
Symptom: You receive a hold notification or a request for additional documentation after your first live batch. Cause: Your actual transaction patterns (ticket size, volume, card-not-present ratio) don’t match what you declared during onboarding. As Scott Talbot noted in the LexisNexis True Cost of Fraud report, unusual early activity often predicts later disputes, so processors watch first batches closely. Fix: Provide updated documentation that accurately reflects your processing patterns. Use your 90-day statements as evidence.
Error: Gateway returns “invalid credentials” in production
Symptom: Transactions fail with an authentication error after switching from test to live mode. Cause: Sandbox API keys are still in your eCommerce platform’s configuration. Fix: Replace sandbox credentials with production credentials. Verify the endpoint URL starts with the production domain, not “sandbox” or “test.”
Next Steps: Extend Your Configuration Advantage
Now that your processor is configured to match your actual business, you can build on this foundation. First, review your interchange qualification. Submitting Level 2 and Level 3 transaction data (tax amount, customer code, line-item detail) can lower your per-transaction cost on B2B and corporate card purchases. See this guide to selecting eCommerce merchant services for more on interchange optimization.
Second, set up automated chargeback alerts. Processors like BAMS offer proactive chargeback defense that notifies you before a dispute becomes a chargeback, giving you time to issue a refund and avoid the chargeback fee entirely.
Third, schedule a quarterly configuration review. Your transaction patterns change seasonally. Revisit your fraud thresholds, batch timing, and volume declarations every 90 days to keep your settings aligned with your actual business.
Frequently Asked Questions
What documents do I need to gather before switching merchant service providers?
You need your EIN letter, articles of incorporation, a voided check or bank letter (dated within 90 days), government-issued ID, your most recent 90-day processing statements, and your current PCI compliance certificate. Having your 90-day statements ready is especially important because they provide the transaction pattern data your new processor uses to set risk thresholds and reserve requirements.
Why is it important to keep my old merchant account open during the transition?
Chargebacks and refund requests can arrive up to 120 days (and sometimes longer) after the original transaction. If your old account is closed, you lose the ability to respond to disputes on those transactions. Keep the old account active until you’ve passed the chargeback window for your last batch processed through it.
How can I ensure my new processor coordinates effectively with my POS system or eCommerce platform?
Verify three things before going live: (1) your Merchant ID matches your approval letter, (2) your API credentials are production keys (not sandbox), and (3) the transaction type is set to “Authorize and Capture” unless you specifically need delayed capture. Run at least 5 test transactions at realistic dollar amounts to confirm end-to-end settlement.
When should I conduct testing before going live with a new payment processor?
Test after you’ve configured all settings (batch timing, fraud filters, gateway credentials) but before you route any real customer traffic. Process test transactions that mirror your actual patterns: average ticket, maximum ticket, partial AVS match, and a refund. Close the test batch and verify the deposit arrives in your bank account within the contracted timeline.
Which pricing model is best for my eCommerce business when setting up merchant services?
Interchange plus pricing gives you the most transparency because you see the actual interchange cost plus a fixed markup. Tiered and flat-rate models bundle costs in ways that obscure the true per-transaction fee. For established eCommerce businesses processing consistent volume, interchange plus almost always results in lower total costs.
How do batch timing settings affect when I receive my deposits?
Your batch close time determines which funding cycle your transactions enter. If your processor’s cutoff for next-day funding is 9:00 PM Eastern and your batch closes at 10:00 PM, you miss the window and your deposit arrives a day late. Set your auto-batch to close at least 60 minutes before the cutoff to account for processing delays.
Sources

