Hidden Fees in Processing: An Ecommerce Data Guide
How mapping tax and freight fields to Level 2 and Level 3 data unlocks lower interchange rates
Learn how to audit your processing statements for interchange downgrades and configure your eCommerce platform to pass Level 2 and Level 3 data. This guide covers the exact fields that trigger hidden fees in processing and how to eliminate them.
TL;DR
- Interchange downgrades are a data problem, not a negotiation problem — When your eCommerce platform doesn’t pass tax, freight, and line-item fields to your gateway, card networks charge you the highest applicable interchange rate by default.
- Level 2 and Level 3 data unlock lower rates — Passing tax amounts, shipping costs, commodity codes, and line-item details can reduce interchange by 0.50% to 1.00% per transaction on commercial cards.
- Most platforms don’t pass this data automatically — Default payment integrations (including Shopify Payments) prioritize checkout speed over data richness. You need to explicitly configure enhanced data passthrough via your gateway’s API or a dedicated plugin.
- Interchange-plus pricing makes the savings visible — Flat-rate pricing hides downgrades. Interchange-plus lets you see exactly which transactions are qualifying at suboptimal rates and measure the impact of fixes.
- Start with one field, one statement cycle — Map your tax amount field first (it’s the highest-impact Level 2 requirement), verify it passes through your gateway, and check your next statement for qualification improvements.
Guide Orientation: What This Covers and Who It’s For
This guide teaches eCommerce managers how to map tax and freight data fields across their platforms to unlock Level 2 and Level 3 interchange rates. These lower rates exist specifically for transactions that include enriched data (line-item details, tax amounts, shipping costs), but most online merchants never capture or pass this data correctly.
This is written for eCommerce managers at established online businesses running on platforms like Shopify, WooCommerce, BigCommerce, or Magento, processing enough volume that even small per-transaction savings compound into meaningful margin recovery. If you manage payment operations for a team of 10 to 50 people, this is for you.
By the end, you’ll understand exactly which data fields trigger interchange downgrades, how to audit whether your current setup passes them, and how to configure your gateway and platform to capture Level 3 data. We won’t cover general fee negotiation tactics or platform migration. This is strictly about the data layer between your checkout and your processor, and the hidden fees in processing that disappear when you get it right.
Why Mapping Tax and Freight Fields Matters for Your Effective Processing Rate

Most hidden processing fees are not extra charges. They are interchange downgrades caused by missing transaction data.
Your processing statement tells you what you paid. It does not tell you what you overpaid. The difference lives in interchange downgrades, and most eCommerce merchants never learn to spot them because the problem looks like a fixed cost rather than a configuration error.
Merchant Payments Coalition resources continue to highlight the growing financial impact interchange and swipe fees have on merchants processing eCommerce and B2B transactions. Interchange rates aren’t uniform. They vary by card type, transaction method, and critically, by how much data accompanies the transaction.
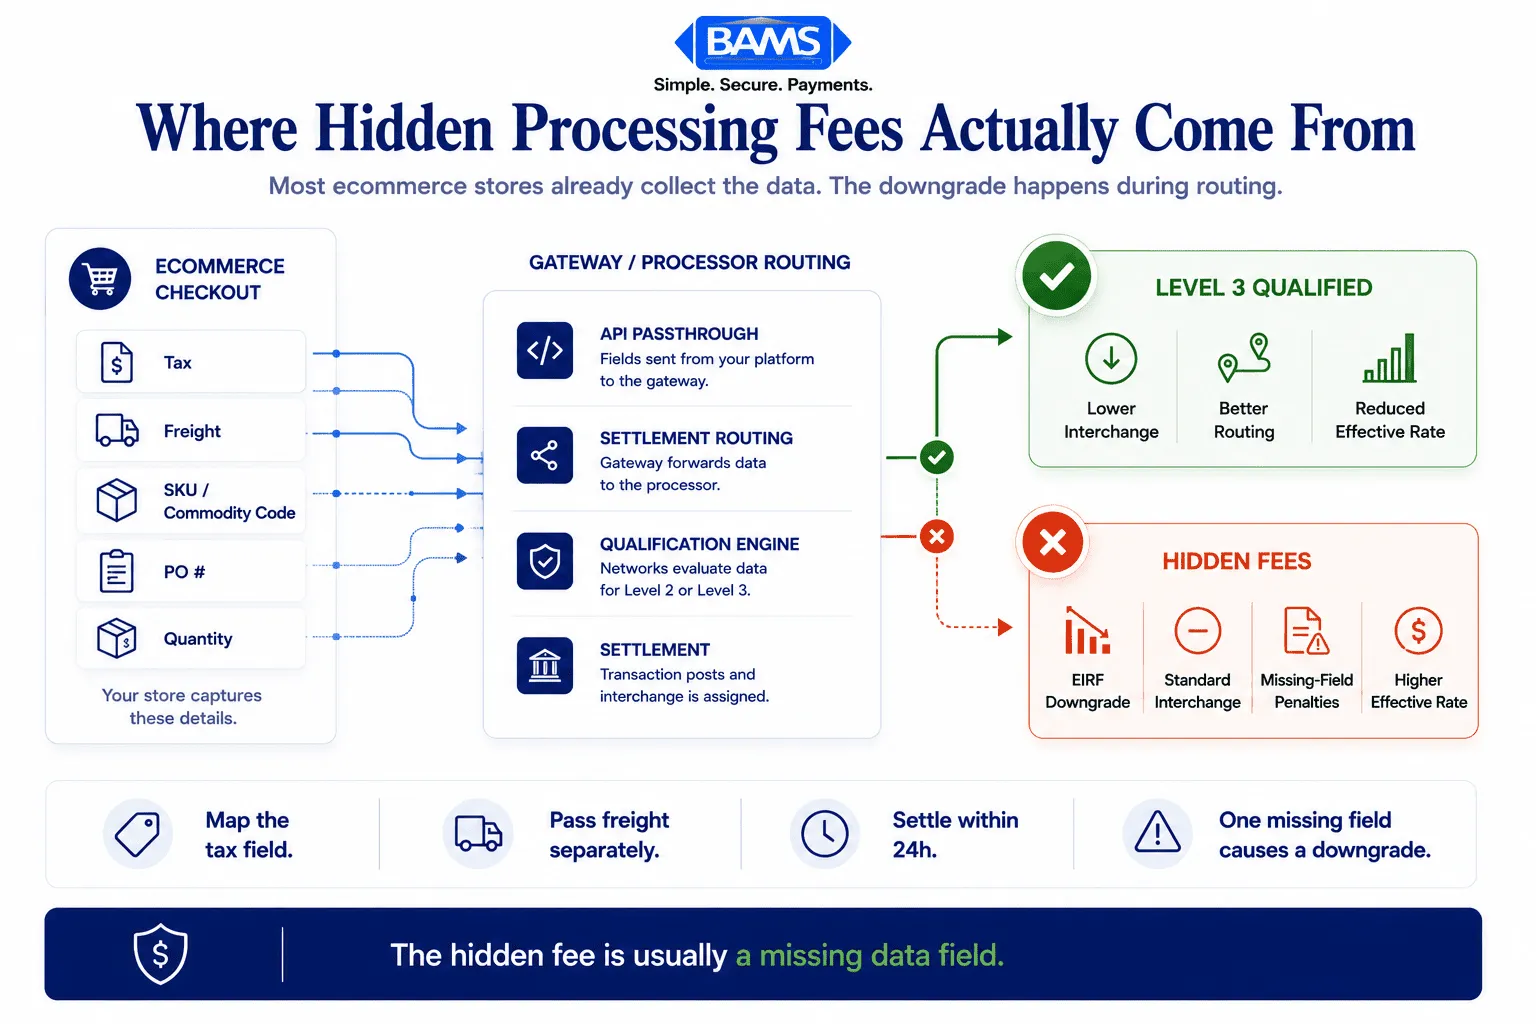
Visa and Mastercard offer lower interchange tiers (Level 2 and Level 3) for transactions that include tax amounts, freight costs, product codes, and other line-item details. When your platform doesn’t pass these fields, the card networks default your transaction to the highest applicable rate.
For B2B eCommerce merchants, the gap between a standard rate and a Level 3 rate can be 0.50% to 1.00% per transaction. On $2 million in annual volume, that’s $10,000 to $20,000 in unnecessary cost. This isn’t a negotiation problem. It’s a data problem. Your gateway either passes the right fields or it doesn’t, and your effective processing rate reflects the result.
The cost of inaction compounds silently. Every transaction that qualifies for Level 3 but settles at Level 1 is a margin leak you’re funding month after month. And because it shows up as “interchange” on your statement, it looks non-negotiable. It isn’t.
Core Concepts: Interchange Levels, Data Fields, and Downgrades
The Three Interchange Levels
Card networks classify transactions into three data tiers. Level 1 is the baseline: card number, expiration, transaction amount, and date. Every card-present and card-not-present transaction meets Level 1. Level 2 adds tax amount, tax indicator, and customer code (like a purchase order number). Level 3 adds line-item detail: product descriptions, commodity codes, unit costs, quantities, and freight amounts.
Each level unlocks progressively lower interchange rates. The card networks designed this structure to incentivize richer data for commercial and purchasing card transactions, but the benefits extend to any transaction where the data is available and passed correctly.
What Causes a Downgrade
A “downgrade” happens when a transaction fails to qualify for its optimal interchange tier. The most common triggers for eCommerce merchants are missing tax fields, absent freight data, incomplete authorization data, and delayed settlement. Federal Reserve interchange fee data continues to demonstrate how qualification differences materially affect merchant processing costs over time.
Why This Is an Ecommerce-Specific Problem
Ecommerce platforms handle tax and shipping calculations at the cart level, but that data doesn’t automatically flow to the payment gateway in the format card networks require. Your platform knows the tax amount. Your gateway may not. This disconnect is where the downgrade happens, and it’s where this guide focuses your attention.
Interchange-Plus Pricing Makes This Visible
If you’re on flat-rate pricing, you’ll never see the downgrade because your rate doesn’t change. On interchange-plus pricing, every downgrade shows up as a higher interchange line item. This transparency is precisely why interchange-plus matters: it turns invisible waste into a diagnosable, fixable problem.
The Framework: Audit, Map, Configure, Verify
Interchange downgrades become visible only when merchants audit the transaction data path from checkout to settlement.
The process for capturing Level 3 data and eliminating interchange downgrades follows four phases. Each phase builds on the previous one, and skipping ahead creates gaps that are hard to diagnose later.
- Audit — Identify which transactions are downgrading and why by reading your interchange qualification detail.
- Map — Document the specific data fields your platform generates at checkout and trace whether each field reaches your gateway and processor.
- Configure — Adjust your gateway settings, platform plugins, or API calls to pass the required fields in the correct format.
- Verify — Confirm that transactions are qualifying at the expected interchange tier by reviewing subsequent statements and running test transactions.
These four phases form a cycle, not a one-time project. Card network requirements shift (Visa and Mastercard update their fee schedules regularly), platforms push updates that can break field mappings, and your product catalog changes. Treat this as an ongoing operational discipline.
Step-by-Step Breakdown: Mapping Tax and Freight Fields for Lower Interchange
Step 1: Audit Your Interchange Qualification Detail
Objective: Identify which transactions are downgrading and quantify the cost impact.
Pull your most recent processing statement and look for the interchange qualification section. On an interchange-plus statement, each transaction (or batch of transactions) should show the specific interchange category it settled into. Look for categories with words like “Standard,” “EIRF” (Electronic Interchange Reimbursement Fee), or “Non-Qualified.” These indicate transactions that failed to meet Level 2 or Level 3 criteria.
Calculate your effective processing rate by dividing total processing fees by total sales volume. A detailed breakdown of this calculation can help you benchmark where you stand. If your effective rate is above 2.1% for card-not-present transactions and you process commercial or purchasing cards, downgrades are almost certainly a factor.
Anti-patterns: Don’t average your rate across all card types. Commercial cards and consumer cards have different interchange structures. Averaging masks the problem. Also avoid relying on your processor’s summary page alone; you need the line-item interchange detail.
Success indicator: You can identify specific interchange categories where transactions are settling and estimate the dollar gap between current and optimal qualification.
Step 2: Inventory Your Platform’s Data Fields at Checkout
Objective: Document every data element your eCommerce platform captures during a transaction.
Open a test order in your platform’s admin panel and catalog every field available at the order level. You’re looking for: tax amount, tax rate, tax indicator (exempt vs. taxable), shipping/freight amount, shipping method, line-item descriptions, unit prices, quantities, product/commodity codes, customer PO numbers, and destination zip codes.
Most major platforms (Shopify, WooCommerce, BigCommerce, Magento) calculate and store tax and shipping at the order level. The question isn’t whether the data exists. It’s whether the data is structured in fields your gateway can read and pass downstream. Create a simple spreadsheet with three columns: Field Name, Platform Location, and Gateway Equivalent. This becomes your mapping document.
Anti-patterns: Don’t assume your platform’s built-in payment integration handles this automatically. Shopify Payments, for example, does not pass Level 3 data to the card networks. Many default integrations prioritize speed and simplicity over data richness.
Success indicator: You have a complete inventory of available data fields and a clear picture of which Level 2/Level 3 fields your platform can supply.
Step 3: Trace the Data Path from Platform to Processor
Objective: Identify exactly where data drops out between your checkout and the card network.
The transaction data path typically flows: ecommerce platform → payment gateway → payment processor → card network. Data can be lost at any handoff. Your gateway may accept tax and freight fields but not pass them to the processor. Your processor may accept Level 2 data but not support Level 3. Or your platform’s plugin may simply not include these fields in the API call to the gateway.
Contact your payment gateway provider and ask three specific questions: (1) Does your gateway support Level 2 and Level 3 data passthrough? (2) Which specific fields does your API accept for enhanced data? (3) Does the gateway automatically populate any fields (like tax amount) from the transaction, or must they be explicitly passed?
Then ask your processor the same questions. Visa payment rules and merchant guidance continue to emphasize that interchange qualification depends heavily on enriched transaction data, authorization quality, and correct settlement procedures. If your processor doesn’t support Level 3 submission, no amount of gateway configuration will help.
Anti-patterns: Don’t assume “Level 3 support” means full automation. Many gateways advertise Level 3 capability but require you to explicitly populate each field via API. “Supported” and “automatically captured” are very different things.
Success indicator: You can trace each required field from platform to processor and identify the specific point(s) where data is lost or not transmitted.
Step 4: Configure Your Gateway to Pass Tax and Freight Fields
Objective: Ensure every required Level 2 and Level 3 field is populated and transmitted with each transaction.
This is the implementation step, and it varies by platform and gateway combination. The core fields you need to pass for Level 2 qualification are: tax amount (or tax-exempt indicator), customer code/PO number, and merchant zip code. For Level 3, add: line-item commodity codes, product descriptions, unit costs, quantities, unit of measure, freight/shipping amount, duty amount (if applicable), and destination zip code.
If your platform uses a plugin or extension for gateway connectivity, check whether a Level 3 data plugin exists. For WooCommerce and Magento, several gateway-specific extensions handle this. For Shopify, you’ll likely need a third-party gateway integration rather than Shopify Payments to access Level 3 fields. BigCommerce offers some Level 2 support through specific gateway partnerships.
For custom or headless commerce setups, you’ll configure this in your API integration.
Map each field from your order object to the corresponding gateway API parameter. Pay particular attention to data formatting: tax amounts must typically be passed as numeric values (not percentages), freight must be separated from the total transaction amount, and commodity codes must match the card network’s accepted code lists.
A merchant services partner like BAMS can help identify which fields your current setup is missing and whether your processor supports Level 3 submission, which is especially valuable if you’re on interchange-plus pricing and want to see the direct impact on your statement.
Anti-patterns: Don’t hardcode tax amounts as zero to “fill the field.” Card networks validate data quality, and submitting incorrect tax data can trigger downgrades rather than prevent them. Also avoid batch-configuring commodity codes as a single generic code for all products; specificity matters for Level 3 qualification.
Success indicator: Test transactions show all required Level 2/Level 3 fields populated in your gateway’s transaction log.
Step 5: Validate Qualification on Your Next Statement
Objective: Confirm that configured transactions are settling at the expected interchange tier.
After implementing your field mapping, process a controlled batch of transactions and wait for your next statement cycle. Pull the interchange qualification detail again and compare the same transaction types (same card brands, same card categories) against your pre-configuration baseline. You should see transactions that previously settled at Standard or EIRF categories now qualifying at Commercial Level 2 or Level 3 rates.
Calculate your new effective processing rate for the affected transaction segment. If your baseline was 2.4% and your new rate is 1.9%, that 0.5% difference on $500,000 in annual commercial card volume is $2,500 recovered. Scale that across your full volume of qualifying transactions to quantify the total impact.
Anti-patterns: Don’t evaluate results based on a single statement. Interchange qualification can vary by card issuer and card type. Give it two to three statement cycles to establish a reliable pattern. Also don’t ignore transactions that still downgrade; these reveal fields that aren’t passing correctly or card types that require additional data elements.
Success indicator: Measurable reduction in downgraded transactions and a lower effective rate on commercial card volume.
Step 6: Build an Ongoing Monitoring Routine
Objective: Prevent regression and catch new downgrade triggers before they accumulate cost.
Platform updates, gateway version changes, and card network fee schedule revisions can all break your field mappings without warning. Federal Reserve payment system resources continue to emphasize how evolving payment infrastructure, settlement requirements, and operational controls affect merchant payment workflows and overall transaction economics. These changes affect your cost structure even when your data mapping is perfect.
Set a monthly calendar reminder to review your interchange qualification detail. Track your effective rate as a time series. Any upward movement that isn’t explained by a shift in card mix warrants investigation. Keep your field mapping spreadsheet updated, and re-test after any platform or gateway update.
If your processor offers a dedicated account manager, schedule a quarterly review of your interchange optimization. This is where transparent pricing models pay for themselves: every downgrade is visible, every improvement is measurable, and your processor has a shared incentive to help you qualify at the lowest possible tier.
Anti-patterns: Don’t treat this as a one-time project. The merchants who save the most are the ones who monitor continuously. Also avoid relying solely on your processor’s reporting dashboard; cross-reference with your own records to catch discrepancies.
Success indicator: Effective processing rate remains stable or improves over time, and new downgrades are identified and resolved within one billing cycle.
Practical Examples: Platform-Specific Field Mapping
Scenario 1: WooCommerce with Authorize.Net
A mid-size B2B ecommerce store running WooCommerce processes $1.2 million annually, with 40% of volume on commercial purchasing cards. Their default Authorize.Net plugin passes basic transaction data (amount, card number, billing address) but omits tax amount, freight, and line-item details. Every commercial card transaction settles at Standard interchange.
After installing a Level 3 data extension for Authorize.Net and mapping WooCommerce’s tax_total, shipping_total, and line_items fields to the gateway’s corresponding API parameters, their commercial card transactions begin qualifying at Level 3 rates. The effective rate on that segment drops from 2.65% to 2.05%, saving roughly $2,880 annually on the commercial card portion alone.
Scenario 2: Shopify with External Gateway
An eCommerce brand on Shopify Plus processes $3 million annually. They use Shopify Payments for convenience but notice their effective rate is consistently above 2.3%. Because Shopify Payments doesn’t pass Level 2 or Level 3 data, every transaction qualifies at the base tier regardless of card type.
They switch to an external gateway that supports Level 3 data and integrate it via Shopify’s payment provider API. The tax and shipping fields from Shopify’s order object are mapped to the gateway’s enhanced data fields. Their hidden fees in processing become visible for the first time, and their effective rate drops to 2.0% on qualifying transactions. The annual savings exceed $9,000.
Before and After: The Statement View
Before mapping: A statement shows 200 commercial card transactions settling at “Visa Commercial Standard” with an interchange rate of 2.70% + $0.10. Total interchange on $150,000 in volume: $4,200.
After mapping: The same 200 transactions settle at “Visa Commercial Level III” with an interchange rate of 1.90% + $0.10. Total interchange on $150,000 in volume: $3,050. That’s $1,150 saved in a single month from the same transactions, same cards, same customers. The only change was the data attached to each transaction.
Common Mistakes and Pitfalls
The most predictable failure is assuming your platform handles Level 3 data automatically. It almost certainly doesn’t. Default integrations prioritize checkout speed and conversion, not interchange optimization. You have to explicitly configure enhanced data passthrough.
Another common mistake is focusing on processor markup negotiation while ignoring interchange qualification. Processor markup typically ranges from 0.10% to 1.00%, while interchange makes up the bulk of your cost. Optimizing the larger component yields bigger results.
Some merchants configure Level 3 fields once and never check again. Platform updates can silently break field mappings. A plugin update that changes how tax is calculated or stored can cause every subsequent transaction to downgrade without any visible error.
Finally, merchants on flat-rate pricing often skip this entire process because their rate doesn’t visibly change. That’s the trap. Flat-rate pricing hides the savings you’re leaving on the table. If your volume justifies it, moving to interchange-plus pricing makes the entire optimization visible and actionable.
What to Do Next
Start with step one. Pull your most recent processing statement and look for the interchange qualification detail. If you can’t find it, call your processor and request it. If your processor can’t provide it, that tells you something important about your current pricing structure’s transparency.
You don’t need to overhaul your entire payment stack in a week. Map one field (start with tax amount, since it’s the highest-impact Level 2 field), confirm it’s passing through your gateway, and verify the result on your next statement. One field, one cycle, one measurable improvement.
Revisit this guide as your platform evolves, your product catalog changes, or your processor updates their integration. The merchants who treat interchange optimization as an ongoing practice rather than a one-time fix are the ones who consistently maintain the lowest effective processing rates in their category.
Frequently Asked Questions
What are Level 2 and Level 3 data in payment processing?
- Level 2 and Level 3 refer to enhanced transaction data that card networks (Visa, Mastercard) use to classify transactions for interchange pricing.
- Level 2 includes tax amount, customer code, and merchant zip.
- Level 3 adds line-item details like product descriptions, commodity codes, quantities, unit prices, and freight amounts. Passing this data can qualify your transactions for lower interchange rates.
Why is interchange-plus pricing more beneficial than flat-rate pricing for this optimization?
Interchange-plus pricing separates interchange costs from your processor’s markup, so you see exactly which interchange category each transaction settles into. This visibility lets you identify downgrades and measure the impact of Level 3 data optimization. Flat-rate pricing charges the same rate regardless of qualification level, which means you pay the same whether your data is optimized or not, and you can never see the savings you’re missing.
How can I audit my payment processing statements for hidden fees?
Request the interchange qualification detail from your processor (not just the summary page). Calculate your effective processing rate by dividing total fees by total volume. Compare the result against expected interchange-plus rates for your card mix. Look for transactions settling at “Standard,” “EIRF,” or “Non-Qualified” categories, which indicate downgrades. This guide to credit card processing fees walks through the full calculation method.
Does Shopify Payments support Level 3 data?
No. Shopify Payments does not currently pass Level 2 or Level 3 enhanced data to card networks. If you need Level 3 qualification (especially for B2B transactions on commercial cards), you’ll need to integrate an external payment gateway that supports enhanced data passthrough and connect it to your Shopify store via the payment provider API.
How much can I actually save by passing Level 3 data?
Savings depend on your volume of qualifying transactions, particularly commercial and purchasing cards. The interchange rate difference between Level 1 and Level 3 can be 0.50% to 1.00% per transaction. On $500,000 in annual commercial card volume, that translates to $2,500 to $5,000 in recovered margin. Consumer card transactions see smaller but still meaningful improvements when Level 2 data is passed.
How does optimizing transaction data affect processing fees?
Card networks reward richer transaction data with lower interchange rates because detailed data reduces fraud risk and simplifies reconciliation. When your gateway passes complete tax, freight, and line-item fields, the network classifies your transaction at a lower interchange tier. This directly reduces the largest component of your processing cost. The effect is automatic once the data is configured correctly; no negotiation required.
Sources
- Merchant Payments Coalition Resources
- Federal Reserve Interchange Fee Data
- Visa Payment Rules and Merchant Guidance

