Funding Speed Verification: Audit Your Processor Setup
How to confirm your batch timing, settlement speed, and deposit schedule match what your contract promises
Learn how to verify your processor setup actually delivers the funding speed you were promised. This tutorial walks through batch cutoff audits, hidden fee identification, and live transaction tracing to confirm deposits arrive on time.
TL;DR
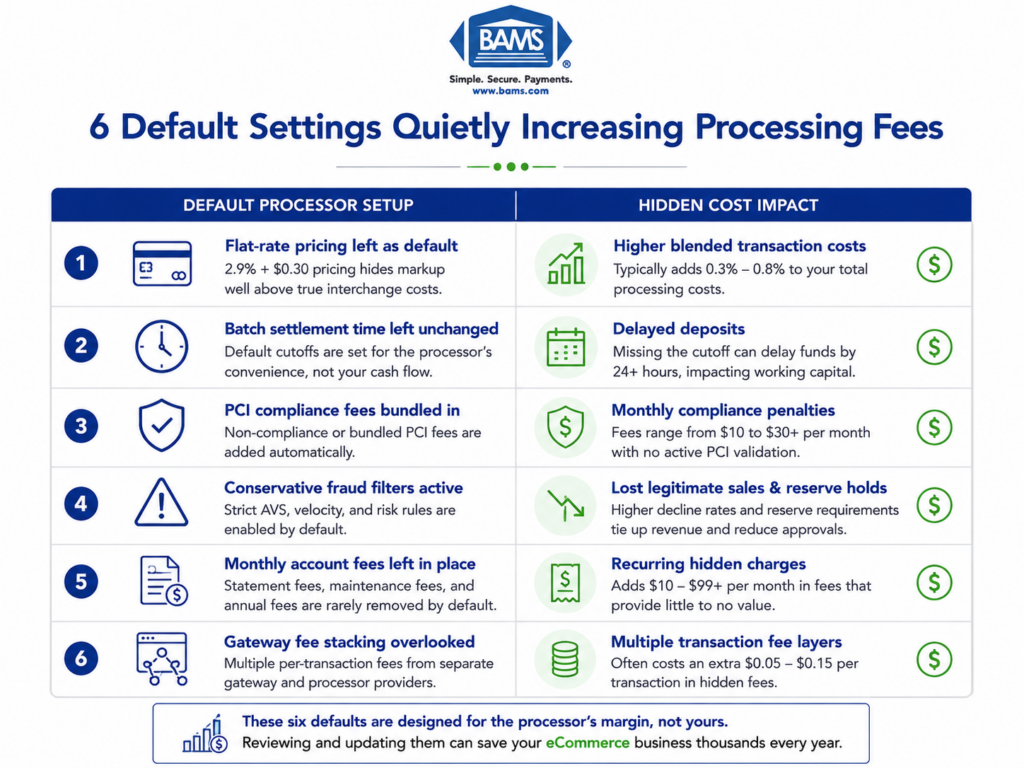
- Setup completion is the starting point, not the finish line – Default processor configurations are optimized for the processor’s risk, not your cash flow. Audit every setting that touches your money.
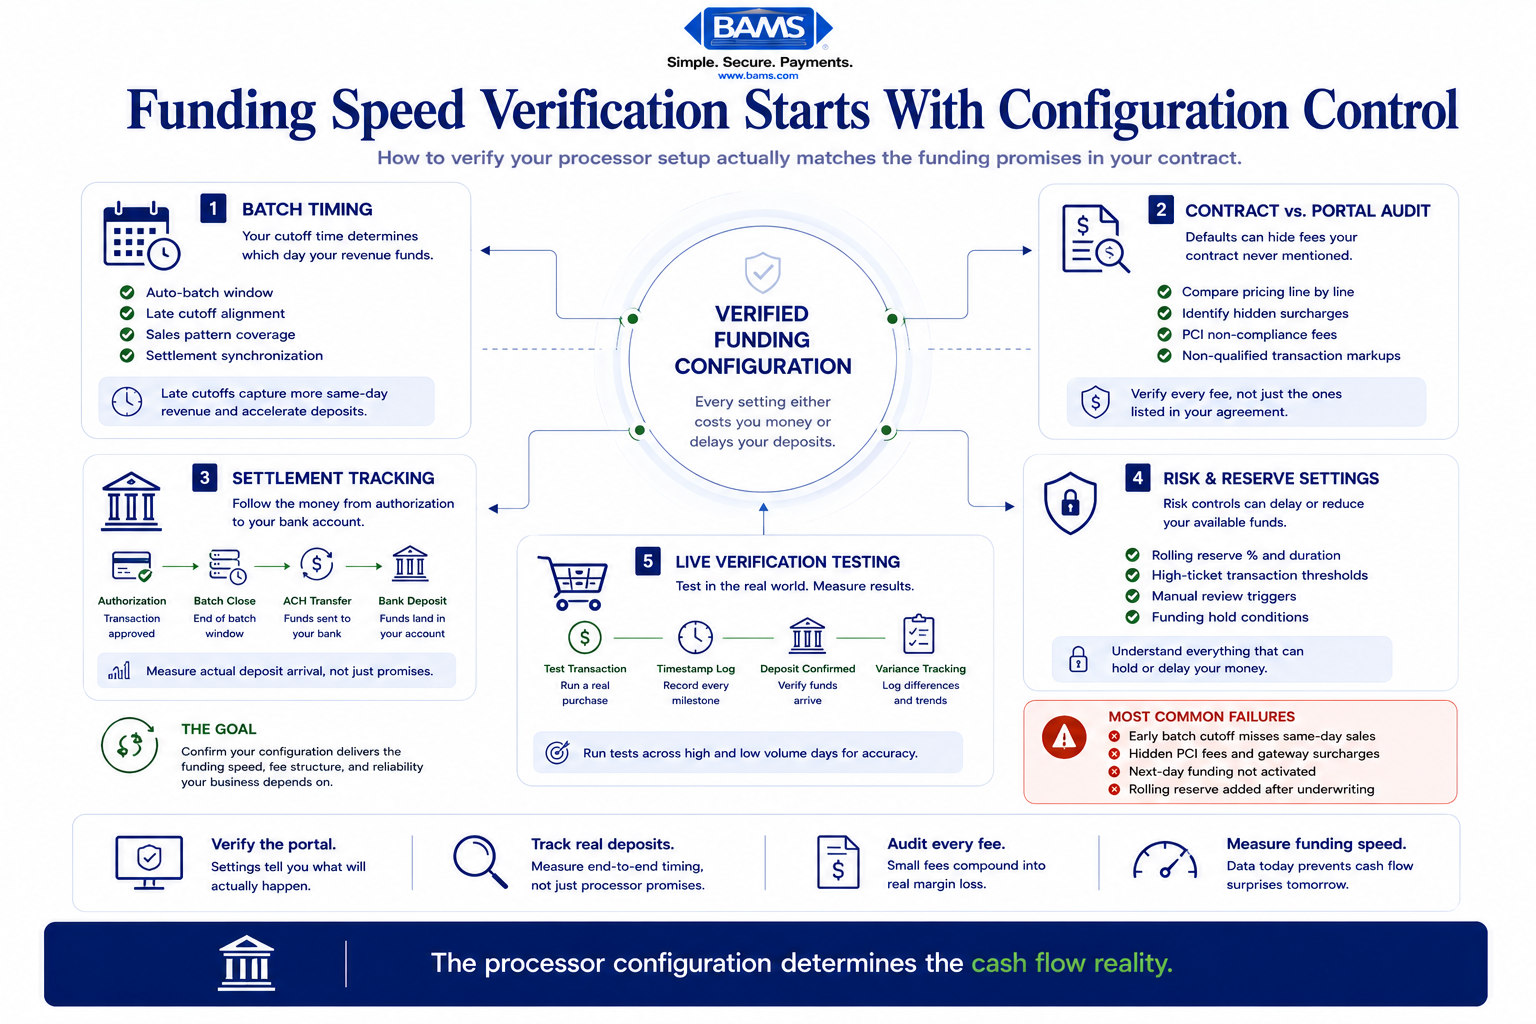
- Compare your portal settings to your signed contract line by line – Hidden fees (PCI non-compliance, gateway surcharges, non-qualified transaction markups) often appear in the portal but not in your agreement.
- Batch cutoff timing directly controls your funding speed – A cutoff set to 3:00 PM when your sales run until 10:00 PM means a full day of revenue gets delayed by 24+ hours.
- Run live test transactions and track deposits to your bank – The only way to verify funding speed is to measure it. Log transaction time, batch close, and actual deposit arrival for at least two weeks.
- Repeat this audit quarterly – Processors can change fees with 30-day notice, and card networks update interchange rates twice a year. A one-time check is not enough.
What You’ll Achieve: Verified Funding Speed and Zero Hidden Fees
Most eCommerce managers finish processor setup and assume the hard part is over. In reality, setup completion is the starting point. Default configurations often contain buried fees, misaligned batch windows, and risk thresholds that silently delay your deposits by one to three days.
By the end of this tutorial, you will have audited every setting that affects your funding speed verification, confirmed your batch cutoff times match your sales patterns, identified hidden charges lurking in your processor’s default configuration, and established a repeatable process for confirming deposits arrive when promised.
Your success criteria: you can trace a test transaction from authorization through settlement to your bank account, verify the deposit landed within the timeframe your contract guarantees, and document the total per-transaction cost with no surprises.
Most funding delays are not caused by processors failing. They are caused by configurations nobody verified after onboarding.
Prerequisites and Setup Checklist
Before you start, gather these items. Missing even one can stall the process.
- Processor admin portal credentials (not just the storefront login)
- Your signed merchant agreement (PDF or paper), including the fee schedule and funding terms addendum
- Gateway dashboard access (Authorize.Net, NMI, or whichever gateway your processor uses)
- Bank account details for the account receiving deposits, plus recent bank statements covering the last 30 days
- A small test budget ($5 to $20) for running live verification transactions
- A spreadsheet or note-taking tool to log timestamps, amounts, and discrepancies
Time estimate: 90 minutes to 2 hours for the full audit. Plan for a second session 48 hours later to verify deposit timing.
Potential blocker: If you only have storefront-level access, you will not see batch settings or fee schedules. Contact your processor’s support team to request admin-level portal access before starting.
Why This Approach Works (and What Others Miss)
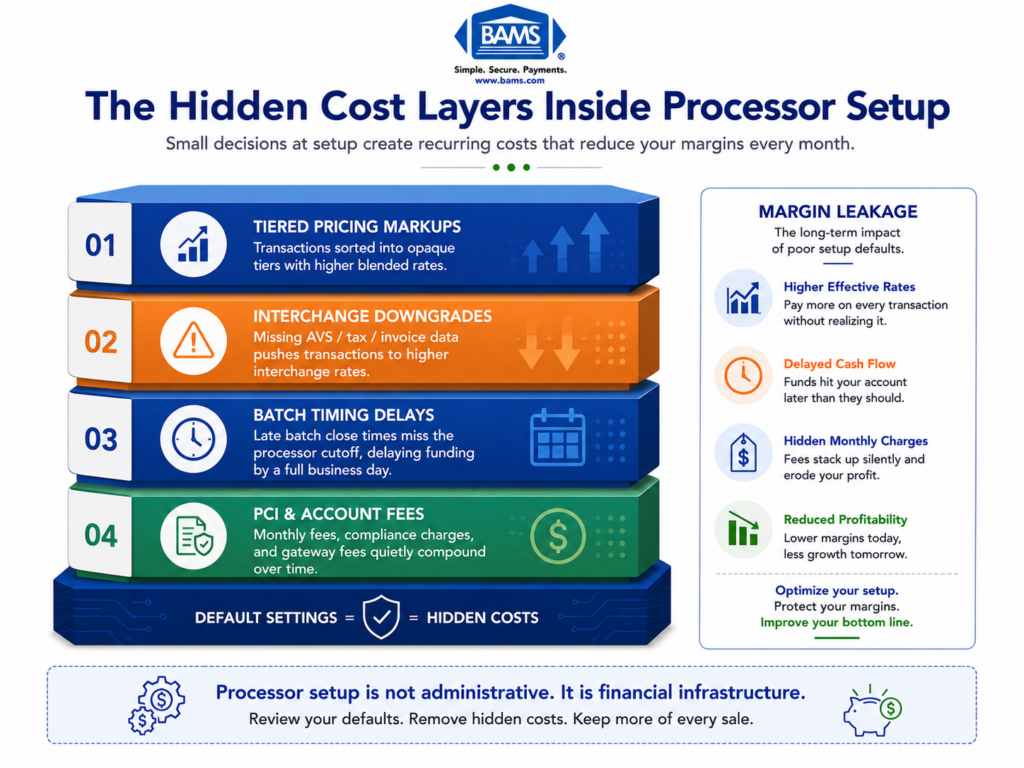
Standard merchant account setup guides stop at “go live.” They treat configuration as a one-time task. The problem is that processors ship defaults optimized for their risk exposure, not your cash flow. Batch windows default to early afternoon. Risk holds default to conservative thresholds. Fee tiers default to the pricing structure that benefits the processor.
This tutorial treats your live configuration as a financial document. Every setting either costs you money or delays your deposits. By auditing systematically (batch timing, then settlement terms, then fee defaults, then risk thresholds), you connect each configuration choice directly to a cash flow outcome you can measure.
Alternative approaches include hiring a payments consultant ($150 to $300/hour) or relying on your processor’s onboarding team. Both work, but neither gives you the ongoing ability to verify things yourself when terms change or new fees appear.
Step 1: Pull Your Fee Schedule and Compare It to Your Contract
Action: Log into your processor’s admin portal and navigate to the fee or pricing section. Download or screenshot every line item. Open your signed merchant agreement side by side.
Compare each fee category: per-transaction rate, per-transaction fixed fee, monthly account fee, batch fee, statement fee, PCI compliance fee, and chargeback fee. Federal Reserve interchange fee data continues to demonstrate how qualification differences and processor markups materially affect effective merchant costs over time.
Checkpoint: Every fee in the portal should have a matching line in your contract. Flag any fee that appears in the portal but not in your agreement. Common culprits include “regulatory compliance fees,” “network access fees,” and “account maintenance fees” that were never disclosed.
Common failure: You see a PCI compliance fee of $25/month but your contract says $9.95/month. This is not a glitch. Contact your processor immediately with the contract reference and request a correction in writing.
Step 2: Identify Your Batch Cutoff Time
Action: In your gateway dashboard, locate the batch settlement settings. Look for “auto-batch” or “batch close” time. Write down the exact time and timezone.
Most gateways default to auto-batching between 3:00 PM and 5:00 PM Eastern. If your peak sales hours run until 10:00 PM or later, every transaction after the cutoff rolls into the next day’s batch. That means an extra 24 hours (or more) before those funds settle. Since NACHA ACH Network resources continue to highlight the operational constraints of batch-based ACH settlement systems, a misaligned cutoff compounds the delay significantly.
Checkpoint: Your batch cutoff time should fall after your last significant sales window. For most eCommerce businesses, setting it to 10:00 PM or 11:00 PM Eastern captures the full day’s revenue in a single batch.
Common failure: The gateway shows “auto-batch” enabled but no configurable time. This means the processor controls the cutoff. Call support and ask for the exact time. If they cannot move it, document this as a limitation that directly affects your next day funding eligibility.
Step 3: Verify Your Settlement and Funding Timeline
Action: In your processor portal, find the section labeled “funding,” “settlement,” or “deposit schedule.” Note whether your account is set to next-day funding, two-day funding, or standard (three-plus days).
Cross-reference this with your contract’s funding terms. Your agreement should state a specific funding window (e.g., “funds deposited within one business day of batch settlement”). If the portal shows a different timeline than your contract, you have a discrepancy that needs resolution.
Checkpoint: The portal setting and the contract language should match. If your contract promises next-day funding but the portal shows “standard” or “2-3 business days,” the default was never updated during onboarding.
Common failure: Your contract says “next-day funding available” (note: “available” is not “enabled”). Many processors offer faster funding as an option but do not activate it by default, or they charge an additional per-transaction fee for it. Ask explicitly: “Is next-day funding active on my account, and is there an additional cost?”
Step 4: Audit Risk and Reserve Thresholds
Action: Search your processor portal for “risk settings,” “reserve,” or “hold” configurations. Look for three things: rolling reserve percentage, transaction hold threshold, and high-ticket authorization limits.
A rolling reserve means the processor withholds a percentage of each deposit (typically 5% to 10%) for a set period (often 90 to 180 days). A transaction hold threshold triggers manual review for any single transaction above a set dollar amount. A high-ticket limit caps the maximum transaction you can process without pre-authorization.
Checkpoint: Document each threshold and compare it to your average order value and your highest typical order value. If your average order is $200 but the hold threshold is set to $150, a large portion of your transactions will trigger holds and delay funding.
Common failure: You did not know a rolling reserve existed. Processors sometimes add reserves during underwriting without clearly communicating them during onboarding. Check your contract’s “reserve” or “holdback” section. If no reserve is mentioned but one exists in the portal, escalate immediately.
Step 5: Check for Tiered Pricing Buried in Defaults
Action: Return to your fee schedule and look at how transactions are categorized. Specifically, check whether your pricing model is interchange-plus, tiered, or flat-rate.
Tiered pricing groups transactions into “qualified,” “mid-qualified,” and “non-qualified” buckets. The processor decides which bucket each transaction falls into, and the non-qualified rate can be 1% to 2% higher than the qualified rate. If your contract says interchange-plus but the portal shows tiered categories, your account may be misconfigured.
Checkpoint: Run a recent transaction report and look at how individual transactions were priced. On interchange-plus, you should see the actual interchange rate plus a fixed markup. On tiered, you will see bucket labels instead of interchange categories.
Common failure: The contract says interchange-plus, but your monthly statement shows a “non-qualified surcharge” line item. This indicates the processor is applying tiered surcharges on top of interchange-plus pricing, a practice that effectively creates a hybrid model costing you more than either model alone.
Step 6: Review Gateway-Level Fees Separately
Action: Log into your payment gateway dashboard (this is separate from your processor portal if you use a third-party gateway). Navigate to the billing or invoicing section.
Gateway fees are often billed separately from processing fees. Look for: monthly gateway fee, per-transaction gateway fee, token storage fee, and API call fees. These can add $0.05 to $0.10 per transaction on top of your processing costs, and they frequently go unnoticed because they appear on a different invoice.
Checkpoint: Add your gateway per-transaction fee to your processor per-transaction fee. This is your true per-transaction cost. If your processor charges $0.10 and your gateway charges $0.07, your real fixed cost is $0.17 per transaction, not $0.10.
Common failure: You assumed the gateway fee was included in your processing rate. For businesses processing thousands of transactions monthly, an extra $0.05 to $0.10 per transaction adds up to hundreds of dollars in costs that never appeared in the original quote.
Step 7: Run a Live Verification Transaction

The only way to verify funding speed is to trace real transactions from authorization to bank arrival.
Action: Place a real test order on your store using a personal card. Use a specific, recognizable amount (e.g., $7.53) so you can track it easily. Note the exact date and time of the transaction.
After the transaction processes, log into your processor portal and confirm it appears in the current open batch. Then wait for the batch to close at the cutoff time you identified in Step 2. The next morning (or within your contracted funding window), check your bank account for the deposit.
Checkpoint: The deposit should arrive within the timeframe your contract specifies. Calculate the amount deposited versus the transaction amount. The difference is your effective processing cost for that transaction. It should match your contracted rate.
Common failure: The deposit does not arrive within the expected window. Possible causes: the transaction missed the batch cutoff, a risk hold was triggered, or your bank’s ACH processing added an extra day. Check the processor portal for hold flags before contacting support.
Step 8: Document Everything in a Funding Verification Log
Action: Create a simple spreadsheet with these columns: Transaction Date/Time, Amount, Batch Close Time, Expected Deposit Date, Actual Deposit Date, Deposited Amount, Variance, and Notes.
Run this log for at least two weeks, capturing transactions across different days and times. Include at least one transaction near your batch cutoff time and one above your hold threshold (if safe to do so with a real customer order you can verify).
Checkpoint: After two weeks, you should see a consistent pattern. Deposits should arrive within the contracted window at least 95% of the time. Any variance should be explainable (weekends, bank holidays). Unexplained delays are grounds for a support escalation.
For businesses looking to simplify this process, BAMS offers dedicated account management and transparent funding terms, so you can verify deposit timing with a single call rather than cross-referencing multiple dashboards. Their next-day funding with a late batch cutoff addresses many of the timing issues this audit is designed to catch.
Configuration and Customization
1. Settings You Should Adjust
- Batch cutoff time: Move to the latest time your processor allows. 10:00 PM or 11:00 PM Eastern is ideal for most eCommerce businesses.
- High-ticket threshold: Set this 20% above your highest typical order value to avoid unnecessary holds on legitimate sales.
- Auto-batch vs. manual batch: Use auto-batch unless you have a specific operational reason to batch manually. Manual batching introduces human error and delays.
2. Settings to Leave at Default (Usually)
- Fraud filters: Keep AVS (Address Verification Service) and CVV checks enabled. Disabling them may speed up authorizations marginally but increases chargeback risk. Note that around 47% of businesses now use some form of AI-driven fraud prevention, and overly aggressive filters can reduce approval rates.
- Velocity limits: These cap how many transactions a single card can run in a set period. The defaults are usually reasonable unless you sell subscription products with frequent rebills.
3. Settings That Must Change
- Funding speed: If your contract includes next-day funding, confirm it is toggled on. Never assume the default matches your contract.
- Reserve percentage: If your contract specifies no reserve, verify the portal reflects zero. Any non-zero reserve is holding your money without authorization.
Funding Speed Verification: Testing and Edge Cases
Test Procedure
Run three test transactions over three consecutive business days at different times: one in the morning, one mid-afternoon, and one 30 minutes before your batch cutoff. Track each through the funding verification log from Step 8.
Success definition: All three deposits arrive within your contracted funding window, and the deposited amounts match expected amounts after subtracting your known processing fees (with less than $0.02 variance per transaction for rounding).
Edge Cases to Verify
- Friday evening transactions: These often do not settle until Monday or Tuesday. Confirm your contract addresses weekend batch handling.
- Transactions just above your hold threshold: Verify whether these are held, delayed, or processed normally.
- Refund impact: Process a refund on one test transaction and confirm it does not trigger a reserve hold or delay the rest of the batch’s funding.
- Cross-border transactions: If you sell internationally, test with a non-US card. Visa payment rules and merchant guidance continue to emphasize that international transactions may follow different authorization, fraud screening, and settlement workflows that can affect approval rates and funding timing.
Common Errors and Fixes
Error: “Deposit amount does not match expected amount”
Symptom: Your bank deposit is lower than the transaction total minus your known processing rate.
Cause: Hidden per-transaction fees (gateway fee, batch fee, or non-qualified surcharge) are being deducted before deposit.
Fix: Pull the processor’s detailed settlement report for that batch. Every deduction should be itemized. Compare each line to your contract. Dispute any fee not in your agreement.
Error: “Deposit arrived one day late”
Symptom: Contract says next-day funding, but deposits consistently arrive in two business days.
Cause: Your batch cutoff is set too early, or next-day funding was never activated on your account.
Fix: Confirm the batch cutoff time and the funding speed toggle in your portal. If both look correct, ask your processor whether your bank’s ACH processing window is adding a day. Some banks credit ACH deposits at end-of-day rather than morning.
Error: “Transaction held for review”
Symptom: Orders above a certain amount show “held” or “pending review” in the processor portal.
Cause: The high-ticket threshold is set too low for your business’s transaction patterns.
Fix: Request a threshold increase through your processor’s risk department. Provide 90 days of transaction history showing your typical order values.
Error: “Rolling reserve deducted but not in contract”
Symptom: A percentage of each deposit is withheld, and the portal shows a reserve balance.
Cause: A reserve was applied during underwriting and either not communicated or added post-onboarding due to chargeback activity.
Fix: Request the specific underwriting note or chargeback report that triggered the reserve. If your contract has no reserve clause, you have grounds to demand its removal. Escalate to a supervisor with your contract attached.
Error: “PCI non-compliance fee appearing monthly”
Symptom: A $19.95 to $49.95 monthly fee labeled “PCI non-compliance” on your statement.
Cause: You have not completed your annual PCI SAQ (Self-Assessment Questionnaire), or the processor has not recorded your completion.
Fix: Complete the SAQ through your processor’s PCI portal. Once validated, the non-compliance fee should drop off within one billing cycle. If it persists, contact support with your SAQ completion confirmation.
Next Steps and Extensions
Now that your processor configuration is verified, you have a baseline for ongoing monitoring. Here is how to build on this work:
- Automate deposit reconciliation: Connect your processor’s reporting API to your accounting software to flag deposit variances automatically instead of checking manually.
- Quarterly fee audits: Processors occasionally adjust fees with 30-day notice buried in email. Re-run Steps 1 and 5 every quarter to catch changes early.
- Evaluate your processor fit: If this audit revealed multiple discrepancies, it may be time to compare your current setup against a dedicated merchant account with interchange-plus pricing and contractually guaranteed funding speed.
Your payment configuration is not a “set it and forget it” task. Treat it like any other financial system: verify regularly, document everything, and hold your processor accountable to the terms they signed.
Frequently Asked Questions
What documents do I need to gather before switching merchant service providers?
At minimum, collect your current signed merchant agreement (including the fee schedule and funding terms addendum), three months of processing statements, your gateway login credentials, and recent bank statements for the account receiving deposits. Having your current effective rates calculated before you switch gives you a concrete benchmark for evaluating new offers.
Why should I keep my old merchant account open during a processor transition?
Open chargebacks and pending refunds are tied to your existing merchant account. If you close it before those resolve, you may lose the ability to respond to disputes or the processor may withhold a reserve balance for 90 to 180 days. Keep the old account active until all pending transactions have fully settled and the chargeback window (typically 120 days from the last transaction) has closed.
How can I confirm my new processor coordinates with my eCommerce platform and gateway?
Run end-to-end test transactions in your staging environment before going live. Verify that authorization, capture, void, and refund actions all complete successfully. Check that order status updates flow correctly between your platform and the gateway. Most integration issues surface during refund or partial capture testing, so do not skip those scenarios.
When should I run testing before going live with a new payment processor?
Test during a low-traffic period, ideally mid-week. Run at least five test transactions covering different card brands, transaction amounts (including one near your high-ticket threshold), and refund scenarios. Allow 48 to 72 hours after your first test batch to verify that deposits arrive within the contracted funding window before routing all live traffic to the new processor.
Which pricing model is best for established eCommerce businesses?
For businesses processing more than $10,000 per month, interchange-plus pricing is almost always the most cost-effective and transparent model. You see the actual interchange rate set by the card networks plus a fixed markup from your processor. Tiered and flat-rate models obscure the true cost per transaction and tend to become more expensive as volume grows.
How often do processor fee schedules change, and how will I know?
Processors can adjust fees with as little as 30 days written notice, often sent via email or posted in the merchant portal. Card networks (Visa, Mastercard) also update interchange rates twice per year, typically in April and October. Run the fee comparison audit from this tutorial quarterly to catch any changes before they accumulate into significant unexpected costs.