Online Payment Gateway Setup: 3 Steps to Verify
How to confirm your gateway, batch timing, and deposit schedule before processing live orders
Learn how to verify your online payment gateway setup is truly operational with three concrete checkpoints. Run a structured test transaction, validate batch cutoff timing, and confirm funds land in your bank account on schedule.
TL;DR
- Go-live is not the finish line – Processor defaults often include settings that inflate fees and delay deposits. Audit every default before processing real orders.
- Batch timing controls your funding speed – Set your batch to close at least 30 minutes before your processor’s cutoff to avoid losing an entire business day on every settlement cycle.
- Run a real transaction end-to-end – Test with a live card, verify the charge settles in the correct batch, and confirm the deposit (minus fees) actually arrives in your bank account on time.
- Check for hidden fee triggers – Auto-retry on declines, strict AVS rejection, and missing Level II/III data fields can quietly increase your processing costs without any visible warning.
- Repeat verification after every platform update – eCommerce platform updates can reset payment settings or break gateway connections, so a quick test transaction after each update prevents silent failures.
What You Will Achieve: A Fully Verified Payment Setup
By the end of this tutorial, you will have confirmed that your online payment gateway setup is genuinely operational, not just configured. You will run a structured test transaction, verify your batch timing aligns with your funding goals, and confirm that deposited funds actually land in your bank account on the expected date.
Your success criteria are concrete: a test charge that settles end-to-end, a batch window that closes before your processor’s cutoff, and a deposit that arrives in your account within the timeframe your contract promises. These three checkpoints separate a “finished” setup from one that quietly costs you money through delayed settlements, misrouted batches, or default configurations you never agreed to.

A fully verified payment gateway setup confirms transaction authorization, batch settlement timing, and successful bank deposits before accepting live customer orders.
Prerequisites and Setup Checklist
Before you begin, confirm you have the following in place. Missing even one item can stall your verification process.
- Active merchant account with your processor, fully approved (not pending review)
- Gateway credentials (API login ID, transaction key, or equivalent) from your processor’s dashboard
- Access to your eCommerce platform’s payment settings (Shopify, WooCommerce, Magento, BigCommerce, or custom)
- A real payment card for live testing (not a sandbox card)
- Login to your business bank account to verify deposits
- Your processor’s batch cutoff time (check your welcome email or merchant portal)
- A spreadsheet or document to log test results, timestamps, and amounts
Time estimate: 60 to 90 minutes spread across two business days (you need to wait for a deposit to verify funding speed). Potential blocker: If your merchant account is still in underwriting review, none of these steps will work. Confirm approval first.
Why This Approach Matters for Funding Speed Verification
Most setup guides treat “go live” as the finish line. You enter credentials, save settings, and assume everything works. The problem is that processor defaults often include settings that slow your deposits, inflate your fees, or batch transactions at suboptimal times.
The payment gateway market is projected to reach $245.71 billion by 2033, yet the majority of merchants never verify that their specific configuration delivers the funding speed and fee structure they were promised. This tutorial treats the post-setup window as its own operational phase. You will not assume your configuration works. You will prove it. According to Visa payment processing resources, payment infrastructure configuration and settlement timing directly affect authorization efficiency and funding reliability for eC`ommerce businesses.
This is moderately difficult. You do not need coding skills, but you do need patience and attention to timestamps. The payoff is catching costly misconfigurations before they compound across hundreds of transactions.
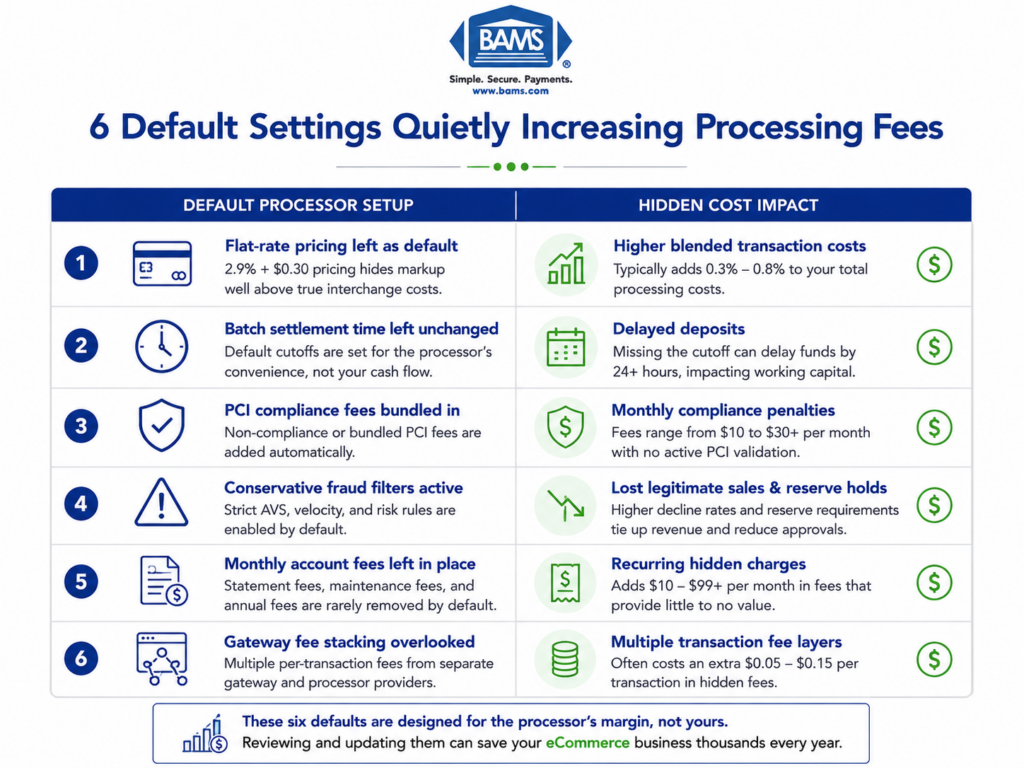
Step 1: Audit Your Gateway Configuration Defaults
Log into your processor’s merchant portal and navigate to the gateway settings section. Look for settings labeled “transaction mode,” “AVS settings,” “CVV requirements,” and “duplicate transaction window.” Write down every default value you see.
Many processors ship with conservative defaults: strict AVS rejection rules, short duplicate windows, and enabled surcharge fields. These defaults exist to reduce the processor’s risk, not to optimize your revenue. A strict AVS setting, for example, can decline legitimate international orders where address formats differ from U.S. standards. Using an integrated payment gateway also improves transaction visibility and simplifies settlement monitoring across eCommerce platforms.
Expected result: A documented list of 8 to 15 default settings in your gateway. Checkpoint: If you cannot find a settings panel, your gateway may be managed entirely by your eCommerce platform. In that case, check your platform’s payment provider settings instead.
Common failure: You see “test mode” or “sandbox” still enabled. Fix: Toggle the environment to “live” or “production” before proceeding. Processing in test mode generates no real transactions and no deposits.
Step 2: Identify Hidden Fee Triggers in Default Settings
With your list of defaults documented, compare each setting against your merchant agreement. Specifically look for these fee triggers that processors often enable by default:
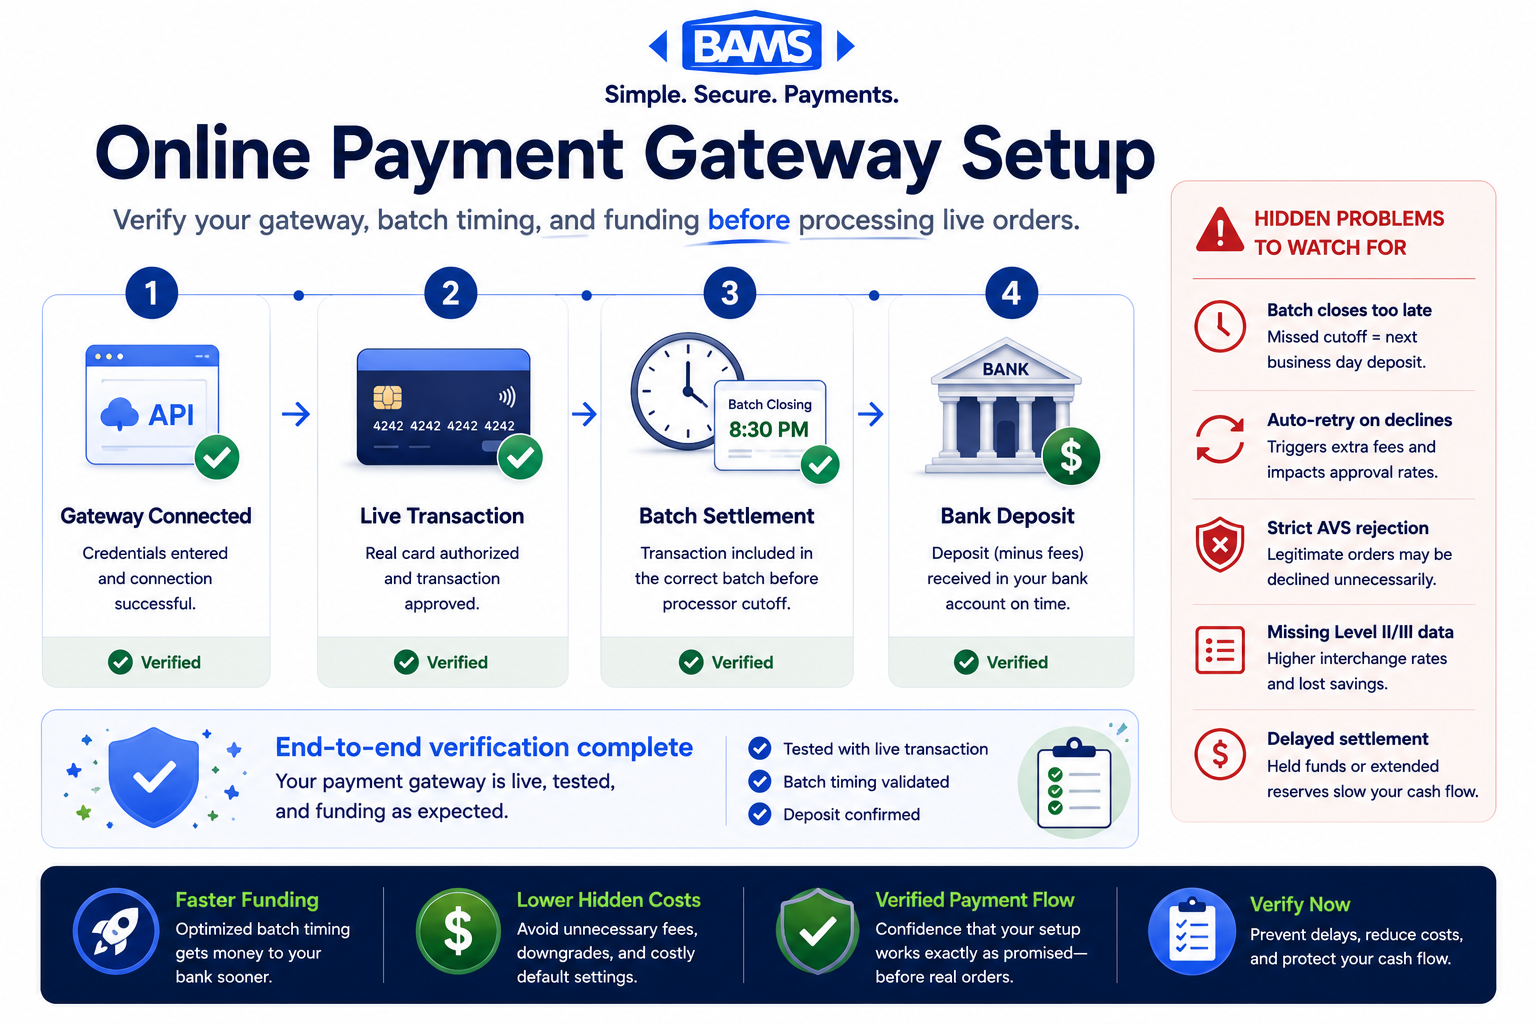
- Address Verification Service (AVS) set to “reject on mismatch” instead of “flag for review.” This does not charge a fee directly, but each declined and retried transaction can incur an additional authorization fee.
- Automatic retry on decline enabled. Some gateways retry failed authorizations automatically, and each retry counts as a separate billable transaction.
- Level II/III data fields left empty. If you sell B2B, failing to pass enhanced data means you miss lower interchange rates on commercial cards.
- Batch auto-close time set to processor default (often 10:00 PM or 11:00 PM EST). If your cutoff does not align with your processor’s settlement window, your deposits arrive a day late.
- Convenience or service fee fields enabled. Some gateways include optional surcharge fields that, if left active, can create compliance issues in states where surcharging is restricted.
Expected result: You identify at least two or three settings that differ from what you expected based on your contract. Checkpoint: If every setting matches your agreement perfectly, confirm you are looking at the live environment, not a template.
Step 3: Adjust Your Batch Timing to Match Your Funding Goal
Your batch close time is the single biggest lever for funding speed verification. When your gateway “batches” transactions, it packages all authorized charges since the last batch and sends them to your processor for settlement. If your batch closes after your processor’s cutoff, your funds wait an extra business day.
Action: In your gateway settings, locate the auto-batch or auto-settle schedule. Change it to close at least 30 minutes before your processor’s stated cutoff time. For example, if your processor’s cutoff is 9:00 PM ET, set your batch to close at 8:30 PM ET.
If you use a provider like BAMS, which offers next-day funding with a late cutoff, you have more flexibility. But even with a generous cutoff, padding 30 minutes protects you against processing delays during high-volume periods.
Common failure: Your eCommerce platform overrides the gateway’s batch time with its own schedule. Fix: Check your platform’s payment settings for a separate “settlement” or “capture” schedule and align both.

Closing your batch before your processor’s cutoff time helps ensure faster settlement and next-day funding eligibility.
Step 4: Run a Live Test Transaction
This is where transaction testing procedures move from theoretical to real. Place a small live order on your own store using a real credit card. Use an amount that is easy to track, such as $1.37 or $2.53, so you can identify it quickly in your bank statement.
Action steps:
- Add a product to your cart and complete checkout as a customer would.
- Record the exact time of the transaction (to the minute).
- Note the authorization response code in your gateway dashboard (look for “approved” or a specific code like “00”).
- Check that the order appears in both your eCommerce platform’s order list and your gateway’s transaction log.
Expected result: The transaction shows “authorized” or “captured” in your gateway within 60 seconds. Checkpoint: If the charge appears in your gateway but not in your platform (or vice versa), your integration has a communication gap. Do not proceed until both systems reflect the transaction.
Common failure: The transaction declines with a generic error. Fix: Verify your API credentials are entered correctly, your gateway is in live mode, and your card is not blocked for online purchases by the issuing bank.
Step 5: Verify the Transaction Settles in the Correct Batch
After your test transaction is authorized, wait for your batch to close (based on the time you set in Step 3). Then log into your gateway dashboard and confirm the test transaction appears in the settled batch.
Action: Navigate to your gateway’s “batch history” or “settlement reports” section. Find the most recent closed batch and confirm your test transaction amount ($1.37 or $2.53) is listed inside it.
Expected result: The transaction appears in a batch that closed at the time you configured. Checkpoint: If the transaction is still listed as “unsettled” or “pending capture,” your gateway may be set to “authorize only” mode instead of “authorize and capture.” This is a common default that delays settlement until you manually capture each transaction.
Common failure: The batch closed but your transaction is not in it. Fix: Your transaction was authorized after the batch cutoff. Check timestamps carefully. If the authorization came in at 8:32 PM and your batch closed at 8:30 PM, it will roll into the next day’s batch.
Step 6: Confirm the Deposit Lands in Your Bank Account
This is the step most merchants skip, and it is the most important. Funding speed verification is not complete until money appears in your bank account.
Action: On the business day following your batch settlement, log into your business bank account. Search for a deposit from your processor (it may appear under the processor’s name, a DBA, or a generic label like “merchant deposit”). Match the deposit amount to your test transaction minus processing fees.
Expected result: A deposit appears within the timeframe your contract specifies (next business day for next-day funding, two business days for standard). Checkpoint: If the deposit amount does not match your expectations, subtract the per-transaction fee and percentage fee from your test amount. The remainder should match the deposit. If it still does not match, call your processor.
Common failure: No deposit appears after two business days. Fix: Check your processor dashboard for holds or risk flags on your account. New merchant accounts sometimes trigger automatic holds on initial transactions. Contact your processor’s support team with your batch ID and transaction reference number.
Step 7: Refund the Test Transaction and Verify the Reversal
A complete test includes confirming that refunds process correctly. Issue a full refund for your test transaction through your eCommerce platform or gateway dashboard.
Action: Locate the test order in your admin panel, click “Refund,” and process the full amount. Record the time. Then check your gateway dashboard to confirm the refund appears as a credit in the next batch.
Expected result: The refund shows as a negative entry in your next settled batch, and a corresponding debit appears in your bank account within one to two business days. Checkpoint: If the refund does not appear in the batch, your platform may queue refunds separately. Check for a “pending refunds” section in your gateway.
Common failure: The refund succeeds in your platform but the customer (you, in this case) never receives the credit. Fix: Confirm the refund was submitted to the gateway, not just marked as refunded in your platform’s order management system. These are two separate actions on some platforms.
Configuration Settings to Customize for Your Business
Now that your baseline is verified, revisit these settings and adjust them based on your actual transaction patterns:
- AVS response handling: If you sell internationally, consider setting AVS to “flag” rather than “reject.” This lets you review borderline orders instead of losing them automatically.
- Duplicate transaction window: The default is often 2 minutes. If you sell low-cost items where customers legitimately buy multiples quickly, extend this to 30 seconds or disable it.
- Fraud velocity filters: Defaults may flag accounts with more than 3 transactions per hour. If you run flash sales, increase this threshold before launch day.
- Auto-capture vs. authorize-only: For physical goods, authorize-only lets you capture at shipment. For digital goods, auto-capture avoids settlement delays.
Safe defaults to keep: CVV required on all transactions, 3D Secure enabled for card-not-present orders, and TLS 1.2+ enforced on your checkout page. These protect you from payment fraud losses that surpassed $40 billion globally in recent years.
Maintaining secure payment settings and transaction verification standards is also aligned with PCI Security Standards Council guidance for eCommerce merchants handling card-not-present transactions.
How to Verify Everything Is Working Correctly
Run this verification checklist after completing all seven steps:
- Gateway connection: Test transaction authorized and captured within 60 seconds? Yes/No
- Batch timing: Transaction appeared in the correct batch based on your configured close time? Yes/No
- Deposit speed: Funds arrived in your bank account within the contractually promised timeframe? Yes/No
- Refund processing: Refund appeared as a credit in the next batch and debited your account? Yes/No
- Fee accuracy: Deposit amount matched your transaction minus the agreed processing fees? Yes/No
If any answer is “No,” do not go live with real customer transactions. Resolve the discrepancy first. A single misconfigured setting can compound across thousands of orders.
Common Errors and How to Fix Them
Error: “Transaction Declined — Invalid Merchant Configuration”
Symptom: Every transaction fails with a configuration error. Cause: Your merchant account ID (MID) or terminal ID (TID) is entered incorrectly in your gateway settings. Fix: Copy your MID and TID directly from your processor’s welcome email or merchant portal. Do not type them manually.
Error: Deposits Arrive Two Days Late Consistently
Symptom: You expected next-day funding but deposits always take three business days. Cause: Your batch closes after your processor’s settlement cutoff, pushing everything to the next cycle. Fix: Move your batch close time 30 to 60 minutes earlier than the cutoff. Verify the time zone setting in your gateway matches your processor’s cutoff time zone.
Error: Deposit Amount Does Not Match Expected Total
Symptom: You processed $500 in sales but only received $470. Cause: Your processor deducts fees before depositing (net settlement) rather than billing fees separately (gross settlement). Fix: Check your contract for “net” vs. “gross” settlement terms. If you expected gross settlement, contact your processor to switch. If fees still seem too high, request a detailed fee breakdown for that batch. A provider focused on transparency, like BAMS, will provide interchange-plus pricing breakdowns so you can see exactly what you are paying and why.
Error: Orders Appear in Platform but Not in Gateway
Symptom: Your eCommerce platform shows completed orders, but your gateway has no record. Cause: Your platform is using a different payment method (like PayPal or a built-in processor) instead of routing through your configured gateway. Fix: Check your platform’s active payment methods and disable any you did not intend to use. Ensure your gateway is set as the primary or default payment method.
Error: “Batch Failed to Close” Notification
Symptom: You receive an email or dashboard alert that your batch did not settle. Cause: A connectivity issue between your gateway and processor during the batch window, or an invalid transaction in the batch that blocked settlement. Fix: Manually close the batch from your gateway dashboard. If it fails again, contact your processor with the batch ID to identify the blocking transaction.
Next Steps After Verification
Once all five verification checkpoints pass, you are ready to accept live customer orders with confidence. Here are ways to build on this foundation:
- Set up automated batch monitoring. Configure email or SMS alerts for failed batches so you catch settlement issues the same day they occur.
- Review your fee structure monthly. Compare your effective rate (total fees divided by total volume) against your contracted rate. Drift usually means card mix changes or hidden assessment fees. Learn more about selecting the right eCommerce merchant services provider if your rates do not match expectations.
- Test your gateway integration after every platform update. Ecommerce platform updates can reset payment settings or break API connections. Run a quick test transaction after each major update.
- Understand the difference between your processor and gateway. If you are unclear on how these two components interact, this guide to payment processors vs. payment gateways clarifies the relationship.
Federal Reserve interchange fee data also reinforces the importance of monitoring effective processing costs and settlement performance over time.
Frequently Asked Questions
What documents do I need to gather before switching merchant service providers?
You will need your current processing statements (at least three months), your business tax ID (EIN), a voided check or bank letter for the deposit account, your current gateway credentials for migration, and any existing contract terms so you know about early termination fees. Having recent statements helps your new provider match or beat your current effective rate.
Why should I keep my old merchant account open during the transition?
Chargebacks and refunds from transactions processed on your old account can arrive weeks or months later. If that account is closed, you have no way to respond to disputes, and the funds may be pulled from your bank with no recourse. Keep the old account open for at least 120 days (the standard chargeback window) after your last transaction on it.
How can I ensure my new processor coordinates effectively with my eCommerce platform?
Before signing, confirm your processor’s gateway is listed as a supported integration on your platform’s documentation. Test the connection in a staging environment if your platform offers one. After going live, run the seven-step verification process in this guide to confirm end-to-end functionality, including deposit arrival.
When should I conduct testing before going live with a new payment processor?
Run your live test transaction during a low-traffic period, ideally mid-morning on a Tuesday or Wednesday. Avoid Fridays and weekends because deposits will not arrive until Monday at the earliest, making it harder to verify funding speed. Complete all seven steps before directing any customer traffic to the new processor.
Which pricing model is best for my business when setting up merchant services?
For most eCommerce businesses processing over $10,000 per month, interchange-plus pricing offers the most transparency. You see the actual interchange cost set by the card networks plus a fixed markup from your processor. Flat-rate pricing is simpler but typically more expensive at higher volumes. Tiered pricing is the least transparent and most likely to contain hidden fees through “non-qualified” surcharges.
How do I know if my gateway is charging fees I did not agree to?
Compare your monthly processing statement line by line against your signed merchant agreement. Look for charges labeled “gateway monthly fee,” “batch fee,” “statement fee,” or “PCI non-compliance fee.” If any charge appears on your statement but not in your contract, contact your processor immediately and request a written explanation or credit.