Transaction Data Optimization: A Field-by-Field Guide
Map every tax, freight, and line-item field your gateway needs to unlock Level 2 and Level 3 interchange rates
Learn exactly which transaction fields your eCommerce checkout must pass to your payment gateway for B2B orders to qualify at lower interchange tiers. This step-by-step tutorial walks you through identifying dropped data, mapping missing fields, and verifying qualification.
TL;DR
- Lower interchange is a data problem, not a negotiation problem – Passing complete tax, freight, and line-item fields through your gateway qualifies B2B transactions for Level 2/3 rates, saving 5 to 165 basis points per transaction.
- Map platform fields to gateway parameters – Your eCommerce platform already collects most required data (tax, shipping, SKUs). The gap is between your platform’s data model and what your gateway actually transmits to the processor.
- Watch for silent field-stripping – Default plugin settings, guest checkout paths, and mobile flows often drop L2/L3 fields. Test every checkout path, not just the default one.
- Handle edge cases explicitly – Tax-exempt orders need the exempt flag (not just zero tax), free shipping needs “0.00” (not blank), and commodity codes must be populated even if your platform does not natively support them.
- Measure with interchange detail reports – Pull transaction-level reports monthly to verify qualification rates and catch regressions caused by platform updates or configuration changes. According to the Federal Reserve’s 2025 Small Business Credit Survey, managing operating expenses remains a significant challenge for many businesses, increasing the value of payment cost optimization.
What You Will Achieve: Lower Interchange Through Complete Transaction Data
By the end of this tutorial, you will have mapped every tax, freight, and line-item field your eCommerce platform needs to pass through your payment gateway so that B2B and commercial card transactions qualify for Level 2 and Level 3 interchange rates. This is transaction data optimization at its most practical: identifying which fields your checkout already collects, which ones your gateway silently drops, and how to connect the two so card networks see the enriched data they require for lower-cost tiers.
Your success criteria are concrete. After completing these steps, you will be able to pull a test transaction, confirm that tax amount, freight amount, product code, and ship-to postal code reach the processor, and verify that the transaction qualifies at the intended interchange tier rather than downgrading to a more expensive category.
Prerequisites and Setup Checklist
Before you start, confirm you have the following in place. Missing any one of these will stall the process.
- Interchange-plus pricing on your merchant account. Flat-rate pricing absorbs interchange into one blended rate, so Level 2/3 savings never reach you. If you are on flat-rate, switch first.
- Admin access to your eCommerce platform (Shopify, WooCommerce, BigCommerce, Magento, or equivalent).
- Admin or developer access to your payment gateway dashboard (Authorize.Net, NMI, USAePay, or equivalent).
- A recent processing statement showing transaction-level interchange categories. You need this to identify current downgrades.
- A test commercial or purchasing card (Visa Purchasing, Mastercard Corporate, or similar) for verification.
- Estimated time: 2 to 4 hours for mapping and configuration, plus 1 to 2 business days for test-transaction settlement and statement verification.
Potential blocker: Some hosted checkout platforms restrict which fields you can pass to the gateway. Identify your platform’s limitations before investing time in field mapping.
Why Field Mapping Matters More Than Rate Negotiation
Most eCommerce managers approach payment processing fees as a negotiation problem: call the processor, ask for a lower markup. But the markup is only one component. Interchange optimization can reduce rates by 5 to 165 basis points on commercial card transactions when Level 2 and Level 3 data is submitted correctly. That dwarfs most markup concessions.
The reason is structural. Card networks like Visa and Mastercard set interchange tiers based on how much data accompanies a transaction. A card-not-present B2B order missing tax and freight fields gets routed to the most expensive “standard” tier automatically. No negotiation fixes that. Only complete data does.
This tutorial treats eCommerce profitability as a data-completeness execution problem. The fields already exist in your checkout. The gap is between your platform and your processor. Visa’s payment processing guidance emphasizes the importance of complete and accurate transaction information throughout the payment lifecycle.
Step 1: Audit Your Current Interchange Qualification
Open your most recent processing statement and look for the interchange category column. Each transaction will show a code or description (for example, “Visa Commercial Card Not Present” or “MC Data Rate II”). Flag every transaction labeled “Standard,” “EIRF,” or any downgrade category. These are the transactions where missing fields cost you money.
If your statement does not show transaction-level interchange detail, request an “interchange detail report” from your processor. Without this, you are working blind. For a deeper breakdown of what your statement may be hiding, see Payment Analytics: What Your Statement Hides.
Expected result: A list of downgraded transactions with their card types and amounts. This becomes your baseline for measuring improvement.
Common failure: Processor provides a summary statement without interchange categories. Fix: Explicitly request a “line-item interchange qualification report” or ask for access to an online reporting portal that shows this detail.
Step 2: Identify the Required Level 2 and Level 3 Fields
Level 2 and Level 3 are data tiers defined by Visa and Mastercard. Each tier requires specific fields beyond the basics (card number, amount, authorization code). Here is what you need to map:
Level 2 Fields (Required for Level 2 Qualification)
- Sales tax amount (numeric, in transaction currency)
- Tax indicator (taxable, tax-exempt, or not provided)
- Customer/purchase order number
- Merchant postal code (your business zip code)
Level 3 Fields (Required for Level 3 Qualification, in Addition to Level 2)
- Ship-to postal code
- Ship-from postal code
- Freight/shipping amount
- Duty amount (set to 0.00 for domestic orders)
- Line-item detail: product code/SKU, description, quantity, unit of measure, unit cost, extended amount, commodity code
- Discount amount (per line item, if applicable)
For a diagnostic checklist of the seven most commonly missing fields and the specific downgrade each one triggers, see 7 Missing L3 Fields That Inflate Your Effective Processing Rate.
Expected result: A reference list of every field you need to populate. Print or save this. You will check each one against your platform and gateway in the next steps.
Step 3: Map Fields From Your eCommerce Platform’s Data Model

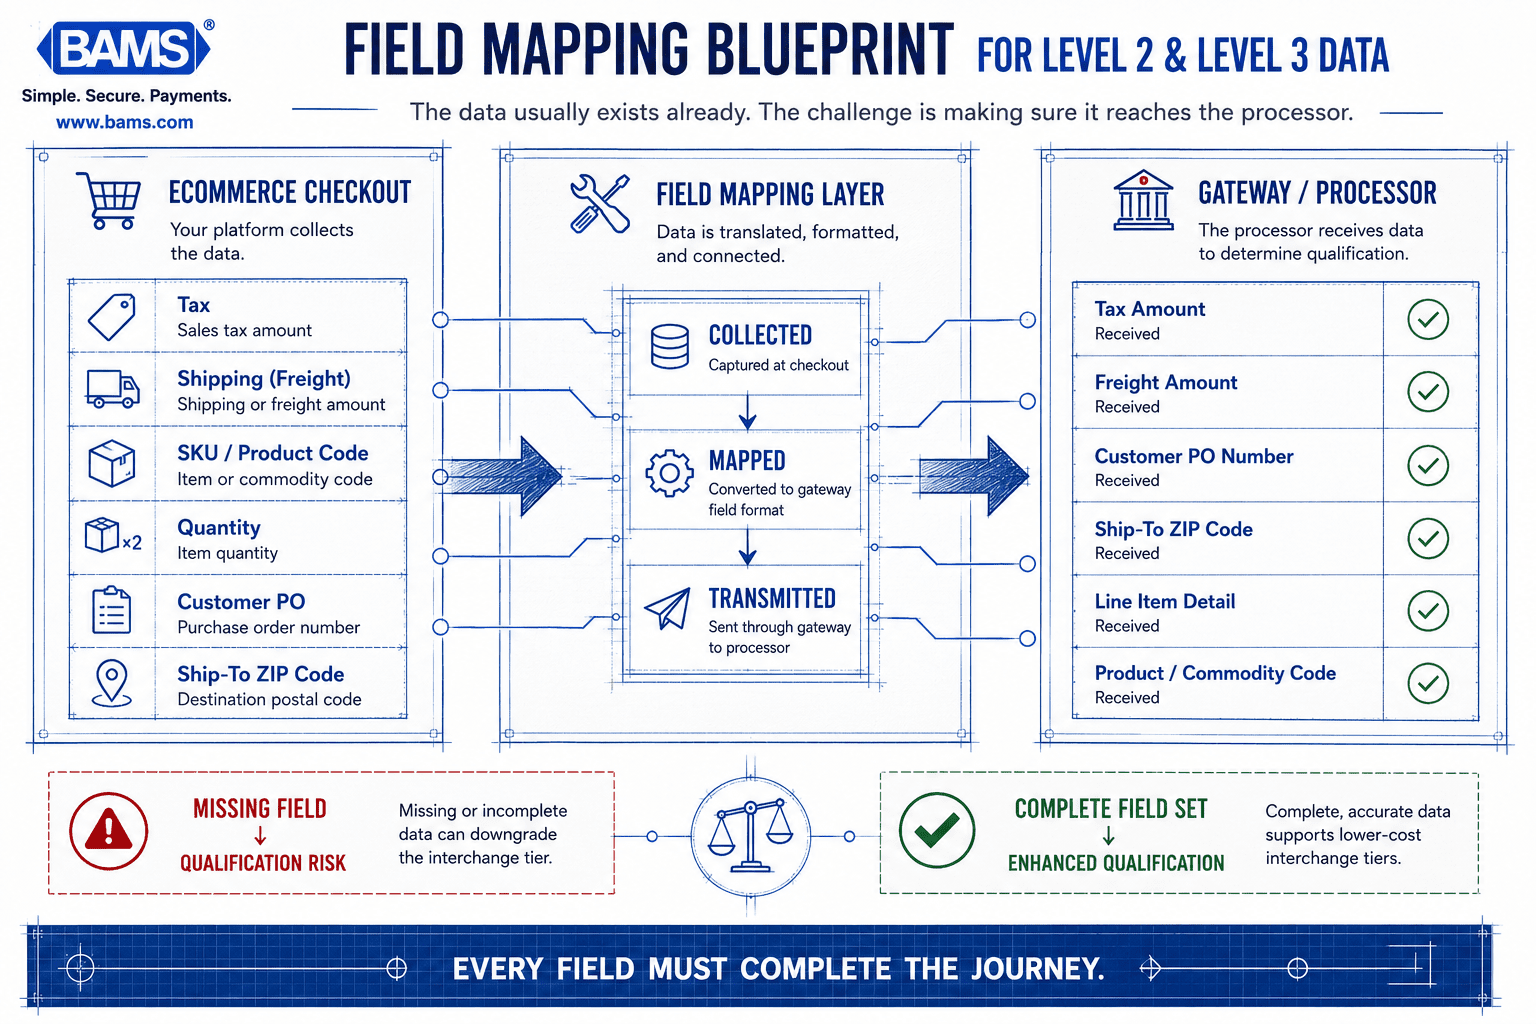
The data usually exists already. The challenge is making sure it reaches the processor.
Open your eCommerce platform’s order data schema or API documentation. You need to confirm where each required field lives in your platform’s data model. Here is a general mapping for common platforms:
Example Field Mapping Table
| Required Field | Shopify | WooCommerce | BigCommerce |
|————————|————————–|————————–|—————————|
| Sales tax amount | order.total_tax | order.total_tax | order.tax_total |
| Customer PO number | order.note_attributes | order.meta_data (custom) | order.staff_notes (custom)|
| Ship-to postal code | order.shipping_address.zip| order.shipping.postcode | order.shipping_address.zip|
| Freight amount | order.shipping_lines.price| order.shipping_total | order.shipping_cost_total |
| Line-item SKU | line_item.sku | line_item.sku | product.sku |
| Line-item quantity | line_item.quantity | line_item.quantity | line_item.quantity |
| Line-item unit price | line_item.price | line_item.subtotal / qty | line_item.base_price |
Action: For each required L2/L3 field, write down the exact field name or path in your platform. If a field does not exist natively (for example, commodity code), note it. You will handle missing fields in Step 5.
Common failure: Customer PO number has no default field in most B2C-oriented platforms. Fix: Add a custom checkout field or use the order notes field, then map it explicitly in your gateway integration.
Step 4: Check Your Payment Gateway’s L2/L3 Support
Not every gateway accepts Level 3 data, and those that do may require specific API calls or configuration flags. Log in to your gateway’s admin dashboard and check the following:
- Does the gateway support Level 2 data submission? Look for fields like “tax amount” and “PO number” in the transaction API or virtual terminal.
- Does the gateway support Level 3 line-item data? This is less common. Look for an “enhanced data” or “line-item detail” section in the API documentation.
- Is L2/L3 submission enabled on your account? Some gateways support it but require activation. Check your account settings or contact gateway support.
Consult your gateway’s API reference. For Authorize.Net, see the Authorize.Net API Reference. For NMI, check the NMI Integration Portal.
Expected result: Confirmation that your gateway accepts L2 and L3 fields, and a list of the exact API parameter names it expects (for example, tax, freight, shipping_postal_code).
Common failure: Gateway supports L2 but not L3. Fix: Evaluate whether L2 alone provides sufficient savings for your transaction mix, or consider a gateway that supports full L3 submission. For guidance on how gateway choice impacts interchange costs, read Payment Gateway Integration: The Hidden Cost Decision.
Step 5: Build the Field-Mapping Bridge
This is the core execution step. You are connecting your platform’s data fields to your gateway’s L2/L3 parameters. The method depends on your integration type.
If You Use a Plugin or Extension
Check the plugin settings for an “enhanced data” or “Level 2/3” toggle. Some plugins (especially for WooCommerce and Magento) have built-in field mapping interfaces. Enable the feature and verify each field maps correctly. If the plugin does not support L3, you may need a different plugin or a custom integration.
If You Use a Direct API Integration
Modify your payment submission code to include L2/L3 fields. Here is a simplified example for an API call that includes Level 3 data:
{
“amount”: “1250.00”,
“tax”: “93.75”,
“tax_exempt”: false,
“po_number”: “PO-4821”,
“shipping”: “45.00”,
“ship_to_zip”: “90210”,
“ship_from_zip”: “60614”,
“line_items”: [
{
“product_code”: “WDG-4410”,
“description”: “Industrial Widget”,
“quantity”: 50,
“unit_of_measure”: “EA”,
“unit_cost”: “22.25”,
“extended_amount”: “1112.50”,
“commodity_code”: “5945”,
“discount_amount”: “0.00”
}
]
}
Key rule: The tax field must contain the actual tax amount, not zero, unless the transaction is genuinely tax-exempt (in which case, set the tax-exempt indicator to true). Passing 0.00 for tax on a taxable transaction will trigger a downgrade.
If you are working with a merchant services partner like BAMS, their account management team can review your gateway configuration and confirm whether L2/L3 fields are being received correctly on the processor side, saving you the guesswork of verifying from the merchant end alone.
Expected result: A modified integration (plugin settings or code) that sends every required L2/L3 field from your platform to your gateway on each transaction.
Step 6: Handle Missing or Non-Standard Fields
Some fields required for Level 3 qualification may not exist naturally in your eCommerce platform. Here is how to handle the most common gaps:
- Commodity code: This is a standardized product classification code (often UNSPSC or SIC). Your platform will not have it by default. Add it as a custom product attribute or maintain a lookup table that maps your SKUs to commodity codes.
- Customer PO number: Add a custom field to your checkout. In WooCommerce, use a checkout field editor plugin. In Shopify, use cart attributes or a checkout extension.
- Unit of measure: Default to “EA” (each) for most retail products. Override for bulk or weight-based items.
- Duty amount: Set to
0.00for all domestic transactions. Only populate for international shipments where duty applies. - Discount amount: If your platform applies order-level discounts, you need to allocate the discount proportionally across line items. Most gateways expect a per-line-item discount value.
Common failure: Commodity codes left blank. Some processors will accept the transaction without them but will not qualify it at Level 3. Fix: Populate commodity codes for at least your top-selling SKUs. Use a generic code for the rest while you build out the full mapping.
Step 7: Run a Test Transaction and Verify Field Delivery
Process a test transaction using a commercial or purchasing card. After the transaction settles (typically 1 to 2 business days), verify the following:
- In your gateway dashboard: Open the transaction detail view. Confirm that tax amount, freight amount, PO number, ship-to zip, and line-item data all appear in the transaction record.
- In your processor reporting: Check whether the transaction qualified at Level 2 or Level 3 interchange. The interchange category should reflect the enriched data (for example, “Visa Commercial Level III” instead of “Visa Commercial Standard”).
If the transaction still downgrades, compare the required fields list from Step 2 against what your gateway actually transmitted. The most common culprit is a field that appears in your platform but was not mapped to the correct gateway parameter.
Configuration and Customization Notes
Once your field mapping is working, review these settings to ensure consistency across all transaction types:
- Tax-exempt orders: When a customer provides a tax-exempt certificate, your integration must set the tax-exempt indicator to
trueand the tax amount to0.00. Sending0.00without the exempt flag causes downgrades. - Free shipping orders: Set the freight field to
0.00, not blank. A blank freight field is treated as “not provided” and can prevent L3 qualification. - Multi-shipment orders: If an order ships in multiple packages, the freight amount in the transaction should reflect the total shipping charge, not a per-package amount.
- Currency: All monetary fields (tax, freight, line-item amounts) must be in the same currency as the transaction total. Mismatched currencies will cause validation errors or downgrades.
- Settlement timing: Settle transactions within 24 hours of authorization. Delayed settlement is an independent downgrade trigger that can override correct L2/L3 data.
For a broader look at how checkout configuration affects your effective processing rate, see eCommerce Profitability: The Checkout Fields Tax.
Transaction Data Optimization: Common Errors and Fixes
Professional infographic highlighting common points where Level 2 and Level 3 transaction fields fail to reach the payment processor.
Even after mapping fields correctly, specific errors can prevent qualification. Here are the most frequent issues:
- Symptom: Transaction qualifies at Level 2 but not Level 3. Cause: Line-item data is missing or incomplete (often missing commodity code or unit of measure). Fix: Verify that every line item includes all required sub-fields, not just SKU and quantity.
- Symptom: Tax amount shows
0.00on taxable orders. Cause: Tax calculation runs after the payment data is captured, so the gateway receives the pre-tax snapshot. Fix: Ensure your checkout calculates tax before submitting the payment request, not after. - Symptom: Gateway returns a validation error on the freight field. Cause: Freight amount is passed as a string with a currency symbol (“$45.00”) instead of a plain decimal (“45.00”). Fix: Strip currency symbols and formatting before submission.
- Symptom: Transactions qualify on test orders but downgrade on live orders. Cause: A different checkout flow (guest checkout, mobile checkout, one-click reorder) bypasses the L2/L3 field mapping. Fix: Test every checkout path your customers use, not just the default.
- Symptom: PO number field is blank on most orders. Cause: The custom checkout field is optional and B2B buyers skip it. Fix: Make the PO number field required for orders above a threshold, or auto-populate it with the order number as a fallback.
Remember that interchange optimization can reduce rates by 5 to 165 basis points on commercial card transactions. Each of these errors, left unfixed, leaves that savings on the table.
Verification: Measuring Your Savings
After running live transactions for a full billing cycle, pull a new interchange detail report and compare it against your baseline from Step 1. Measure these three things:
- Downgrade count: How many transactions still land in Standard/EIRF categories versus before?
- Effective rate on commercial cards: Divide total fees on commercial card transactions by total commercial card volume. This number should drop.
- Basis-point reduction: Compare the interchange rate on qualifying transactions before and after. For context, businesses can save up to 40% on processing fees by optimizing payment strategy including L2/L3 data.
If your downgrade count dropped but your effective rate barely moved, check whether the remaining downgrades are concentrated in a specific card type or checkout path. That tells you where to focus next.
Next Steps and Extensions
With your L2/L3 field mapping in place, you have addressed the largest controllable factor in your interchange costs. Here are three ways to extend this work:
- Automate commodity code assignment. Build a product-category-to-commodity-code lookup so new SKUs automatically receive the correct code without manual entry.
- Monitor qualification rates monthly. Platform updates, plugin changes, and new checkout features can break field mapping silently. Add a monthly check to your operations calendar.
- Expand to ACH and bank payments for high-value B2B orders. For orders where card interchange is still expensive even at Level 3 rates, offering ACH payment options can reduce processing costs further.
Reducing payment processing fees is not a one-time project. It is an ongoing discipline of keeping your transaction data complete, your gateway configured correctly, and your statement under regular review.
Frequently Asked Questions
How does optimizing transaction data affect processing fees?
Card networks like Visa and Mastercard set interchange rates partly based on how much data accompanies a transaction. The Visa Commercial Enhanced Data Program outlines how enhanced transaction data supports qualification for preferred commercial card interchange categories.
When you submit enriched fields (tax amounts, freight, line-item detail), commercial card transactions can qualify for Level 2 or Level 3 interchange tiers, which carry lower rates than the default Standard tier. The savings range from 5 to 165 basis points per transaction depending on the card type and data completeness.
What is the difference between Level 2 and Level 3 data?
Level 2 data includes sales tax amount, tax indicator, customer PO number, and merchant postal code and Level 3 adds line-item detail: product codes, quantities, unit costs, freight amount, ship-to and ship-from postal codes, commodity codes, and more. Level 3 provides the deepest discount but requires the most fields. Both levels build on each other, so you must pass Level 2 fields to qualify for Level 3.
Why is interchange-plus pricing more beneficial than flat-rate pricing for L2/L3 savings?
Flat-rate pricing charges you the same percentage regardless of interchange qualification. If your transactions qualify at a lower interchange tier, the flat-rate processor keeps the difference. Interchange-plus pricing passes the actual interchange cost through to you, so when L2/L3 data lowers your interchange rate, your total cost drops accordingly.
Do all payment gateways support Level 3 data?
No. Many gateways support Level 2 fields (tax and PO number), but Level 3 line-item data requires more advanced API support. Some gateways offer L3 capability only on certain account types or require it to be activated separately. Check your gateway’s API documentation or contact their support team to confirm before investing time in field mapping.
Can I benefit from L2/L3 optimization if most of my customers use personal credit cards?
The savings are most significant on commercial, purchasing, corporate, and government cards. Personal consumer cards have a simpler interchange structure where L2/L3 data provides minimal or no rate benefit. If your customer mix is primarily B2B or includes government buyers, the impact is substantial. If your mix is mostly consumer cards, focus on other optimizations like AVS compliance and timely settlement.
How can I audit my payment processing statements for hidden fees?
Request a transaction-level interchange detail report from your processor. Look for transactions categorized as “Standard,” “EIRF,” or any downgrade label. These indicate transactions that failed to qualify at a lower interchange tier, often due to missing data fields. Compare the interchange rate charged on each transaction against the rate it should have received with complete data. The difference is the hidden cost of incomplete field mapping.


