Recurring Billing Solutions: A Migration Guide
How to sequence a processor switch that protects token portability, subscription continuity, and your margins
Learn how to audit your current processor for hidden default fees and sequence a migration that prevents revenue gaps. This guide covers batch timing, token portability, gateway markups, and funding speed verification for recurring billing merchants.
TL;DR
- Hidden fees live in default settings — Processors ship your account with batch times, pricing tiers, and fee schedules optimized for their margin, not your costs. Audit every line item on your statement and calculate your effective rate (total fees ÷ total volume).
- Token migration must happen before your old account closes — Saved card tokens are often processor-specific. If your old account shuts down before tokens transfer, every recurring charge on a saved card fails. Keep both accounts active for at least one full billing cycle.
- Sequence the switch around your billing calendar — Schedule your cutover for the day after your largest recurring billing cycle completes, not before. This gives you maximum buffer to catch and fix issues before the next wave of charges.
- Configure intentionally on day one — Set batch timing, fraud thresholds, retry logic, and pricing model before processing a single live transaction. Every transaction on default settings costs you money you won’t recover.
- Audit your first statement line by line — The first month on a new processor reveals whether the promised rates and terms are actually applied. Compare your new effective rate to the old one. If it’s not meaningfully lower, something needs to be fixed immediately.
Guide Orientation: What This Covers and Who It’s For
This guide walks you through the hidden fees that processors bury inside their default settings and shows you how to eliminate them before, during, and after a processor switch. The focus is on payment processing configuration choices that silently inflate costs: batch timing defaults, token migration gaps, gateway markups, and funding speed throttles that most merchants never question.
If you’re an eCommerce manager at an established online business running recurring billing, saved-card transactions, or subscription models, this is written for you. You already process meaningful volume. You know fees exist. What you may not know is which fees are artifacts of lazy defaults rather than legitimate costs.
By the end, you’ll be able to audit your current processor’s default settings for buried charges, sequence a processor migration that protects subscription continuity and token portability, and verify that your new setup actually delivers the funding speed and fee structure you were promised. This guide does not cover POS hardware selection or basic merchant account applications.
Why Eliminating Hidden Fees in Payment Processing Matters Now
Modern Treasury payment operations resources continue to emphasize how recurring billing infrastructure, reconciliation workflows, and settlement timing directly affect cash flow predictability and operational efficiency for subscription-based eCommerce businesses. As recurring revenue models become more common, the cost of processing those payments compounds with every billing cycle.
The cost of inaction is not just overpaying on fees. It’s revenue interruption during migration, delayed funding that strains cash flow, and compliance missteps that freeze your funds entirely. Processors know most merchants won’t dig into default settings. That’s where margin gets extracted quietly. Understanding this dynamic gives you leverage to negotiate, configure, and verify every dollar that leaves your account.
Core Concepts: Understanding Where Fees Hide
Default Settings vs. Negotiated Settings
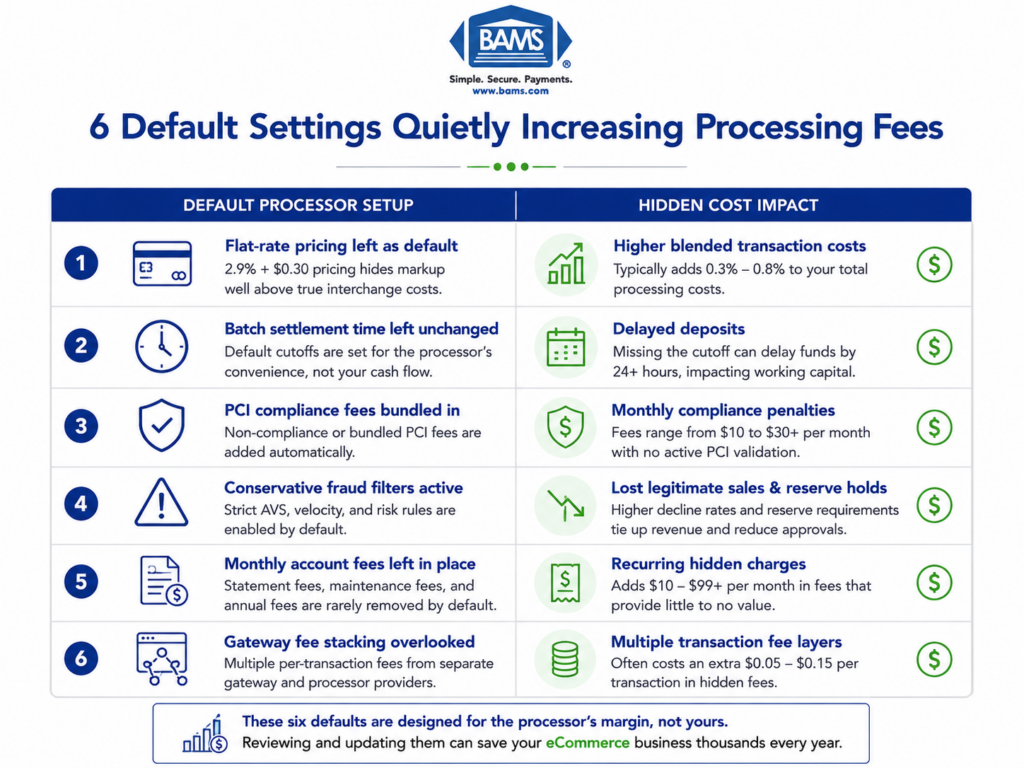
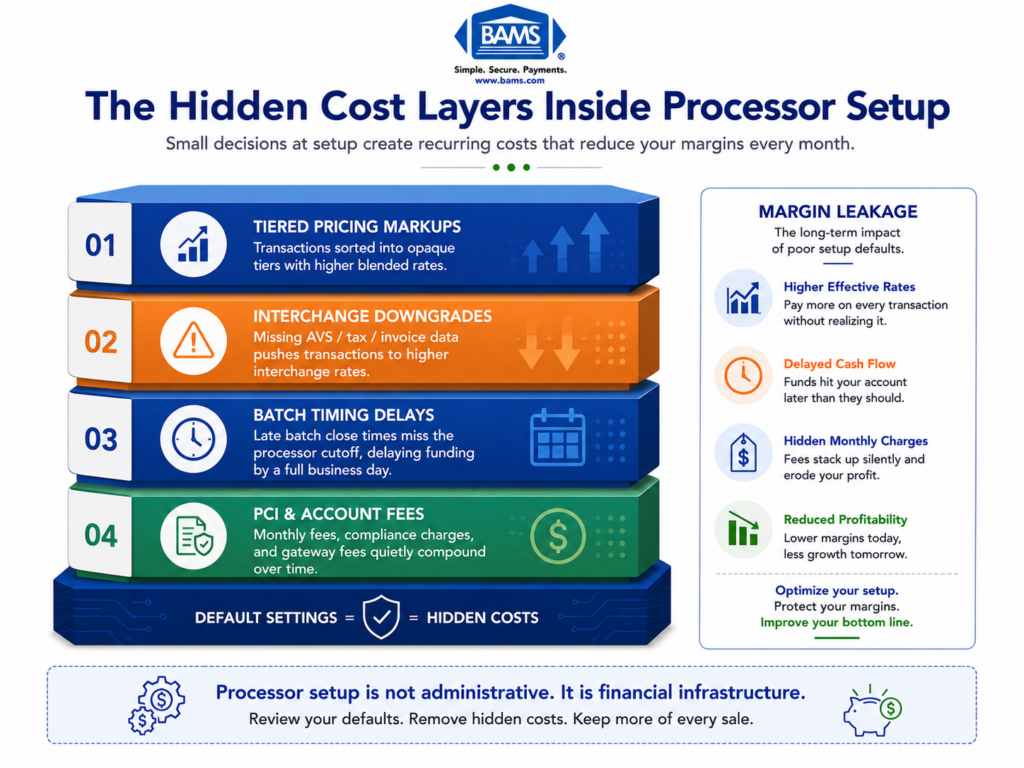
Every processor ships your account with a set of default configurations. These include batch settlement times, risk scoring thresholds, gateway routing rules, and fee schedules. Defaults are designed to minimize the processor’s risk and maximize their margin, not to optimize your costs. The gap between what you’re paying on defaults and what you could pay with intentional configuration is where hidden fees live.
Token Portability
When a customer saves a card on your site, the actual card number gets replaced by a token, a unique identifier stored by your processor or gateway. Tokens are not universal. A token generated by Processor A is usually meaningless to Processor B. If you switch processors without migrating tokens first, you lose the ability to charge every saved card on file. For businesses with fixed recurring payments, this is an existential risk.
Batch Timing and Funding Speed
Settlement happens when your gateway sends the day’s transactions to the processor in a “batch.” Most processors default to a batch time that suits their internal operations, not your cash flow. A batch that closes at 8 PM Eastern instead of 11 PM could mean your Friday sales don’t fund until Tuesday. The default batch window is one of the most common sources of delayed deposits.
Interchange-Plus vs. Tiered Pricing
Tiered pricing bundles transactions into categories (qualified, mid-qualified, non-qualified) and marks up each tier opaquely. Interchange-plus pricing shows you the actual card network cost plus a fixed markup. Opaque billing practices under tiered models have led to significant merchant overpayment. If your processor defaulted you into tiered pricing, you’re almost certainly paying more than you should.
The Migration-First Framework for Eliminating Hidden Fees
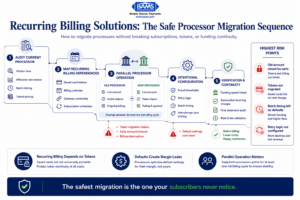
The biggest migration risk is not the new processor. It is losing recurring billing continuity during token transfer.
Most guides treat processor setup as a forward-looking checklist: open new account, configure settings, go live. That sequence misses the critical reality. Switching processors mid-operation fails when recurring billing and saved card tokens aren’t migrated before the old account closes, not when the new account opens.
This framework has five phases, and they’re sequenced around subscription continuity rather than account activation:
- Phase 1: Audit — Identify every hidden fee and default setting in your current processor.
- Phase 2: Map — Document all token dependencies, recurring schedules, and gateway integrations.
- Phase 3: Coordinate — Align old and new processors for parallel operation and token transfer.
- Phase 4: Configure — Set up the new processor with intentional settings, not defaults.
- Phase 5: Verify — Confirm funding speed, fee accuracy, and billing continuity after cutover.
NACHA ACH Network resources continue to highlight the operational importance of recurring payment continuity and reliable settlement infrastructure for subscription-based businesses managing high transaction frequency. Each phase builds on the previous one. Skipping the audit means you’ll carry hidden fees into your new setup. Skipping coordination means you’ll lose tokens. The sequence matters more than any individual step.
Step-by-Step: Eliminating Hidden Fees and Protecting Revenue During Migration
Step 1: Audit Your Current Processor’s Default Settings
Objective: Identify every fee, configuration default, and pricing structure that’s costing you money without your explicit approval.
Start by pulling your last three monthly processor statements. Look beyond the summary line. You’re hunting for line items that don’t match what you negotiated: PCI non-compliance fees, batch fees, statement fees, gateway access fees, and “miscellaneous” charges. Many processors add a monthly minimum fee that kicks in when your volume drops below a threshold, and they rarely mention it during onboarding.
Check your batch settlement time. Log into your gateway dashboard and find the auto-batch setting. If it’s set to a time you didn’t choose, that’s a default. Check your risk/fraud scoring thresholds too. Overly aggressive fraud filters decline legitimate transactions, which costs you revenue even though it doesn’t appear as a “fee” on your statement.
Review your pricing model. If your statement shows “qualified,” “mid-qualified,” and “non-qualified” rate tiers, you’re on tiered pricing. Choosing a merchant service provider that uses interchange-plus pricing gives you visibility into the actual card network cost versus the processor’s markup.
Anti-patterns: Don’t assume your current fees are industry standard just because you’ve been paying them for years. Don’t rely on your processor’s customer service to volunteer information about overcharges.
Success indicators: You have a spreadsheet listing every fee on your statement, the corresponding default setting that triggers it, and whether that setting was explicitly chosen or inherited. You know your exact effective rate (total fees divided by total volume).
Step 2: Map Token Dependencies and Recurring Billing Schedules
Objective: Create a complete inventory of every saved card token, recurring billing schedule, and gateway integration that must survive the migration.
This is the step most merchants skip, and it’s the one that causes revenue gaps. Pull a report from your gateway or subscription management platform that lists every active token: the customer it belongs to, the card’s expiration date, the next scheduled charge date, and the billing frequency. If you use a platform like Authorize.net, this data lives in your Customer Information Manager (CIM) profiles.
Document which system “owns” each token. In some setups, the gateway holds the token. In others, the processor does. This distinction determines whether your tokens can survive a processor switch at all. Gateway-held tokens (like those in Authorize.net) are often portable if you keep the same gateway. Processor-held tokens usually are not.
Map every recurring billing schedule against your migration timeline. If 2,000 customers renew on the 15th of each month and you plan to cut over on the 12th, you have three days to confirm everything works. That’s not enough buffer. Plan your cutover for the day after your largest billing cycle completes, not before.
Anti-patterns: Don’t assume your new processor will handle token migration for you. Don’t schedule your cutover date without checking your recurring billing calendar first.
Success indicators: You have a complete token inventory with ownership attribution (gateway vs. processor), a calendar of all recurring billing dates, and a cutover window that avoids overlapping with major billing cycles.
Step 3: Coordinate Parallel Operation Between Old and New Processors
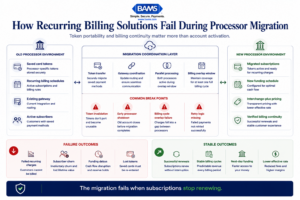
Most recurring billing failures happen because saved card tokens break before the migration is fully verified.
Objective: Ensure both processors are active simultaneously long enough to complete token migration and verify billing continuity.
This is where merchant service provider coordination becomes the critical success factor. Contact your current processor and confirm their account closure policy. Some processors close accounts 30 days after you submit a cancellation request. Others close immediately. If your old account closes before tokens transfer, every saved card on file becomes a dead reference.
Negotiate an overlap period.
You need both accounts active for a minimum of one full billing cycle (typically 30 days). During this window, new transactions route to the new processor while existing recurring charges continue through the old one until tokens are migrated and verified.
Work with your gateway provider to initiate the token transfer. If you’re staying on the same gateway (for example, keeping Authorize.net but switching the back-end processor), this is relatively straightforward. If you’re changing gateways entirely, you may need to request a bulk token export from the old gateway and import into the new one. Not all gateways support this. Confirm before you commit.
A real-world example: when ENet replaced its billing infrastructure with Aria Systems’ billing cloud solution in October 2023, the transition required careful coordination of billing data, payment tokens, and renewal logic to ensure recurring charges kept flowing after the old system was retired. That same principle applies to any processor switch involving subscriptions.
Anti-patterns: Don’t cancel your old processor account before confirming token migration is complete. Don’t assume a “seamless transition” based on a sales rep’s promise without verifying the technical handoff.
Success indicators: Both processor accounts are active simultaneously. Token migration has been initiated with a confirmed timeline from the gateway provider. Your old processor’s account closure date is set after the migration verification window.
Step 4: Configure the New Processor With Intentional Settings
Objective: Replace every default setting on your new processor account with a configuration that reflects your actual business needs and cost targets.
When your new account activates, resist the urge to go live immediately. Every default is a potential hidden fee. Start with these configurations:
- Batch settlement time: Set it to the latest possible window that still qualifies for next-day funding. If your processor offers next-day funding with an 11 PM batch close, don’t leave it at the 5 PM default.
- Pricing model: Confirm you’re on interchange-plus pricing in writing. If the contract says “tiered” or “bundled,” renegotiate before processing a single transaction.
- Gateway fees: Some processors charge a per-transaction gateway fee on top of processing fees. Processors that include free Authorize.net gateway access eliminate this line item entirely.
- PCI compliance: Confirm your PCI compliance status is registered from day one. A monthly PCI non-compliance fee ($25-$100/month) starts accruing immediately if your compliance isn’t validated during setup.
- Fraud filters: Set thresholds based on your actual chargeback rate and transaction patterns, not the processor’s conservative defaults. Overly tight filters decline good customers.
For businesses running recurring billing solutions, configure your subscription billing rules in the new processor before migrating any tokens. Set retry logic for failed charges (how many times to retry, at what intervals), dunning email triggers, and proration rules. These settings directly impact your recovery rate on failed recurring payments.
This is where working with a provider that offers dedicated account management pays off.
BAMS, for instance, pairs merchants with a dedicated account manager who walks through each configuration decision rather than leaving you with a self-service dashboard and default settings. That hands-on coordination is the difference between a setup that looks right and one that actually performs.
Anti-patterns: Don’t go live on default settings with a plan to “optimize later.” Later never comes, and every transaction processed on bad defaults costs you money. Don’t configure fraud filters without reviewing your historical chargeback data.
Success indicators: Every configurable setting has been reviewed and intentionally set. You have written confirmation of your pricing model. Batch time, fraud thresholds, and retry logic match your business requirements.
Step 5: Test Transactions Before Full Cutover
Objective: Verify that the new processor handles every transaction type your business uses, correctly and at the expected cost.
Run test transactions across every payment method and scenario you support: standard card-present (if applicable), card-not-present, recurring charges on migrated tokens, refunds, partial refunds, and void transactions. Don’t just test that transactions go through. Verify the fee applied to each test transaction matches your negotiated rate.
Test your funding speed. Process a small batch and track exactly when the funds appear in your bank account. If you were promised next-day funding, confirm it. If the deposit arrives a day late, investigate before routing real volume through the new processor. Common culprits include incorrect bank account verification, batch timing misconfigurations, or risk holds that the processor didn’t disclose.
Test the customer experience. Place a real order on your site using a test card. Check that the checkout flow, confirmation emails, and receipt formatting all work correctly with the new gateway integration. A broken checkout page during cutover is worse than any hidden fee.
Anti-patterns: Don’t limit testing to a single successful transaction and call it done. Don’t skip refund and void testing, as these are the scenarios most likely to reveal configuration errors.
Success indicators: Every transaction type processes successfully. Fees match your contract. Funding arrives within the promised timeframe. Customer-facing checkout works without errors.
Step 6: Execute Cutover and Verify Billing Continuity
Objective: Route all live traffic to the new processor and confirm that every recurring billing cycle completes without interruption.
Schedule your cutover for a low-traffic period, ideally the day after your largest recurring billing cycle completes. Update your gateway routing to point to the new processor. If you’re using a platform like WooCommerce, Shopify, or a custom integration, update the API credentials in your payment module.
Monitor the first 48 hours closely. Watch for declined transactions that should have been approved (a sign of misconfigured fraud filters or unmigrated tokens). Check your processor dashboard for any holds or reserves that weren’t disclosed. Some processors apply a rolling reserve (holding back a percentage of each transaction) as a default risk mitigation for new accounts. If you see a reserve you didn’t agree to, escalate immediately.
Run a reconciliation report after the first full billing cycle on the new processor. Compare the number of successful recurring charges against your pre-migration baseline. If your success rate dropped, investigate whether tokens failed to migrate, cards expired during the transition, or retry logic isn’t configured correctly.
Anti-patterns: Don’t close your old processor account until you’ve confirmed at least one full billing cycle on the new processor. Don’t ignore a small decline rate increase, as it compounds over time.
Success indicators: All live traffic routes through the new processor. Recurring billing success rate matches or exceeds your pre-migration baseline. No unexpected reserves or holds appear. Funding speed meets the promised timeline.
Step 7: Post-Migration Fee Audit and Ongoing Monitoring
Objective: Confirm that your first full statement on the new processor matches your negotiated terms, and establish a recurring audit cadence.
When your first statement arrives, audit it line by line against your contract. Check that your interchange-plus markup matches what was agreed. Look for fees that weren’t in the contract: annual fees, regulatory recovery fees, technology fees, or “account maintenance” charges. These are the hidden fees that processors add after onboarding, counting on merchants not to notice.
Calculate your effective rate again (total fees divided by total processing volume). Compare it to the effective rate you calculated during your Step 1 audit of the old processor. If the new rate isn’t meaningfully lower, something in the configuration or contract isn’t delivering as promised.
Set a calendar reminder to repeat this audit quarterly. Third-party processors and dedicated merchant accounts alike can introduce fee changes over time. Rate increases, new surcharges, and modified terms often arrive as statement inserts that merchants discard without reading.
Anti-patterns: Don’t assume your first clean statement means all future statements will be clean. Don’t stop monitoring after the first quarter.
Success indicators: Your effective rate on the new processor is lower than on the old one. Every line item on the statement matches your contract. You have a recurring audit scheduled.
Practical Example: Subscription eCommerce Migration
Consider a mid-size eCommerce brand selling subscription boxes with 8,000 active subscribers billing on the 1st of each month. Their current processor uses tiered pricing, batches at 5 PM Eastern (delaying Friday funding to Monday), and holds tokens at the processor level rather than the gateway level.
During the Step 1 audit, they discover a $0.10 per-transaction “technology fee” and a $99/month PCI non-compliance fee they didn’t know existed. Their effective rate is 3.2%, roughly 0.7% higher than interchange-plus would deliver at their volume.
In Step 2, they learn their 8,000 tokens are processor-held, meaning they can’t simply swap the back-end processor and keep the tokens. They need to request a bulk token migration or, in the worst case, re-tokenize cards by sending customers a secure update link.
They schedule the cutover for January 2nd, the day after their largest billing cycle. During the 30-day overlap, they migrate tokens in batches, test recurring charges on the new processor, and verify next-day funding. By the time the old account closes in early February, every subscriber has been successfully transitioned.
The result: their effective rate drops to 2.45%, batch timing moves to 10 PM Eastern (capturing a full day’s sales for next-day funding), and the hidden technology and non-compliance fees disappear entirely. On $500,000 in monthly volume, that’s roughly $3,750 saved per month.
Common Mistakes and Pitfalls
Closing the old account too early. This is the single most damaging mistake. Once the old account closes, processor-held tokens are gone. There’s no recovery. Keep the old account open until you’ve verified at least one full billing cycle on the new processor.
Accepting default batch timing. Every hour your batch closes earlier than it could is an hour of sales that fund a day later. This is invisible money sitting in transit.
Ignoring the effective rate. Processors can quote a low per-transaction rate while padding margins through ancillary fees. The only number that tells the truth is total fees divided by total volume.
Merchant Payments Coalition resources continue to highlight how hidden interchange markups and fee inflation quietly increase operational costs for merchants over time.
Treating PCI compliance as a one-time checkbox. Non-compliance fees start accruing the moment your validation lapses. Set reminders for your annual PCI SAQ renewal.
Skipping the post-migration audit. The first statement on a new processor is the most important one you’ll ever read. Errors and undisclosed fees caught in month one are fixable. Errors caught in month twelve have already cost you thousands.
What to Do Next
Start with Step 1. Pull your last three processor statements and calculate your effective rate. That single number tells you whether your current setup is costing more than it should. If it’s above 2.5% for card-not-present transactions at meaningful volume, there are almost certainly hidden fees or default settings working against you.
You don’t need to switch processors tomorrow. But you do need to know what you’re paying today, in full, with no line item left unexamined. Use this guide as a reference each time you evaluate a new processor or renegotiate your current contract. The fees don’t disappear on their own. They disappear when you find them and refuse to accept them.
Frequently Asked Questions
What documents do I need to gather before switching merchant service providers?
At minimum, collect your last three monthly processor statements, your current contract (including any amendments or rate change notices), your gateway login credentials, a full export of saved card tokens with associated customer records, and your recurring billing schedule showing every active subscription’s next charge date. You’ll also need your bank account details for the new processor’s deposit setup and your current PCI compliance validation certificate.
Why is it important to keep my old merchant account open during the transition?
Your old account holds the processor-side tokens that authorize recurring charges on saved cards. If that account closes before tokens are migrated or re-tokenized on the new processor, those tokens become permanently invalid. Every subscriber with a saved card will see a failed charge. You need both accounts active simultaneously for at least one full billing cycle to verify that all recurring transactions process successfully on the new system before the old one shuts down.
How can I ensure my new processor coordinates effectively with my existing gateway?
Before signing with a new processor, confirm whether they support your current gateway (such as Authorize.net or NMI). If they do, token migration is significantly simpler because gateway-held tokens persist regardless of the back-end processor. Ask the new processor for a written technical migration plan that includes token transfer method, estimated timeline, and a named technical contact. If you’re changing gateways entirely, request confirmation that bulk token export and import are supported.
When should I conduct testing before going live with a new payment processor?
Test after configuration is complete but before routing any live customer traffic. Run test transactions across every payment type you accept: one-time purchases, recurring charges on migrated tokens, refunds, partial refunds, and voids. Verify that each test transaction’s fee matches your contract. Then process a small live batch and confirm funding arrives in your bank account within the promised timeframe. Only after all tests pass should you schedule the full cutover.
Which pricing model is best for established eCommerce businesses?
Interchange-plus pricing is almost always the better choice for businesses processing consistent volume. It separates the card network’s base cost (interchange) from the processor’s markup, giving you full visibility into what you’re actually paying. Tiered pricing obscures this by bundling transactions into qualified and non-qualified categories with opaque markups. At volumes typical of established eCommerce operations, the transparency of interchange-plus consistently delivers a lower effective rate.
How do I verify that next-day funding is actually working after setup?
Process a small batch on your first live day and note the exact time the batch closes. Then check your bank account the following business day. If funds don’t appear, check three things: whether your batch close time is set correctly in the gateway dashboard, whether your bank account passed the processor’s verification (micro-deposit confirmation), and whether any risk holds were applied to your account. Contact your processor’s support team with the specific batch ID and settlement timestamp to trace the delay.