

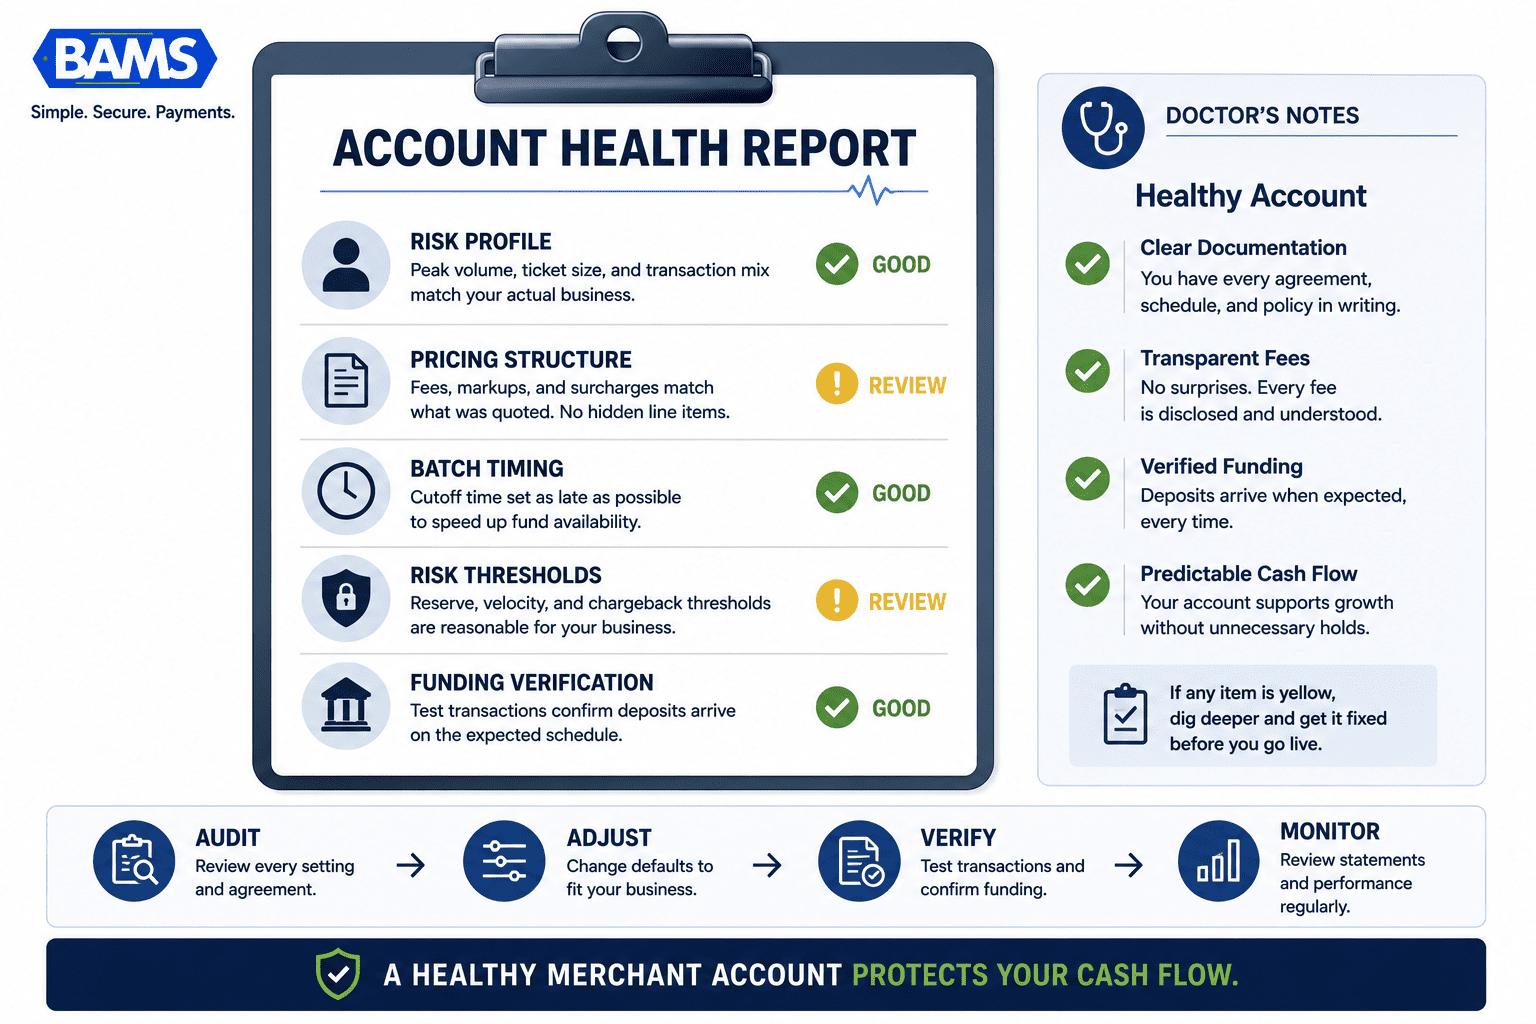
Merchant Account Setup: Audit Hidden Fees & Defaults
Last Updated on October 7, 2026 by Dimitri Akhrin
Find the buried processor settings that trigger reserve holds, funding delays, and account freezes in your first 30 days
Learn how to audit your processor’s default configuration line by line — from batch timing and reserve structures to chargeback thresholds. This tactical guide shows you how to build a clean risk profile that protects your cash flow from day one.
TL;DR
- Processor defaults protect the processor, not you – Batch cutoff times, risk thresholds, reserve structures, and fee schedules are set to the processor’s advantage by default. Request a full configuration summary after approval and compare every setting against what was quoted.
- Your risk profile determines your account’s restrictions – State your peak monthly volume (not your average), your actual highest ticket size, and your real transaction mix on your application. Understating these numbers to look safer causes freezes when your actual activity exceeds the declared limits.
- Batch timing is the most controllable factor in funding speed – Move your batch cutoff to the latest available time. The difference between a 3:00 PM and a 10:00 PM cutoff can mean an extra business day on every afternoon and evening transaction’s deposit.
- Complete PCI compliance and website disclosures before day one – Missing SAQ filings trigger monthly non-compliance fees ($20 to $50), and a missing refund policy on your website can trigger account restrictions. Both are fixable in under an hour.
- Verify funding with real test transactions, then monitor for 90 days – Don’t trust the sales pitch. Run test transactions at different times and days, document when deposits actually arrive, and review your statements line by line for at least three months to catch fee creep and configuration changes.
Guide Orientation: What This Covers and Who It’s For
This guide walks you through the hidden fees and risky default settings that processors bury inside your merchant account setup, then shows you exactly how to find and fix them before they drain your cash flow. It’s built for eCommerce managers at established online businesses who are tired of unexplained deductions, delayed deposits, and the sinking feeling that their processor is quietly profiting from their inattention.
By the end, you’ll be able to audit your processor’s default configuration line by line, identify the specific settings that trigger reserve holds and funding delays, and build a risk profile so clean that your account sails through the critical first 30 days without a freeze. This is not a general “how to accept payments” overview. It’s a tactical playbook for protecting revenue that’s already yours.
We’ll cover batch timing, risk thresholds, reserve structures, chargeback triggers, and the compliance documentation that processors use to justify holds. We won’t cover POS hardware selection, card-present terminal setup, or basic payment gateway installation.
Why Eliminating Hidden Fees in Processor Setup Defaults Matters Now
According to the U.S. Small Business Administration, maintaining healthy cash flow is one of the most important factors in sustaining and growing a small business. For ecommerce businesses processing hundreds or thousands of transactions daily, even small funding delays or unexpected fees can create meaningful operational challenges.
Most processors ship your account with conservative defaults designed to protect themselves, not you. These defaults include higher interchange padding, rolling reserves you never agreed to, batch cutoff times that add an extra business day to every deposit, and risk thresholds set so low that a single large order can trigger a manual review and freeze your entire settlement.
The cost of ignoring these settings is not abstract. A frozen merchant account in the first 30 days doesn’t just delay revenue. It disrupts payroll, stalls inventory replenishment, and forces you into reactive firefighting with a processor’s risk department while your cash sits in limbo. As BAMS’s onboarding guidance puts it: “Every business represents a potential risk.” Underwriting is a risk-screening process, and if your setup doesn’t preemptively answer the underwriter’s questions, the processor will answer them for you with holds, reserves, and restrictions.
The businesses that avoid these traps aren’t lucky. They’re prepared. They treat compliance documentation and configuration review as cash flow protection, not paperwork. According to the Federal Reserve’s 2025 Small Business Credit Survey, managing cash flow and operating expenses remains a significant challenge for many businesses, increasing the importance of minimizing avoidable funding delays and unexpected fees.
Core Concepts: The Language of Processor Defaults
Before you can audit your setup, you need to understand the mechanics processors use to manage their exposure at your expense. These aren’t obscure technicalities. They’re the levers that directly control when you get paid and how much you actually keep.
Interchange-Plus vs. Bundled Pricing
Interchange is the base cost the card networks charge per transaction. In an interchange-plus model, you see that base cost plus a transparent markup. In a bundled (or tiered) model, the processor groups transactions into qualified, mid-qualified, and non-qualified buckets, each with different rates. Bundled pricing is where hidden fees thrive, because the processor decides which bucket each transaction falls into, and that decision almost always favors them.
Rolling Reserves
A rolling reserve is a percentage of your daily settlements that the processor withholds and holds for a set period (often 90 to 180 days) as insurance against chargebacks or fraud. Some processors apply reserves by default to every new account. Others apply them selectively based on your risk profile. If you don’t ask, you won’t know which category you’re in until you notice your deposits are lighter than expected.
Batch Timing and Settlement Windows
Your gateway collects transactions throughout the day and submits them to the processor in a “batch.” The time that batch closes determines when your funds begin moving. A batch that closes at 3:00 PM Eastern versus 10:00 PM Eastern can mean the difference between next-day funding and a two-day wait. Most processors default to early cutoffs.
Risk Thresholds
Processors set automated triggers based on transaction size, velocity, and deviation from your stated processing profile. If a single order exceeds your declared “highest anticipated ticket” or your daily volume spikes above your stated monthly average, the system can flag your account for manual review and hold all pending settlements until the review clears.
The Framework: Configuration Audit Before Day One

Approval is only the beginning. Configuration determines how your account performs.
Think of your processor setup as a five-stage process. Most merchants only complete the first two stages (application and approval) and assume everything after that is handled. The remaining three stages are where the money leaks.
- Stage 1: Risk Profile Construction — Build your documentation and processing profile before you apply.
- Stage 2: Application and Underwriting — Submit a profile that preempts underwriter concerns.
- Stage 3: Default Configuration Audit — Review every setting the processor applied to your account after approval.
- Stage 4: Funding Speed Verification — Confirm that deposits actually arrive when and how the processor promised.
- Stage 5: Ongoing Monitoring — Track fees, holds, and threshold triggers continuously through the first 90 days and beyond.
Each stage feeds the next. A weak risk profile in Stage 1 leads to conservative defaults in Stage 3, which leads to slow funding in Stage 4. The guide below breaks down each stage into specific actions.
Step-by-Step: How to Eliminate Hidden Fees and Protect Your Cash Flow
Most cash flow problems begin with a setting that nobody reviewed.
Step 1: Build a Bulletproof Risk Profile Before You Apply
Objective: Give the underwriter zero reasons to apply conservative defaults or elevated reserves to your account.
Your processing application asks for four numbers that determine almost everything about your account’s configuration: average ticket size, highest anticipated ticket, estimated monthly volume, and transaction mix (card-present vs. card-not-present, domestic vs. international). Underwriters compare these figures against your business type, history, and bank statements to assess risk. If the numbers don’t match your actual activity, the processor assumes the worst.
Gather 6 to 12 months of transaction history from your current processor. Calculate your true average ticket, your actual highest single transaction, and your real monthly volume including seasonal peaks. If you’re entering a high season, state the peak volume, not just the average. Understating volume to look “safer” backfires the moment you exceed your declared limits and trigger a review.
Prepare your business formation documents, EIN verification, bank statements, processing statements from your current provider, and a clear description of what you sell and how you fulfill orders. Accounts can be approved in as little as one business day when documentation is complete before underwriting begins. Incomplete applications get flagged for manual review, which means delays and often more restrictive terms.
Anti-patterns: Don’t round numbers down to seem lower-risk. Don’t omit international sales or subscription billing from your transaction mix. Don’t submit bank statements from a different entity than the one applying.
Success indicators: Your application is approved without requests for additional documentation. Your approved processing limits match or exceed your actual peak volume. No rolling reserve is applied, or the reserve percentage is lower than the processor’s standard default.
Step 2: Audit Every Default Setting After Approval
Objective: Identify and change every processor-applied default that costs you money or slows your funding.
Once your account is approved, request a full configuration summary from your processor. This should include your pricing model and markup, batch cutoff time, reserve structure (if any), risk threshold settings, and any per-transaction fees beyond interchange. Many processors don’t send this proactively. You have to ask.
Compare every line item against what was quoted during the sales process. Common discrepancies include: a higher “non-qualified” surcharge than discussed, a batch cutoff time set hours earlier than promised, PCI non-compliance fees activated by default (charged monthly until you complete a self-assessment questionnaire), and statement fees or “account maintenance” fees that weren’t in the original quote.
Pay special attention to hidden costs that inflate your effective processing rate beyond the headline number. A processor quoting 2.6% plus $0.10 per transaction might also be charging a monthly gateway fee, a batch fee per settlement, and an annual PCI compliance fee. These add up to a significantly higher effective rate than the quoted percentage.
Anti-patterns: Don’t assume the approved configuration matches the sales proposal. Don’t skip reading the merchant processing agreement’s fee schedule. Don’t wait until your first statement to discover unexpected charges.
Success indicators: You have a written configuration summary that matches your signed agreement. All fees are accounted for in your projected cost model. Batch cutoff time is set to the latest available window.
Step 3: Configure Batch Timing for Maximum Funding Speed
Objective: Ensure your deposits arrive as fast as contractually possible by optimizing when your transactions settle.
Your online payment gateway’s batch cutoff time is the single most controllable factor in how quickly you receive funds. If your processor supports next-day funding but your batch closes at 2:00 PM, every transaction after that time rolls into the next day’s batch, adding a full business day to your deposit timeline.
Ask your processor what the latest possible batch cutoff time is for your account type. Some processors offer cutoffs as late as 10:00 PM or 11:00 PM Eastern. Configure your gateway to auto-batch at that time. If your processor doesn’t support late cutoffs, that’s a negotiation point or a reason to switch.
After configuring batch timing, verify that your bank account is set up for same-day or next-day ACH. Some business bank accounts have their own processing delays that add time on top of the processor’s settlement. Confirm with your bank that incoming ACH credits post on the day they’re received, not the following business day.
For businesses where funding speed verification is critical, tools like BAMS offer next-day funding with later cutoff times, which can compress the gap between sale and deposit to roughly 24 hours for most transactions.
Anti-patterns: Don’t leave batch timing at the processor’s default without checking. Don’t assume “next-day funding” means the same thing across all processors (some define it as next business day after the batch closes, others after the batch is submitted). Don’t ignore weekends and holidays in your funding timeline calculations.
Success indicators: Your batch closes at the latest available time. Test deposits arrive within the promised funding window. Your cash flow projections accurately reflect actual deposit timing.
Step 4: Set Risk Thresholds That Match Your Actual Business
Objective: Prevent automated holds and account freezes by aligning processor risk triggers with your real transaction patterns.
This is where most first-30-day freezes originate. Your processor sets automated risk thresholds based on the processing profile you submitted. If your stated average ticket is $50 and a customer places a $500 order, the system flags it. If your stated monthly volume is $20,000 and you hit $25,000 in week three because of a promotion, the system flags that too.
Chargebacks remain a significant operational concern because they can trigger manual reviews, reserve requirements, and settlement delays when risk thresholds are exceeded. But many chargeback-related freezes aren’t caused by actual fraud. They’re caused by risk thresholds set too low, which triggers manual reviews that hold all pending funds while the processor investigates.
Request a list of your account’s risk triggers from your processor. These typically include: maximum single transaction amount, maximum daily transaction count, maximum daily dollar volume, chargeback ratio threshold, and refund ratio threshold. Compare each one against your actual business data. If your holiday season routinely doubles your average monthly volume, your thresholds need to accommodate that.
For chargeback risk management, set up alerts that notify you when your chargeback ratio approaches the threshold (typically 1% of transactions) rather than waiting for the processor to freeze your account. Proactive monitoring gives you time to investigate and respond before the processor takes action.
Anti-patterns: Don’t accept default risk thresholds without reviewing them. Don’t assume seasonal spikes will be automatically accommodated. Don’t wait for a freeze to discover what your thresholds are.
Success indicators: Your risk thresholds accommodate your peak processing volume with at least a 20% buffer. You receive alerts before thresholds are breached. No automated holds are triggered during normal business operations.
Step 5: Eliminate Compliance Gaps That Trigger Holds
Objective: Complete every compliance requirement before processing your first transaction so the processor has no justification for post-activation holds.
Processors use incomplete compliance documentation as a reason to apply holds, restrict funding, or freeze accounts. The most common compliance gap is PCI DSS. If you haven’t completed your Self-Assessment Questionnaire (SAQ) and submitted your Attestation of Compliance (AOC), many processors will either charge you a monthly non-compliance fee (typically $19.95 to $49.95) or restrict your funding until you comply.
Complete your PCI SAQ before you process your first transaction.
The PCI Security Standards Council provides merchant guidance on PCI DSS compliance requirements and self-assessment processes.
For most eCommerce businesses using a hosted payment page, this is SAQ A, which is the simplest version. If you handle card data directly on your servers, you’ll need SAQ D, which is significantly more involved. Know which one applies to you and complete it during setup, not after.
Beyond PCI, ensure your website includes all required disclosures: a clear refund and return policy, terms of service, a privacy policy, and visible contact information. Processors and card networks review merchant websites during underwriting and periodically after approval. A missing refund policy is a common trigger for account restrictions, especially for eCommerce businesses with higher-than-average return rates.
Keep your business credit profile clean. Setup checklists recommend keeping business credit utilization below 30%, resolving negative items, and maintaining at least four trade lines reporting to business credit bureaus. These factors influence not just approval but also the terms you receive, including reserve requirements and processing limits.
Anti-patterns: Don’t assume PCI compliance is optional or that the monthly fee is cheaper than completing the questionnaire. Don’t launch your merchant account without a refund policy visible on your website. Don’t ignore business credit as a factor in your processing terms.
Success indicators: PCI SAQ is completed and AOC is filed before the first transaction. No non-compliance fees appear on your first statement. Website passes a manual review against card network requirements.
Step 6: Verify Funding Speed With Real Transactions
Objective: Confirm that deposits arrive when promised by running controlled test transactions and tracking settlement timing.
Don’t take your processor’s word for funding speed. Verify it. Before you route live customer transactions through your new account, run a series of test transactions at different times of day and track exactly when the corresponding deposits land in your bank account.
Verify your payment gateway setup by processing at least three test transactions: one before your batch cutoff, one after your batch cutoff, and one on a Friday afternoon. The first confirms next-day funding works as promised. The second confirms you understand the actual cutoff behavior. The third reveals how weekends affect your settlement timeline.
Document the exact time each test transaction is processed and the exact time the deposit appears in your bank account. If the gap exceeds what was promised, contact your processor immediately with the specific transaction IDs and timestamps. This creates a paper trail that’s much more effective than a vague complaint about “slow deposits.”
If you’re transitioning from another processor, keep your old account open and active until you’ve verified that the new account is funding correctly. Running both accounts in parallel for two to four weeks protects you from a gap in cash flow if the new setup has issues. This is especially important for businesses with next-day funding requirements where even a one-day delay disrupts operations.
Anti-patterns: Don’t assume the first deposit proves the system works permanently. Don’t close your old processor account before verifying the new one. Don’t skip the Friday afternoon test (weekend settlement behavior catches many merchants off guard).
Success indicators: All test deposits arrive within the promised funding window. You have documented proof of settlement timing for at least five transactions. Your old account remains active as a fallback during the transition period.
Step 7: Monitor Continuously Through the First 90 Days
Objective: Catch fee creep, threshold breaches, and configuration changes before they impact your cash flow.
The first 90 days of a new merchant account are the highest-risk period for freezes, holds, and unexpected fees. Processors often apply provisional terms during this window and adjust them (sometimes without explicit notification) based on your actual processing behavior.
Review your processing statement line by line every month for the first three months. Compare the effective rate you’re paying (total fees divided by total volume) against the rate you were quoted. If the effective rate is more than 0.15% higher than expected, investigate. The gap is usually caused by non-qualified transaction surcharges, batch fees, or other line items that weren’t prominent in the original quote.
Track your chargeback ratio weekly.
If you’re approaching 0.8% (with most processors triggering action at 1.0%), take immediate steps: contact the customers involved, submit compelling evidence for representment, and review your product descriptions and fulfillment communications for clarity gaps that might be causing buyer confusion. BAMS offers proactive chargeback defense as part of its merchant services, which can help identify and respond to disputes before they escalate to ratio-threatening levels.
Set calendar reminders to check your reserve balance (if applicable) and confirm that reserve releases happen on schedule. Some processors hold reserves longer than the stated period if your account has had any flags during the review window.
Anti-patterns: Don’t stop reviewing statements after the first month. Don’t assume a clean first month means the account is permanently stable. Don’t ignore small, recurring fees that seem insignificant individually but compound over time.
Success indicators: Your effective processing rate stays within 0.10% of the quoted rate. Your chargeback ratio stays below 0.5%. No unexpected holds or reserve extensions occur during the 90-day window. Deposits arrive consistently within the verified funding timeline.
Practical Examples: What This Looks Like in Real Scenarios
Scenario A: The Seasonal Spike That Triggered a Freeze
An online retailer selling outdoor gear stated a $30,000 monthly volume on their application based on their off-season average. During a summer promotion, they hit $55,000 in three weeks. The processor’s automated system flagged the account for exceeding 150% of stated volume. All pending settlements (roughly $12,000) were held for manual review, which took five business days to resolve.
The fix was straightforward but required foresight: the merchant should have stated their peak monthly volume ($60,000) on the application, not their average. The slightly higher stated volume might have triggered a marginally larger reserve requirement, but it would have prevented a $12,000 hold during their most important sales period.
Scenario B: The Batch Cutoff That Cost $800/Month
A mid-size eCommerce brand processing $150,000/month had their batch cutoff set to the processor’s default of 3:00 PM Eastern. Roughly 40% of their daily transactions occurred between 3:00 PM and midnight. Those transactions consistently settled one business day later than necessary, creating a persistent cash flow gap of approximately $2,000 per day. The business was using a line of credit to cover the gap at an annualized cost of roughly $800/month.
Moving the batch cutoff to 10:00 PM Eastern eliminated the gap entirely. The change took one phone call and was effective the next business day.
Scenario C: The PCI Fee Nobody Noticed
A subscription box company processed through a new provider for six months before noticing a $29.95 monthly “PCI non-compliance fee” on their statement. They had completed PCI compliance with their previous processor but hadn’t filed a new SAQ with the new one. Total cost of the oversight: $179.70 in unnecessary fees, plus the time spent filing retroactively. The SAQ itself took 20 minutes to complete.
Common Mistakes and Pitfalls
The most predictable failure is treating merchant account setup as a one-time event rather than an ongoing configuration challenge. Processors change fee schedules, adjust risk thresholds, and update compliance requirements. If you set it and forget it, you’ll pay more than you should.
Another common mistake is negotiating the headline rate while ignoring ancillary fees. A processor offering 2.4% plus $0.10 with $50/month in additional fees can be more expensive than one offering 2.6% plus $0.10 with no additional fees, depending on your volume.
Merchants also routinely underestimate how much their own documentation gaps contribute to freezes and holds. A missing bank statement, an outdated business address, or a website without a refund policy gives the processor justification to restrict your account. These are preventable problems, not bad luck.
Finally, many eCommerce managers assume their developer or platform handles gateway configuration. Batch timing, risk thresholds, and fee structures are business decisions, not technical ones. Own them.
What to Do Next
Start with one action: request a full configuration summary from your current processor. Ask for your batch cutoff time, your risk thresholds, your reserve structure, and a complete fee schedule including all ancillary charges. Compare what you receive against what you were originally quoted.
If you find discrepancies (and most merchants do), you now have specific, documented leverage for a conversation with your processor or for evaluating alternatives. This guide isn’t a checklist to complete once. It’s a reference to revisit at every contract renewal, every processor switch, and every time your business model changes in a way that affects your transaction patterns.
Protecting your cash flow isn’t about finding the cheapest processor. It’s about ensuring that the processor you choose is configured to work for your business, not against it. The defaults are designed for the processor’s convenience. Your job is to replace them with settings designed for yours.
Frequently Asked Questions
What documents do I need to gather before switching merchant service providers?
At minimum, prepare your business formation documents (articles of incorporation or LLC filing), EIN verification letter, three to six months of bank statements, recent processing statements from your current provider, a valid government-issued ID for the business owner, and your website URL with a visible refund policy, terms of service, and contact information. Having all of these ready before you apply can reduce approval time to as little as one business day.
Why should I keep my old merchant account open during a transition?
Your new account needs to be verified with real transactions before you can trust it with your full volume. If deposits are delayed, risk thresholds are misconfigured, or compliance gaps trigger a hold, your old account serves as a functioning fallback. Run both accounts in parallel for two to four weeks and only close the old one after you’ve confirmed the new account funds correctly across multiple transaction types and days of the week.
How can I verify that my new processor’s funding speed matches what was promised?
Run at least three test transactions at different times: one well before your batch cutoff, one just after, and one on a Friday afternoon. Record the exact timestamp of each transaction and the exact time the deposit appears in your bank account. Compare the actual gap against the promised funding timeline. If deposits arrive late, contact your processor with specific transaction IDs and timestamps to create a documented record.
Which pricing model is best for eCommerce businesses?
Interchange-plus pricing is almost always more transparent and cost-effective for eCommerce businesses than bundled or tiered pricing. With interchange-plus, you see the actual card network cost plus a fixed markup. With tiered pricing, the processor decides which rate tier each transaction falls into, and that decision consistently favors the processor. If your processor only offers tiered pricing, ask for an interchange-plus option or treat it as a reason to evaluate alternatives.
What triggers a merchant account freeze in the first 30 days?
The most common triggers are: processing volume that exceeds your stated monthly limit, individual transactions that exceed your declared highest anticipated ticket, a chargeback ratio approaching 1%, incomplete PCI compliance documentation, and mismatches between your website content and what you described on your application. All of these are preventable by building an accurate risk profile and completing compliance requirements before you process your first live transaction.
How often should I review my processing statements for hidden fees?
Review every statement line by line for the first three months, then monthly thereafter. Calculate your effective rate (total fees divided by total processing volume) each month and compare it against your quoted rate. If the effective rate drifts more than 0.15% above the quoted rate, investigate the specific line items causing the gap. Common culprits include non-qualified surcharges, PCI non-compliance fees, batch fees, and annual account maintenance charges.


