Chargeback Protection: Cut Processor Reserves Step by Step
Last Updated on October 7, 2026 by Dimitri Akhrin
A proactive dispute-prevention system that frees merchant cash flow trapped in reserve holds
Learn how to build a documented chargeback protection workflow that drives your dispute ratio below 0.5% and earns faster reserve reductions. This step-by-step tutorial covers evidence trails, prevention controls, and data-backed negotiation tactics to unlock merchant cash flow.
TL;DR
- Reserves are negotiable, not fixed – Your processor sets reserve percentages based on your risk profile, and you can actively reduce that profile through chargeback prevention and documentation.
- Dispute prevention is the fastest path to lower reserves – Enabling CVV/AVS checks, fixing billing descriptors, and using chargeback alerts to resolve disputes before they become formal chargebacks directly lowers your ratio and your financial exposure.
- Track your chargeback ratio weekly – Monthly reporting is too slow to catch spikes. Aim for a ratio consistently below 0.5% over 90+ days before requesting a reserve reduction.
- Build an evidence vault for every order – Structured, timestamped proof (tracking, delivery confirmation, customer communications, policy screenshots) wins representments and signals low risk to your processor.
- Bring data to the negotiation – Processors respond to specific, documented requests. Compile your ratio trend, implemented controls, and a concrete proposal (“reduce from X% to Y%”) rather than asking vaguely for relief.
What You’ll Achieve: Lower Reserves, Better Cash Flow
By the end of this tutorial, you’ll have a complete, proactive system for reducing the reserve your payment processor holds against your merchant account. Instead of waiting for your processor to release funds on their timeline, you’ll build the evidence trail, dispute-prevention controls, and negotiation leverage that earn lower reserve percentages faster.
Your success criteria are clear: a documented chargeback protection workflow, a chargeback ratio consistently below 0.5%, and a formal reserve reduction request backed by data your processor can’t ignore. The result is more merchant cash flow available for inventory, marketing, and growth rather than sitting in a hold account you can’t touch.
Prerequisites and Setup Checklist
Before you start, confirm you have the following in place. Missing any of these will slow you down or block a step entirely.
- Access to your processor dashboard with transaction-level reporting (settlement reports, chargeback reports, reserve balance statements)
- Your current reserve terms documented: percentage held, hold duration, release schedule, and any threshold triggers
- A CRM or order management system that stores customer contact info, order details, shipping/tracking data, and refund history
- CVV and AVS enabled on your payment gateway
- Chargeback alert service active (Verifi or Ethoca, or through your processor)
- A spreadsheet or BI tool for tracking your monthly chargeback ratio and reserve balance over time
Time estimate: 4 to 6 hours for initial setup across all steps. Ongoing maintenance takes roughly 30 minutes per week. The biggest potential blocker is not having historical chargeback data readily exportable from your processor.
Why Proactive Chargeback Defense Reduces Your Financial Exposure
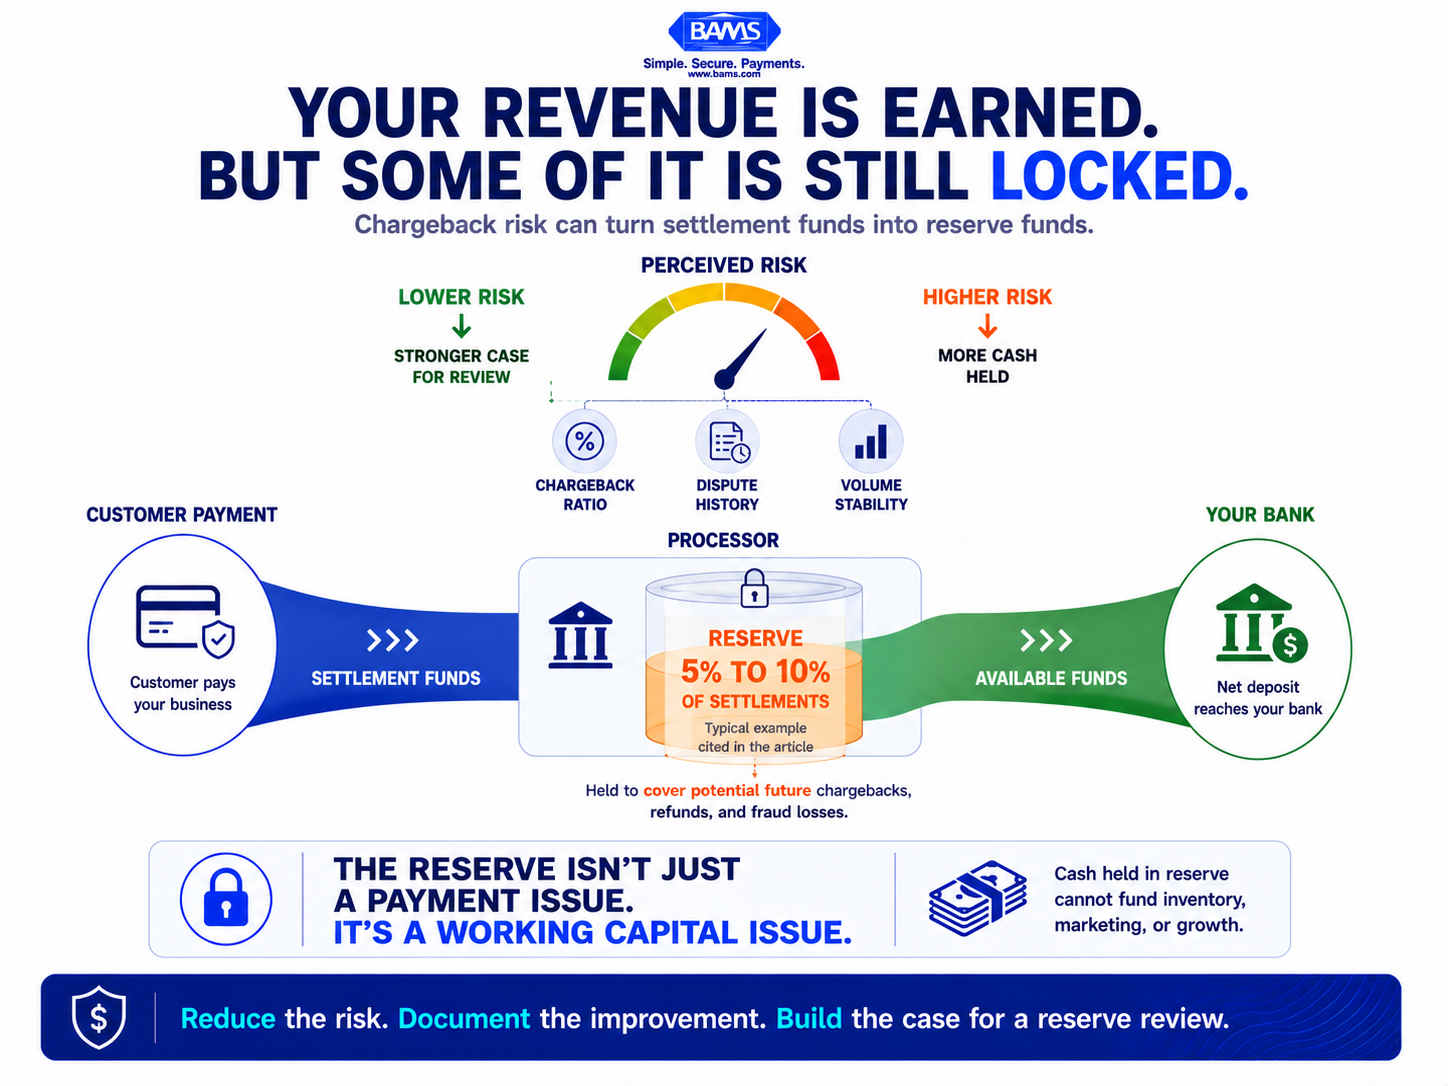
Most eCommerce managers encounter reserves for the first time during a growth phase. You’re processing more volume, your processor’s risk model flags the increase, and suddenly 5% to 10% of your settlements are held back. The standard advice is to wait it out and build a “track record.” That’s incomplete.
Reserves exist because processors need to cover potential financial exposure from disputes. The math is straightforward: fewer chargebacks mean less risk, which means less money your processor needs to hold. As Peter Goldstein noted in a Mastercard chargeback management report, chargebacks should be treated as a cash flow and exposure management problem, not only a fraud issue. Early visibility and evidence quality directly reduce the financial drag on your business.
This tutorial approaches reserve reduction through dispute prevention and structured documentation, giving you control over the variables your processor actually evaluates.
Processor reserves are designed to cover financial exposure. Reducing chargeback risk can strengthen the case for releasing more working capital back to the business.
Step 1: Audit Your Current Reserve Terms and Chargeback Baseline
Open your merchant processing agreement and locate the reserve clause. Write down the exact percentage withheld, the hold period (commonly 90 to 180 days for rolling reserve requirements), and any conditions that trigger increases or decreases. If you can’t find these terms, call your processor and request them in writing.
Next, pull your chargeback data for the last six months. Calculate your monthly chargeback ratio using this formula:
Chargeback Ratio = (Number of Chargebacks in Month) / (Total Transactions in Month) × 100
Expected result: You have a spreadsheet with six months of ratios and your current reserve terms documented side by side. Checkpoint: If your ratio is above 1.0%, your priority is dispute reduction before negotiation. If it’s below 0.5%, you have strong leverage to request a reserve decrease now.
Common failure: Your processor reports chargebacks in the month they’re filed, not the month the original transaction occurred. Make sure you’re using the same methodology your processor uses when calculating your ratio, or your numbers won’t match theirs.
Step 2: Fix Your Billing Descriptor and Customer-Facing Details
A surprising number of chargebacks come from customers who don’t recognize the charge on their statement. This is the easiest category to eliminate. Log into your payment gateway and verify your billing descriptor matches your store name exactly as customers know it.
Action items:
- Set your billing descriptor to your brand name (not your legal entity name)
- Include a customer service phone number or URL in the descriptor if your gateway supports it
- Send a test transaction to yourself and verify the descriptor appears correctly on your bank statement
Expected result: When a customer sees the charge, they immediately connect it to their purchase. Common failure: Some gateways truncate descriptors. If your brand name is longer than 22 characters, abbreviate it clearly rather than letting the system cut it off mid-word.
Step 3: Implement Pre-Dispute Controls at Checkout
Dispute defense starts before a chargeback is filed. The Merchant Risk Council highlights the need for merchants to respond to increasingly sophisticated fraud and chargeback tactics with equally sophisticated prevention and risk-management strategies. For eCommerce merchants, that means strengthening controls throughout the transaction and fulfillment process rather than waiting until a dispute has already been filed. Here’s what to configure:
- Enable CVV verification and decline transactions that fail the check
- Enable AVS (Address Verification Service) and set rules to flag or decline mismatches on street number and ZIP code
- Screen for shipping/billing address mismatches where the shipping address is in a different country or region than the billing address
- Add order confirmation emails with itemized details, expected delivery date, and a direct link to your refund/return policy
Expected result: Your authorization decline rate may increase slightly (1% to 3%), but your dispute rate drops significantly. Checkpoint: After 30 days, compare your chargeback count to the previous month. You should see measurable improvement.
Common failure: Setting AVS rules too aggressively can block legitimate international orders. Start with domestic-only AVS enforcement and review flagged international orders manually.
Step 4: Activate Chargeback Alerts and Resolve Disputes Before They Escalate
Chargeback alerts from Verifi (Visa) and Ethoca (Mastercard) notify you when a cardholder initiates a dispute, giving you a window (usually 24 to 72 hours) to issue a refund before the dispute becomes a formal chargeback. This is critical because refunded disputes do not count toward your chargeback ratio.
Action items:
- Confirm your processor has enrolled you in Verifi CDRN and/or Ethoca alerts
- Assign a team member to monitor alerts daily and respond within 24 hours
- Set a dollar threshold: for disputes under a certain amount (many merchants use $50 to $75), auto-refund to save labor costs
Expected result: Your formal chargeback count drops because you’re resolving disputes at the alert stage. Common failure: Alerts cost money per notification (typically $15 to $40 each). Track your alert-to-refund ratio monthly to confirm the cost is lower than the chargeback fees and reserve impact you’re avoiding.
Step 5: Build a Structured Evidence Vault for Every Order
When you do need to fight a chargeback, the quality of your evidence determines whether you win. First-party misuse accounts for about 70% of chargebacks, meaning the customer received the product but filed a dispute anyway. Winning these cases requires organized, timestamped proof.
For every order, your system should automatically capture and store:
- Order confirmation with timestamp and customer IP address
- AVS and CVV match results from authorization
- Shipping carrier, tracking number, and delivery confirmation (with signature if order value exceeds $100)
- Customer communication logs (emails, chat transcripts, support tickets)
- Screenshots of your refund/return policy as displayed at checkout
Expected result: When a chargeback arrives, you can assemble a representment package in under 15 minutes. Checkpoint: Test your system by pulling evidence for three random orders from the last 30 days. If any required data point is missing, fix the gap before proceeding.
If building this workflow from scratch feels overwhelming, a merchant services partner like BAMS offers proactive chargeback defense and dedicated account management that can help you structure evidence collection and respond to disputes faster.
Step 6: Track Your Chargeback Ratio Weekly, Not Monthly
Monthly reporting is too slow. By the time you see a spike, the damage to your ratio (and your reserve terms) is already done. Set up a weekly tracking cadence.
Create a simple dashboard or spreadsheet with these columns:
Week Ending | Total Transactions | Chargebacks Filed | Alerts Resolved | Chargeback Ratio | Running 90-Day Ratio
Action items:
- Pull data every Monday morning from your processor dashboard
- Flag any week where the ratio exceeds 0.65%
- Investigate flagged weeks immediately: look for product-specific patterns, shipping delays, or marketing campaign issues that correlate with disputes
Expected result: You catch problems within days instead of weeks. Common failure: Relying on your processor’s reporting alone. Cross-reference with your own order data to identify the root cause of disputes, not just the count.
Step 7: Build Your Reserve Reduction Case File
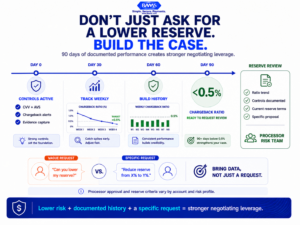
A reserve reduction request is stronger when it is backed by consistent performance, documented controls, and a specific proposal.
Your processor won’t proactively lower your reserve. You need to ask, and you need to bring data. After maintaining a chargeback ratio below 0.5% for 90 consecutive days, compile a reserve reduction request package.
Include the following:
- Your 90-day (or longer) chargeback ratio trend, showing consistent improvement
- Documentation of the controls you’ve implemented (AVS/CVV settings, alert enrollment, evidence procedures)
- Your current reserve balance and a calculation of how much cash is being held relative to your actual dispute losses
- A specific request: “Reduce reserve from X% to Y%” or “Shorten hold period from 180 days to 90 days”
Expected result: A formal, data-backed request your processor’s risk team can evaluate and approve. Common failure: Asking vaguely (“Can you lower my reserve?”) without data. Risk teams respond to numbers, not requests.
Step 8: Schedule the Negotiation Call
Email your account manager or risk contact and request a reserve review meeting. Attach your case file in advance so they can review it before the call. During the conversation:
- Lead with your ratio trend and the specific controls you’ve put in place
- Reference your processing volume growth as evidence of business stability
- Propose specific terms rather than asking what they can offer
- Ask about a stepped reduction schedule: for example, dropping from 10% to 7% now, with a review in 90 days for further reduction
Expected result: An agreement (verbal or written) to reduce your reserve percentage or shorten the hold period. Checkpoint: Get any changes confirmed in writing, ideally as an amendment to your processing agreement.
Common failure: Your processor says no. If this happens, ask specifically what metrics you need to hit and by when. Get the criteria in writing. If they can’t provide clear criteria, that’s a signal to evaluate alternative processors that offer more transparent merchant services.
Configuration and Customization
Variables You Should Adjust for Your Business
Not every setting in this tutorial applies identically to every eCommerce operation. Here are the key variables to calibrate:
- AVS strictness: If more than 20% of your revenue comes from international orders, enforce AVS only on domestic transactions and use manual review or 3D Secure for international ones
- Auto-refund threshold on alerts: Start at $50 and adjust based on your average order value. If your AOV is $200+, you may want to review each alert manually
- Evidence retention period: Keep order evidence for at least 540 days (the maximum chargeback window for some card networks). Automate deletion after that to manage storage costs
- Weekly ratio alert threshold: 0.65% is a safe warning level for most merchants. If you’re in a higher-risk category (supplements, electronics, subscriptions), set it at 0.5%
Safe defaults vs. must-change settings: CVV enforcement and order confirmation emails are safe to enable immediately with no customization. AVS rules and auto-refund thresholds must be tuned to your specific customer base and product mix.
Verification and Testing
Run this verification checklist 30 days after implementing all steps:
- Billing descriptor test: Process a $1 test transaction and verify the descriptor on your bank statement
- Alert response time: Measure average time from alert receipt to resolution. Target: under 12 hours
- Evidence pull test: Select five random orders and attempt to assemble a complete representment package for each. All five should be complete in under 15 minutes each
- Ratio accuracy check: Compare your internally tracked chargeback ratio to your processor’s reported ratio. They should match within 0.05%
Edge cases to verify: Test your system with a refunded order (does it still store evidence?), a partially shipped order (is tracking captured for each shipment?), and a subscription renewal (does the evidence trail cover the recurring charge authorization?).
Common Errors and Fixes
Symptom: Chargeback ratio isn’t dropping despite alerts being active
Cause: Alerts are being received but not acted on within the response window. Fix: Assign a dedicated owner with a daily calendar reminder. Set up email or Slack notifications for new alerts.
Symptom: Processor denies reserve reduction request
Cause: Insufficient data history (less than 90 days of improvement) or your ratio is still above their internal threshold. Fix: Ask for the specific ratio and timeframe they require. Document it and resubmit when you meet the criteria.
Symptom: High representment loss rate (winning fewer than 40% of fought chargebacks)
Cause: Evidence packages are missing key elements, typically delivery confirmation or policy screenshots. Fix: Audit your last 10 lost representments. Identify the most common missing evidence type and add it to your automated capture workflow. For guidance on building a stronger response system, see this tutorial on how to build a chargeback management system that works.
Symptom: Reserve percentage increased after a volume spike
Cause: Rapid volume growth triggered your processor’s risk model even though your chargeback ratio stayed flat. Fix: Notify your processor before large volume increases (seasonal sales, product launches). Provide projected volume and your current ratio data proactively.
Symptom: Customers complain about declined transactions after enabling AVS
Cause: AVS rules are too strict, declining orders where the street address doesn’t match but the ZIP code does. Fix: Adjust your gateway to accept “ZIP match only” results. This catches most fraud while allowing legitimate orders with minor address formatting differences.
Next Steps and Extensions
Once your reserve is reduced, protect your gains and keep optimizing:
- Automate ratio monitoring by connecting your processor’s API to a dashboard tool so you never miss a spike
- Negotiate batch timing to speed up payment deposits now that your risk profile supports faster funding
- Expand your evidence vault to include 3D Secure authentication results, which provide liability shift protection on authenticated transactions
With chargeback volume reaching approximately 238 million disputes globally and the average dispute costing merchants 2.5x to 3x the original transaction value, every percentage point you shave off your reserve translates directly into working capital. The system you’ve built here isn’t a one-time fix. It’s an ongoing competitive advantage that compounds as your business scales.
Frequently Asked Questions
What is reserve and hold management in merchant services?
Reserve management is the process of monitoring, negotiating, and reducing the percentage of your settlement funds that a payment processor withholds to cover potential chargebacks and fraud losses. A rolling reserve typically holds back 5% to 10% of each batch settlement for 90 to 180 days. Actively managing this means tracking your chargeback ratio, implementing dispute prevention controls, and using that data to negotiate lower hold percentages with your processor.
Why do payment processors withhold reserves from merchants?
Processors withhold reserves to protect themselves from financial exposure if a merchant generates chargebacks or refunds that exceed available funds. When a cardholder disputes a charge, the processor is liable to return those funds to the card network. The reserve acts as a buffer. The higher your perceived risk (based on chargeback ratio, industry type, processing history, and volume changes), the larger the reserve your processor will require.
How do rolling reserves work in payment processing?
A rolling reserve holds a fixed percentage of each day’s or week’s settlements for a set period, typically 90 to 180 days. After the hold period expires, those specific funds are released to you. For example, with a 10% rolling reserve and a 180-day hold, funds settled on January 1 become available on June 30. New settlements continue to be held, so there’s always a balance in reserve. The “rolling” aspect means older funds release as new funds are held.
When can a merchant expect to have their reserves released?
Release timing depends on your agreement. Rolling reserves release on a schedule (commonly every 30, 90, or 180 days after settlement). Fixed reserves may be held until your account is closed or until you meet specific performance criteria. The fastest path to full release is maintaining a low chargeback ratio (under 0.5%) for an extended period and formally requesting a review from your processor with supporting data.
Which factors influence the percentage of reserves withheld by payment processors?
The primary factors are your chargeback ratio, industry risk category, processing volume and its volatility, time in business, average transaction size, and delivery fulfillment model. Merchants with chargeback ratios above 1.0% are commonly flagged for increased reserves. Sudden volume spikes, high-ticket items, long fulfillment windows, and subscription billing models also increase the percentage withheld.
How can merchants reduce their reserve requirements over time?
Reduce your chargeback ratio below 0.5% through alert services, evidence-based representment, clear billing descriptors, and checkout fraud controls. Track your ratio weekly, maintain at least 90 days of documented improvement, and submit a formal reserve reduction request to your processor with specific data. Propose concrete new terms (a lower percentage or shorter hold period) and ask for a stepped reduction schedule with defined review milestones.
Sources
- https://www.mastercard.com/global/en/business/cybersecurity-fraud-prevention/dispute-management.html
- https://merchantriskcouncil.org/learning/resource-center/member-news/blog/2025/chargebacks-and-fraud-2025-fighting-advanced-fraud-tactics-with-equally-sophisticated-strategies
- https://usa.visa.com/support/consumer/chargebacks-disputes.html